

Water Damage in Walls: Signs, Risks, and Repair Steps
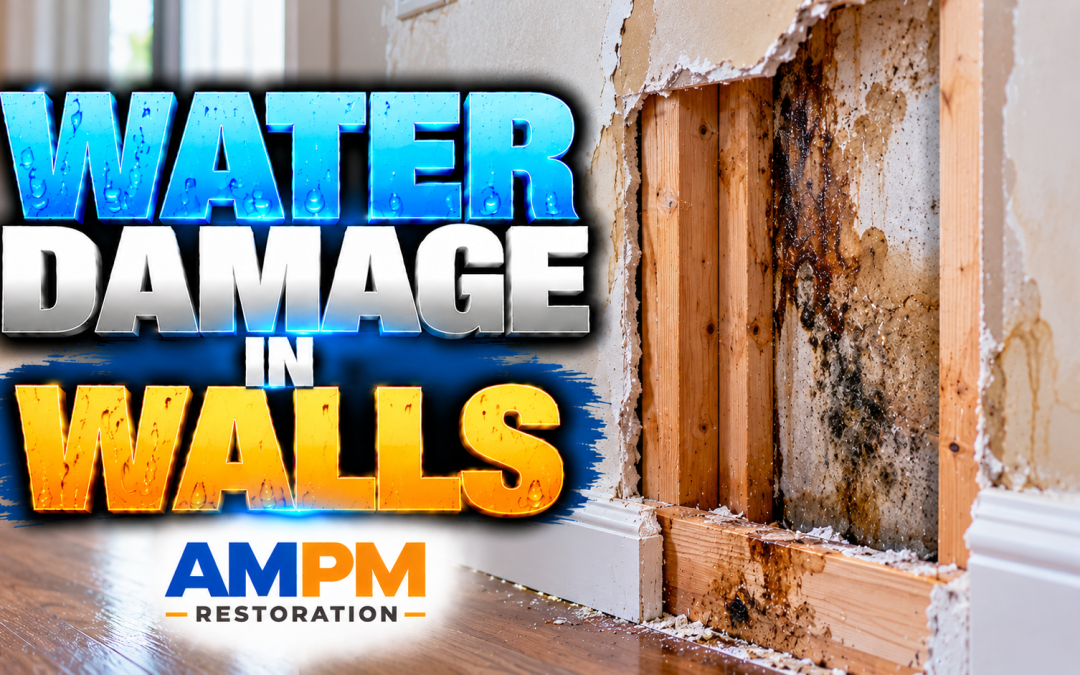
A faint tan ring appears on the hallway wall after a Florida thunderstorm. The paint feels mostly normal, the floor is dry, and the leak seems to have stopped. It’s tempting to wipe the mark, repaint the area, and move on.
That approach can miss the problem. Water damage in walls often begins behind the finished surface, where drywall, insulation, framing, and sheathing can remain damp after the visible room looks dry. The sooner you understand where the water traveled and how to verify that the wall has dried, the better your chance of limiting mold, material failure, and unnecessary demolition.
When a Small Wall Stain Tells a Bigger Story
The homeowner notices the stain before breakfast. It sits above the baseboard, several feet from the nearest window, and looks no larger than a dinner plate. During the night, rain pushed against a roof flashing detail or exterior wall joint. Water entered at a higher point, followed the framing, and found a path downward.
Inside the wall, the story is less tidy than the stain suggests. Drywall has a porous gypsum core and paper facing, so it can absorb water and spread it beyond the original entry point. Moisture may wick upward from a wet floor or baseboard, move sideways along framing, or collect against a vapor barrier and other less-absorbent surfaces. Insulation can hold that water in place, keeping the cavity damp even while the painted face begins to feel dry.

The surface usually speaks last
A stain, bubbling paint, or soft patch is often the final visible clue in a longer process. Water may have already reached the back of the drywall, insulation, electrical components, or wooden framing. In a large U.S. housing dataset summarized by Berkeley Lab’s Indoor Air building-dampness research, 9.9% of homes had exterior-leakage water damage and 8.1% had interior-leakage water damage in 2009. The same source reports a population-weighted average of 47% of U.S. homes with dampness or mold across multiple studies.
Those figures don’t mean every stain hides a major failure. They do show why wall-related moisture intrusion deserves investigation rather than cosmetic treatment. A major BASE study cited by Berkeley Lab found past water damage in 85% of buildings and current leaks in 45%, reinforcing the difference between what a wall shows and what a building may contain.
Florida adds a difficult variable. Warm, humid air slows evaporation, especially inside enclosed cavities with little circulation. A storm can pass in an afternoon, but the wall may remain wet long afterward.
For a useful comparison between a late stain and the earlier clues that often precede it, review this guide to identifying water damage that appears months after a leak. The practical lesson is simple: treat the mark as a location to investigate, not proof that the entire problem is on the surface.
What Water Damage in Walls Actually Means
Water damage in walls means unwanted moisture has entered or become trapped within a wall assembly. That assembly can include drywall, insulation, framing, sheathing, weather barriers, wiring, plumbing, and exterior cladding. Damage begins when moisture changes the performance of those materials, affects indoor conditions, or weakens finishes and connections.
The entry path matters because it helps determine both the affected area and the type of water involved.
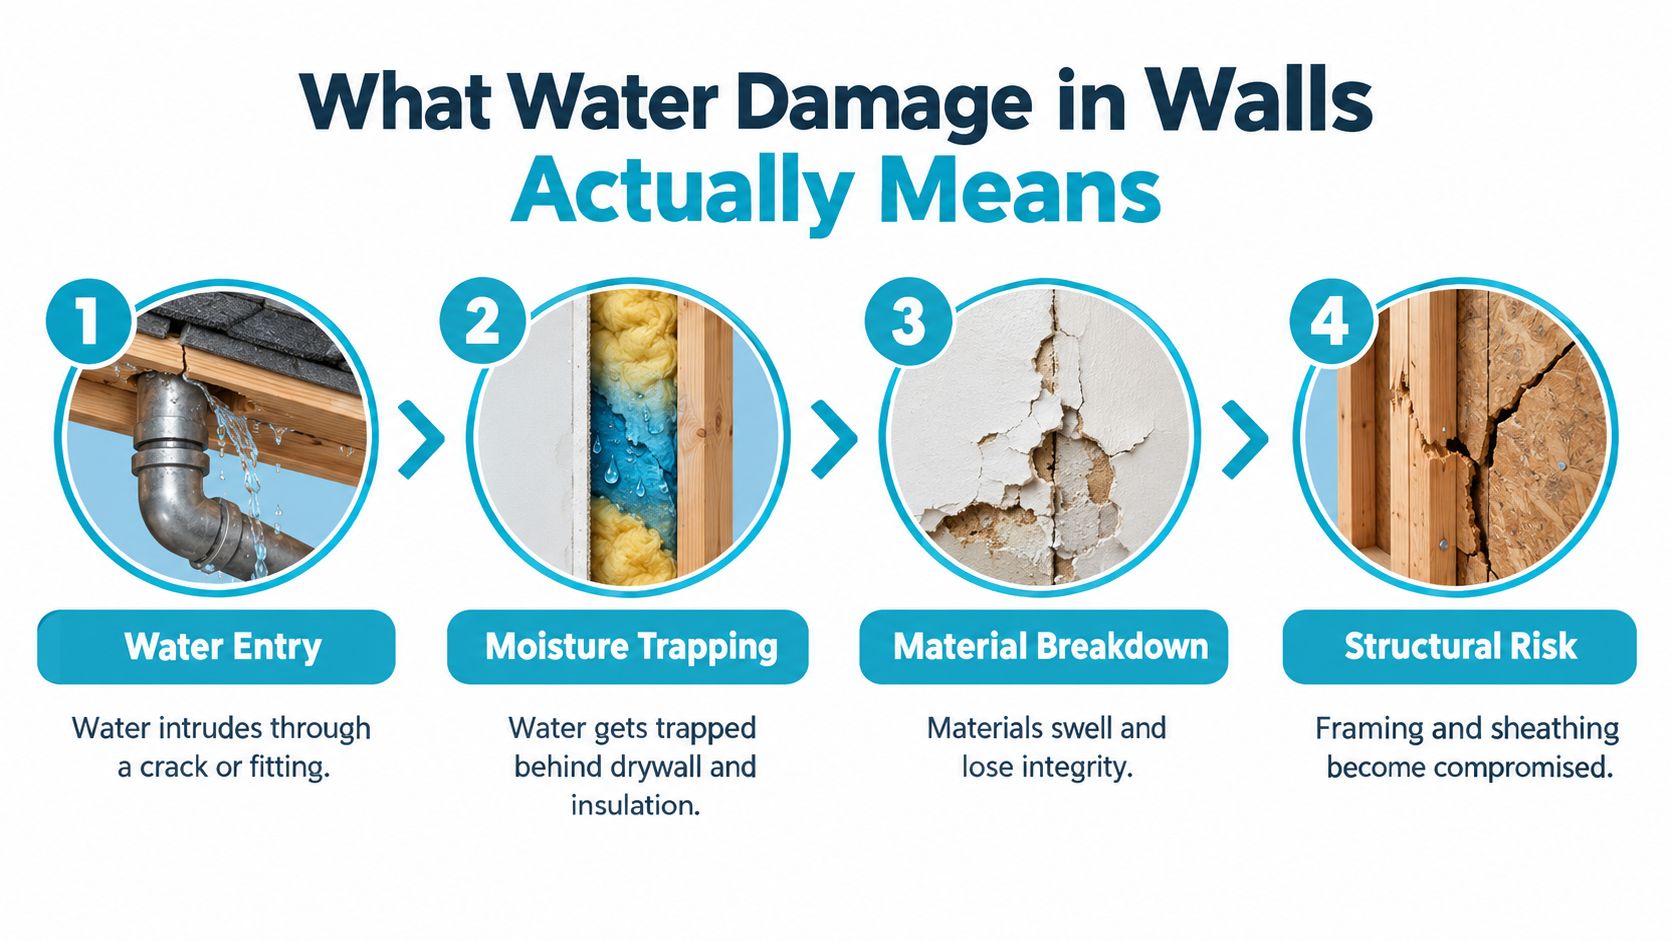
Four common ways water gets inside
- Roof or flashing failure: Rain enters through damaged roofing, flashing, soffits, or a wall-to-roof transition. Gravity carries it down through the attic or upper wall, while hidden gaps can send it sideways before a ceiling or wall stain appears.
- Plumbing leaks: A failed supply line, drain, valve, or fitting releases water inside the cavity. The leak may wet the back of drywall and insulation long before it reaches a floor or becomes visible.
- HVAC moisture: A condensate overflow, blocked drain, wet drain pan, or sweating duct can transfer moisture into an adjacent wall. The source may be near a mechanical closet, attic, bathroom, or return-air pathway.
- Storm and flood intrusion: Hurricane rain, storm surge, and wind-driven water can enter through multiple openings at once. Exterior walls, windows, doors, and lower wall assemblies may receive bulk water that moves inward and upward through porous materials.
Why the wet area spreads
Water doesn’t stay where it first arrives. Gravity pulls it downward, capillary action draws it through porous materials, and pressure differences can move air and moisture through small openings. A flashing gap may be several feet from the first stain. A wet baseboard may indicate water came down from above, or it may show that floor-level moisture wicked upward.
Moisture also changes the materials around it. Wet insulation can restrict airflow, damp drywall can swell, and enclosed framing can remain wet after the room’s temperature and appearance return to normal. In Florida, high outdoor humidity reduces the difference between wet material and surrounding air, so the wall has less opportunity to release moisture naturally.
The result is a chain reaction: water enters, porous materials absorb it, the cavity holds it, finishes hide it, and the affected area expands beyond what a quick visual inspection can establish.
Visible and Hidden Signs You Can Find Today
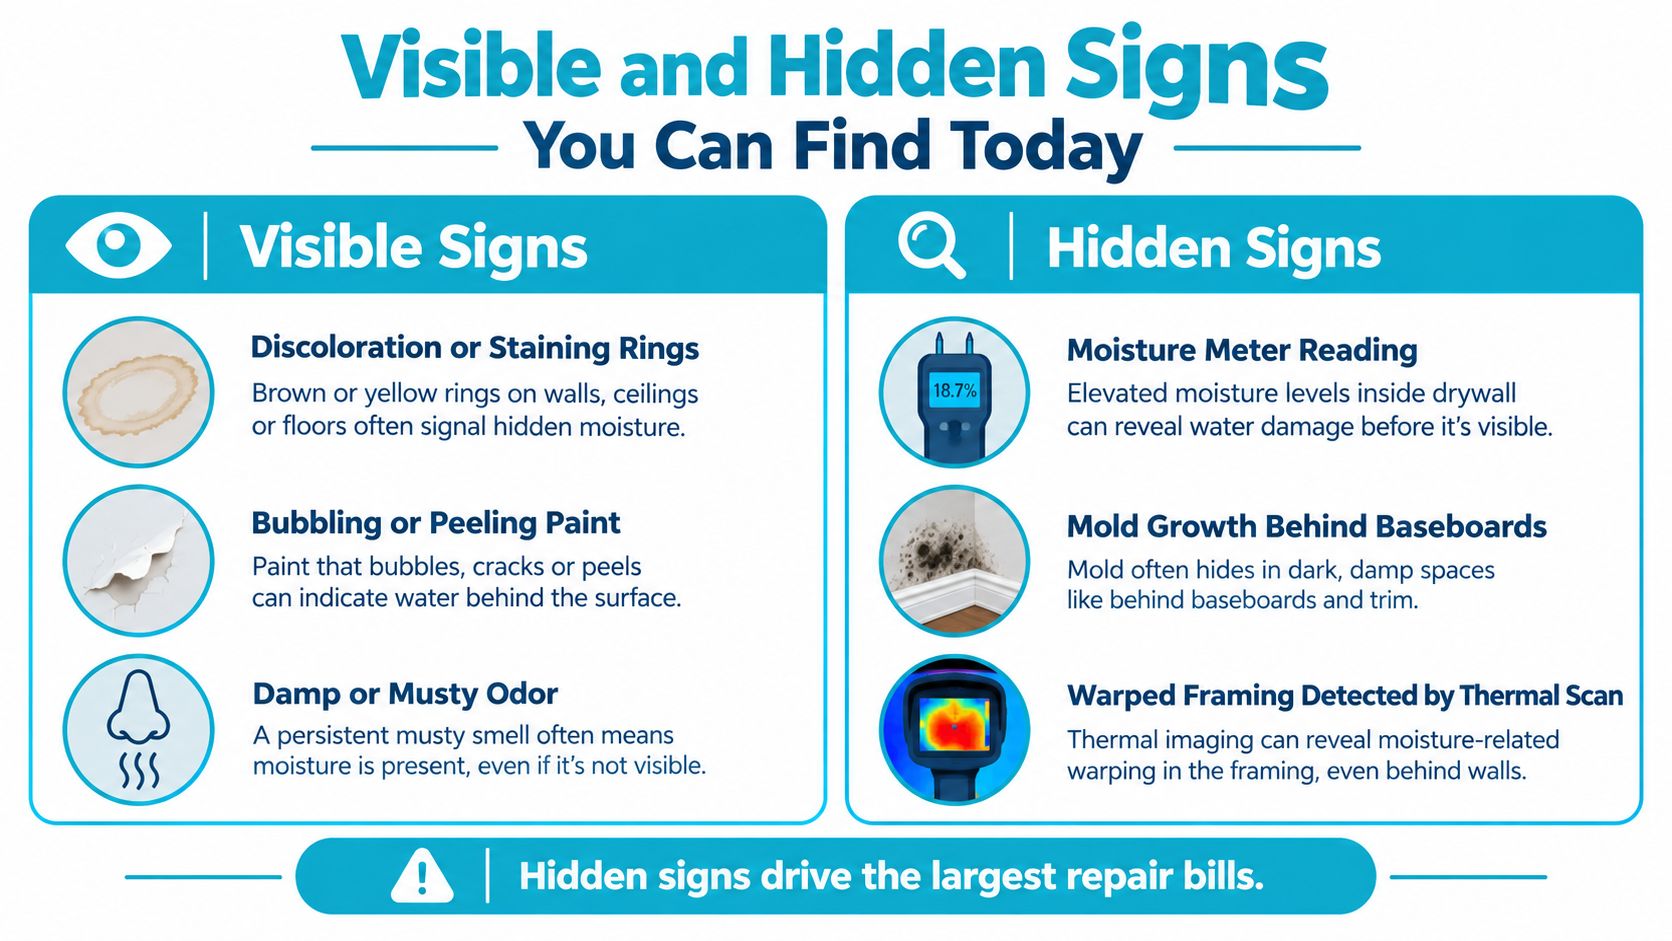
A wall can give you useful clues without giving you a complete diagnosis. The visible signs tell you where to start looking. The hidden signs tell you why a professional may need meters, thermal imaging, or controlled access before deciding whether to repair or remove materials.
What your eyes and hands can reveal
Look for changes that weren’t present before the storm, leak, or plumbing event:
- Discoloration: Tan, yellow, gray, or brown rings often mark repeated wetting or water movement.
- Bubbling paint: Raised paint or wallpaper indicates that moisture may be trapped beneath the finish.
- Peeling surfaces: Loose coatings can expose softened drywall paper.
- Soft drywall: A gentle touch may reveal swelling or loss of firmness. Don’t press aggressively, especially near ceilings.
- Warped trim and flooring: Baseboards, laminate, wood, and other finishes can deform when moisture reaches their edges.
- Rust: Rust around nails, fasteners, outlet plates, or other metal components can suggest prolonged dampness.
A flashlight held flat against the wall can reveal shallow shadows, ripples, and subtle changes in texture. Discoloration around trim deserves attention because water often collects at the bottom of a wall or wicks upward from flooring.
Clues that don’t look like wall damage
A musty smell in one room, unexplained indoor humidity, or a warm or cool patch can point to moisture behind the finish. Persistent allergy irritation doesn’t prove mold is present, but it’s a reason to take a recurring odor or damp area seriously. A smoke pencil used near outlets, baseboards, and trim can reveal drafts that accompany gaps or pressure changes around a wet cavity. Keep it away from open flames and avoid testing energized electrical equipment.
A pinless moisture meter can screen a broad area without puncturing the wall. A pin-probe meter can provide more targeted readings where appropriate, but it should be used carefully around wiring and plumbing. Massachusetts guidance recommends comparing a suspected area with a control location, taking at least three sample points per area, and beginning at the base of the wall. Its moisture-measuring guidance for water-damaged buildings also explains why surface inspection alone isn’t enough.
Practical rule: A dry-feeling painted surface is an observation, not a drying certificate.
Professional drying takes days rather than hours because technicians must establish the moisture boundary, check materials behind finishes, and confirm that readings are moving toward normal rather than just waiting for a stain to fade. More detail on common clues is available in this explanation of hidden water damage behind drywall.
How Moisture, Mold, and Structural Risk Build Over Time
The first 24 to 48 hours after water enters a wall are the most important response period. The EPA’s mold and moisture guide says water-damaged areas and items should be dried within that window to prevent mold growth. It also explains that when wet materials are dried within 24 to 48 hours, mold won’t grow in most cases, while materials wet longer than 48 hours may already support growth.
A practical timeline inside the cavity
During the early period, drywall, insulation, dust, and wood absorb moisture. The exposed room may feel better after fans run, but the back of the wall can remain saturated. If the cavity stays damp, mold spores that were already present can germinate and spread across paper facing, wood, insulation, and other materials.
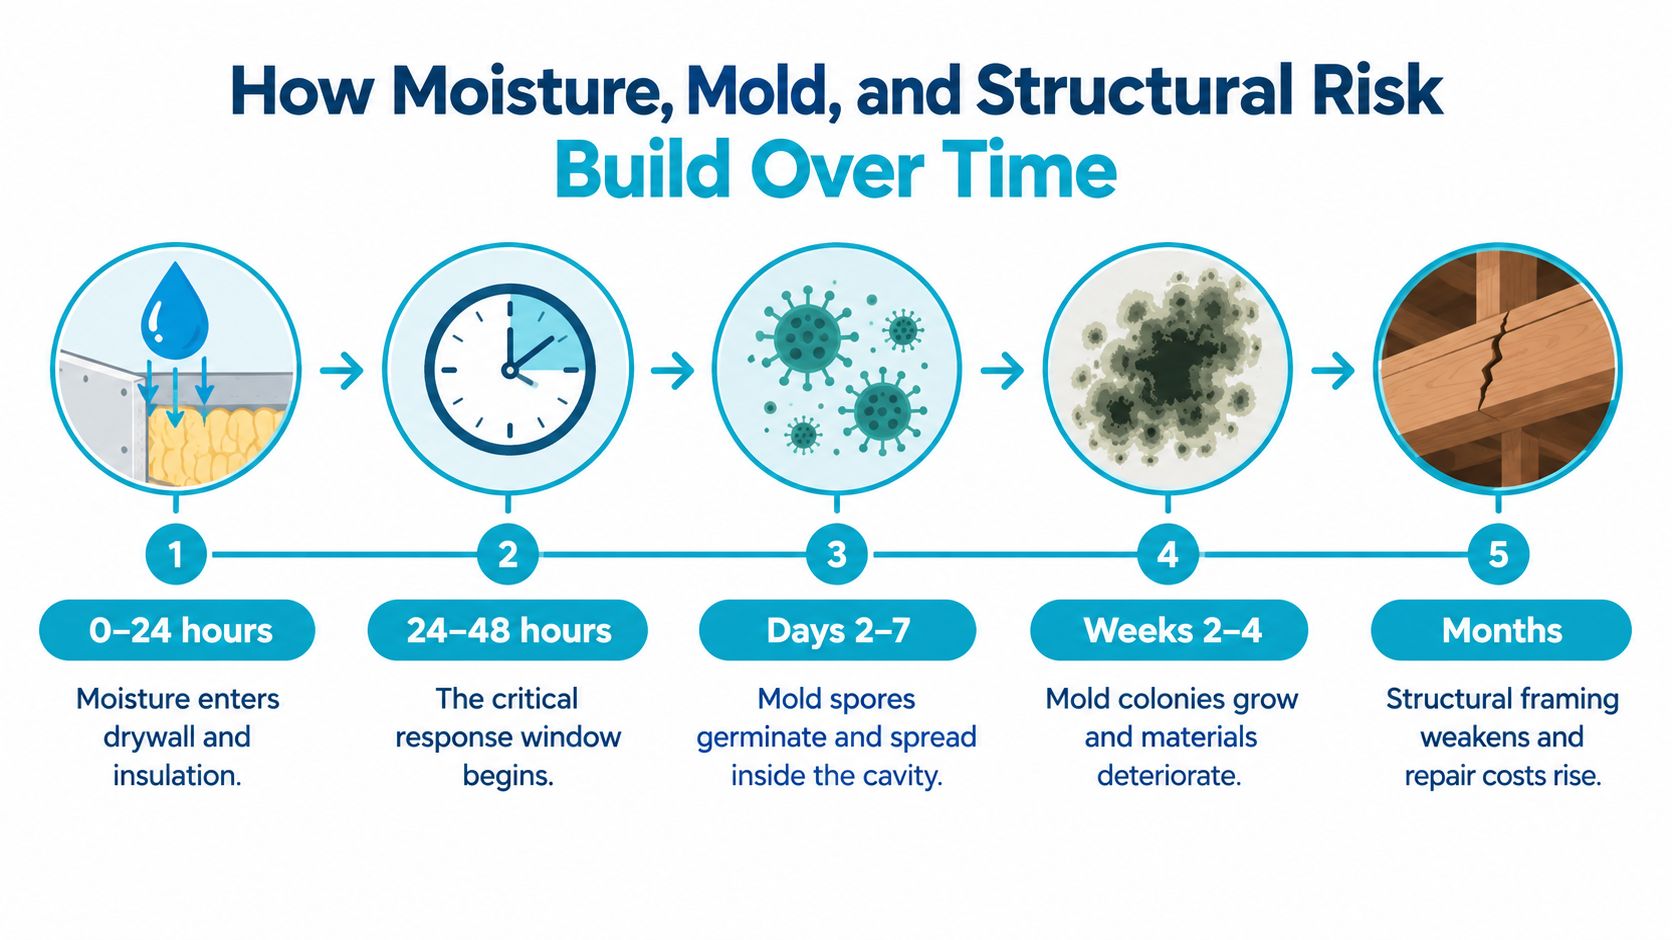
The American Gypsum assessment guidance notes that mold growth can begin in as little as 24 to 48 hours, depending on environmental conditions. It also warns that repeated wetting can make gypsum board slump, sag, or lose structural integrity. That is why a soaked ceiling or wallboard panel isn’t a good candidate for a quick coat of primer.
Over a longer period, damp wood can swell and begin to deteriorate. Fasteners and wiring connections may corrode, while softened drywall may lose its ability to hold screws, cabinets, shelves, or trim securely. These changes can contribute to odors, visible distortion, and indoor irritation, although symptoms alone can’t identify the source or confirm mold.
Florida shortens the margin for error
Heat can increase evaporation, but Florida’s humid air can slow the final stage of drying. A closed wall cavity with wet insulation and limited airflow may stay damp through changing weather conditions. The FEMA mold brochure states that mold colonies can begin growing on a damp surface within 24 to 48 hours and recommends removing soaked wallboard to a foot above the water mark, with wall drainage through baseboard removal and holes near the floor when appropriate.
Water near outlets, switches, wiring, or electrical equipment creates a separate hazard. Don’t probe, remove covers, or restore power in an affected area unless it’s safe to do so. If you’re unsure whether an electrical component has been exposed, use this resource on when to call a licensed electrician and arrange qualified evaluation.
For a concise explanation of the response clock, see this mold growth timeline after water damage. Fast action doesn’t guarantee that every material can be saved, but it gives drying professionals the best opportunity to limit secondary damage.
First Steps to Mitigate Damage After You Notice It
At 8 a.m., a homeowner sees water tracking down a wall near a light switch. The first hour shouldn’t be spent scrubbing the stain or cutting a large opening. It should be spent making the area safe, stopping additional water, and preserving useful information.
Start with the source if you can reach it safely. Shut off a leaking fixture or the home’s water supply when plumbing is involved. If water is near electrical equipment, keep people away and have a qualified professional isolate the affected circuit. Don’t enter standing water near outlets, panels, appliances, or damaged ceilings.
The first-hour sequence
- Protect people first: Leave areas with sagging ceilings, active electrical hazards, sewage, or floodwater that may be contaminated.
- Stop the source: Close a valve, contact a plumber, or arrange temporary roof protection when safe access is possible.
- Record conditions: Take wide and close photographs, note when the damage appeared, and preserve damaged materials until the claim process gives you direction.
- Reduce exposure: Move furniture and valuables away from the wall without dragging items through contaminated water.
- Improve safe airflow: Use air conditioning or dehumidification where appropriate, but don’t blow contaminated air through the property or operate a suspected mold-contaminated HVAC system.
- Call for assessment: A professional crew can identify moisture that isn’t visible and decide which materials need removal.
The first 24 hours of emergency water damage response often determine whether the work remains focused or expands into hidden materials and adjacent rooms. Speed matters more than making a perfect repair during the first hour.
What trained technicians do next
A restoration crew traces the source, maps moisture with meters and thermal imaging, checks wall assemblies, and separates salvageable materials from those that can’t be dried thoroughly. Technicians may perform controlled demolition, remove wet insulation or compromised drywall, create access for cavity airflow, and apply antimicrobial products when the material and water conditions justify it.
Homeowners shouldn’t open walls around suspected category two or category three water without proper protective equipment, containment, and disposal procedures. Sewage, floodwater, and water of uncertain cleanliness require a different response from a clean supply-line leak.
Inspection, Drying, and Repair From Start to Finish
A wall can look nearly normal while moisture remains behind the drywall. The surface stain may fade first, much like a wet towel that feels dry on one side while the fold underneath stays damp. Professional drying follows moisture readings and the wall’s construction, not appearance alone. See the full water damage restoration process for what happens from inspection through rebuild.
A technician begins by locating the source and mapping wet materials. A pinless meter can screen larger areas, while pin-probe readings can assess specific materials when conditions make that safe. Infrared imaging may show temperature patterns linked to hidden moisture, but those observations need confirmation with direct moisture measurements.
The workflow from wet wall to finished room
- Inspection and mapping: The crew records affected rooms, wall sections, trim, flooring, insulation, framing, and nearby HVAC components. The water damage response reference recommends comparing suspected areas with unaffected control locations instead of trusting one isolated reading.
- Removal decisions: Materials that cannot be dried thoroughly are removed. The National Institutes of Health Office of Research Facilities guidance states that wallboard that cannot be dried within 48 hours should be removed and discarded below 12 inches above the water mark. Damp insulation should also be discarded, and the cavity ventilated.
- Active drying: Air movers push air across wet surfaces while dehumidifiers remove moisture from the room. For porous materials, fans and heating during the 24 to 48-hour response period can work better than passive air-drying alone.
- Monitoring: Technicians repeat readings and adjust equipment as conditions change. A comfortable room or lighter stain does not prove that framing or insulation is dry, so equipment stays in place until the readings support removal.
- Reconstruction: After drying and any required remediation, the crew rebuilds drywall, insulation, trim, texture, paint, flooring, and other finishes.
How long walls can take to dry
Drying time varies with water volume, wall construction, insulation, ventilation, humidity, sun exposure, and the affected assembly’s location. Recent 2026 guidance describes a minor loss as potentially drying in 3 to 5 days, moderate wall damage as taking 1 to 2 weeks, and concrete block or masonry walls as taking 2 to 4 weeks or longer. That recent drying guidance for water-damaged walls also helps explain why Florida humidity and masonry can extend the process.
Before closing the cavity, the crew should confirm stable readings in the wall materials. Rebuilding too soon can trap moisture behind fresh finishes.
Insurance Claims and Florida Prevention That Actually Help
Insurance paperwork becomes easier when your documentation follows the same sequence as the damage. Photograph the source, affected rooms, stained surfaces, damaged belongings, and any water removal work. Add written notes with dates, weather conditions, when you discovered the issue, and what you did to stop further damage.
Build a clear claim record
Keep damaged materials available for inspection when doing so is safe. Save invoices, estimates, plumber or roofer reports, equipment records, and communication with contractors. A restoration company can document moisture readings and the boundaries of the affected area, which helps connect the visible damage to the work being proposed.
Coverage depends on the policy and the cause of loss. A sudden burst pipe or storm intrusion may be treated differently from a gradual leak, long-term seepage, deferred maintenance, or an excluded flood event. Don’t assume that a hidden leak is automatically covered or automatically denied. Report the loss promptly, ask the adjuster about required documentation, and avoid authorizing permanent repairs before the insurer has had a reasonable opportunity to inspect, unless emergency work is needed to protect people or property.
Reduce the next opportunity for intrusion
Florida prevention is practical, not complicated:
- Inspect roof details: Check roofing, flashing, soffits, sealants, and wall transitions before storm season.
- Control roof runoff: Keep gutters and downspouts clear, and direct discharge away from exterior walls.
- Review attic conditions: Check ventilation, duct sweating, insulation, and signs of roof leakage.
- Protect plumbing: Inspect supply connections, drains, valves, and exposed piping. Pipe insulation can help during occasional cold snaps.
- Manage indoor humidity: Use air conditioning and dehumidification during humid shoulder months, when moisture can accumulate.
- Watch vulnerable rooms: Bathrooms, laundry areas, kitchens, mechanical closets, and rooms below roof penetrations deserve regular visual checks.
The DuPont technical summary on moisture and building envelopes cites a 2007 ASHRAE journal study in which 69% of 17,000 construction defect claims were attributed to moisture-related defects in enclosure systems. The same summary says American businesses may spend up to $9 billion annually repairing and litigating moisture intrusion damage. Prevention won’t eliminate every loss, but routine maintenance is usually less disruptive than restoring a wall after water has traveled through the assembly.
Get Local Help and Answers to Common Questions
A small wall stain deserves a measured response. Stop the source, protect electrical and structural safety, document what you see, and arrange moisture mapping before anyone closes or paints the wall. The first 24 to 48 hours are the critical mold-prevention window, and Florida’s humid conditions make evidence-based drying more important than waiting for the surface to look normal.
For homeowners and property managers in Bradenton, Sarasota, Tampa Bay, Saint Petersburg, Lakewood Ranch, Palmetto, and nearby Gulf Coast communities, local restoration help should include source tracing, moisture inspection, drying, mold evaluation when indicated, and reconstruction coordination. Choose a company that explains what it found, separates emergency mitigation from permanent repairs, and communicates clearly with your insurer.
Frequently asked questions
How long do walls take to dry after water damage?
A minor loss may dry in 3 to 5 days, while moderate wall damage can take 1 to 2 weeks. Concrete block and masonry walls may take 2 to 4 weeks or longer, especially in humid conditions. Equipment and repeat moisture readings matter more than a calendar estimate.
Can I leave a small wall stain alone?
You shouldn’t assume a small stain is harmless. It may come from a limited surface event, but it can also mark moisture behind drywall or at the base of a wall. Find and correct the source before repainting.
When should drywall be cut out instead of saved?
Remove drywall when it’s soaked, sagging, soft, contaminated, or unlikely to dry thoroughly. If wallboard can’t be dried within 48 hours, the NIH guidance recommends discarding it below 12 inches above the water mark and removing damp insulation.
How does insurance treat hidden leaks?
Policies often distinguish sudden covered events from gradual leaks, seepage, maintenance issues, and flood damage. Document the source and timeline, notify your carrier promptly, and ask what inspections and records are required before permanent repairs.
What does a professional inspection include?
It commonly includes source tracing, visual inspection, moisture-meter readings, comparison with unaffected areas, thermal imaging when useful, and evaluation of drywall, insulation, framing, flooring, and nearby HVAC components. The findings should define the affected boundary and next steps.
How do I choose a reputable local restoration company?
Look for licensing and insurance, trained technicians, clear written scopes, documented moisture readings, emergency availability, insurance coordination, and a willingness to explain which materials can be dried or must be removed. Avoid anyone who promises a cosmetic fix without investigating the wall cavity.
AMPM Restoration Services provides 24/7 water damage restoration, moisture inspection, drying and dehumidification, mold inspection and removal, storm and flood cleanup, and reconstruction for homes and commercial properties across Florida’s Suncoast. Call 941-946-7807 for a free inspection and estimate, and ask about insurance claim assistance and financing options, or visit AMPM Restoration Services to request help with water damage in walls.