


8 Signs of Hidden Water Damage Behind Drywall
After a week of Gulf Coast rain, a wall can still look almost normal while moisture is building behind it. In Bradenton and Sarasota homes, I often see the first clues show up as a faint musty smell near a hallway return vent, a light stain under a window, or paint that starts looking slightly raised after a storm.
Florida homes deal with a tough mix of wind-driven rain, year-round humidity, aging plumbing lines, heavy air conditioner use, and roof wear that gets worse during storm season. In ranch homes, block homes with furred interior walls, and two-story houses with upstairs baths, water can travel farther than homeowners expect before it becomes visible. By the time drywall shows a symptom, the paper facing, insulation, framing, or baseboards may already be affected.
That makes early inspection a practical decision, not an overreaction. A small leak is usually far less expensive to dry and repair than a wall cavity that has stayed wet long enough to support mold growth or require larger tear-out work.
If the moisture may be coming from above, review 8 critical signs your roof needs replacement and then have the wall checked. At AMPM Restoration, our free inspection is built for exactly this kind of uncertainty. We look for the source, check surrounding materials, identify whether the drywall can be dried in place or needs removal, and map out the next step before the damage spreads.
1. Discoloration and Staining on Drywall Surface
After a Gulf Coast downpour, a drywall stain often shows up before anything else. Homeowners in Bradenton and Sarasota usually spot a yellow ring on the ceiling, a brown patch under a window, or a shadowy line running down a wall near a bathroom. That mark matters because it shows water has already moved through the drywall paper and paint.
The pattern helps narrow down the source, but it does not confirm it. A round ceiling stain can point to a roof leak, especially after wind-driven rain. A stain below a second-floor bath often lines up with a plumbing leak, overflow, or failed caulk line. In block homes with furred interior walls and older ranch layouts, I regularly see water travel sideways before it becomes visible, so the stain may appear several feet away from the entry point.
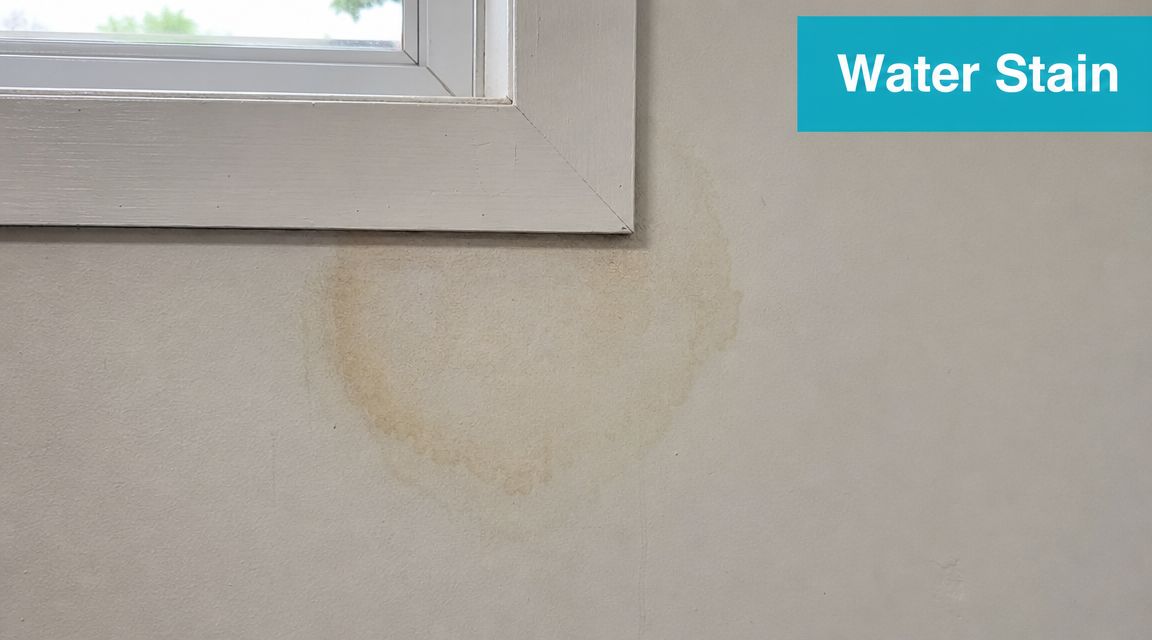
What stains usually mean
A stain that darkens, spreads, or comes back after repainting usually means moisture is still active or the material never dried fully. Surface dryness does not rule that out. In Florida, high humidity can dry the paint film enough to fool you while the cavity behind it stays damp.
That is why we do not treat staining as a cosmetic issue first. At AMPM Restoration, our free inspection checks the likely source, tests surrounding materials for hidden moisture, and helps determine whether the drywall can be dried in place or whether removal makes more sense. That trade-off matters. Saving intact drywall is preferable when the board is still sound, but covering over a wet wall usually leads to a larger repair later.
Use the stain as a clue, not a conclusion.
- Watch the shape: Rings, streaks, and vertical trails often point to different water paths.
- Check timing: If the mark worsens after storms, focus on the roof, flashing, windows, and exterior penetrations first.
- Photograph it over several days: Changes in color or size help confirm whether the issue is active.
- Hold off on paint: Primer and fresh paint can hide the evidence we use to trace the leak.
- Look nearby: Trim, baseboards, window corners, and ceiling edges often show where the water traveled next.
2. Soft or Spongy Drywall Material
Drywall shouldn’t feel soft. If you press gently on a suspect area and it gives more than the surrounding wall, that’s a serious warning sign. Once water gets into the gypsum core, the board loses strength and starts to break down.
This is common near shower enclosures, behind bathroom vanities, under kitchen sinks, around refrigerator supply lines, and at the lower portions of walls where water has been running downward inside the cavity. In Florida homes with persistent humidity problems, AC condensation and poorly controlled bathroom moisture can also contribute to gradual softening around exterior walls.
What a soft wall tells you
A soft section usually means the issue isn’t brand new. The board has already absorbed enough moisture to change physically. If it feels spongy, dents easily, or seems slightly depressed compared with the surrounding area, the wall likely needs more than drying alone.
That’s where homeowners often make the wrong call. They touch the wall, decide it isn’t dripping, and wait. Waiting is what turns a contained repair into a larger remediation job.
A better response is straightforward:
- Press lightly only once: You want to confirm softness, not punch through weakened drywall.
- Mark the area: Painter’s tape can help you show the affected location during inspection.
- Keep the room ventilated: Airflow helps, but it doesn’t solve hidden saturation.
- Don’t start tearing it open yourself: If mold is already present, disturbing the wall can spread contamination.
In Gulf Coast homes, soft drywall around baseboards deserves special attention because moisture often settles low in the wall first. If the softness is paired with odor or staining, assume the problem has been there longer than the surface suggests.
3. Musty or Moldy Odor
Sometimes the wall tells you there’s a problem before your eyes do. A persistent musty or earthy smell is one of the most useful early signs of hidden water damage behind drywall, especially when the odor keeps returning after cleaning.
That smell matters because mold and mildew can produce volatile compounds before visible staining appears. Professional guidance notes that musty odors may show up days to weeks earlier than wall discoloration, which makes odor one of the most actionable clues for concealed moisture issues.
Where odor shows up first
In Sarasota and Bradenton homes, this often shows up in closets on exterior walls, guest bathrooms that stay closed up, rooms near air handlers, laundry areas, and corners that don’t get much airflow. You may notice it more after a rainy spell or on humid mornings when the house has been closed overnight.
A room that smells musty only when the AC kicks on or after heavy rain usually isn’t having an air freshener problem. It’s having a moisture problem.
That odor can travel, which is why homeowners sometimes misread the source. The smell may seem strongest in a hallway even though the actual moisture is behind the adjacent bathroom wall or around a window assembly.
A few practical checks help narrow it down:
- Track timing: Note whether the smell worsens after rain, showers, or AC operation.
- Check closed spaces: Closets and cabinets often trap odor before the main room does.
- Don’t mask it: Sprays and candles only cover the clue you need to follow.
- Compare rooms: If one area smells different from the rest of the house, trust that difference.
Odor alone doesn’t tell you how extensive the damage is, but it often tells you the problem is active enough to investigate now.
4. Peeling Paint or Wallpaper Bubbling
Paint that bubbles, blisters, wrinkles, or peels away from the wall isn’t just a finish problem. Water behind the surface weakens the bond between the paint layer and the drywall face. Wallpaper reacts similarly when moisture softens the adhesive and starts pushing outward.
This shows up a lot in bathrooms with weak exhaust ventilation, kitchens with slow leaks under sinks, and bedroom walls near windows that take repeated wind-driven rain. In Florida’s Gulf Coast climate, indoor humidity can also worsen the appearance, but humidity alone shouldn’t be your default explanation when the damage is localized.
Cosmetic fix versus real fix
Homeowners often scrape, sand, and repaint. That may make the wall look better for a while, but if moisture is still behind it, the finish usually fails again. The wall system has to dry, and the source has to be corrected first.
Professional guidance on hidden wall moisture emphasizes confirming conditions with tools such as moisture meters and thermal imaging instead of relying on appearance alone, as noted in AMPM Response’s discussion of hidden damage behind walls. That’s especially important when you’re trying to figure out whether the damage is current or leftover from an older event.
- Look at the edges: Paint often starts lifting around trim, outlets, and corners first.
- Check pattern: A small isolated bubble may point to a local leak. Broader peeling can suggest ongoing humidity or wider intrusion.
- Photograph before repair: Good documentation helps if you need to support an insurance claim.
- Skip the repaint reflex: Finish work comes after moisture investigation, not before.
If the bubbling is confined to one wall near plumbing or a window, treat it as a targeted moisture warning, not normal wear.
5. Visible Mold Growth or Dark Spots
A Sarasota or Bradenton homeowner often first notices this after a storm cycle or a long stretch of air conditioner run time. A few dark flecks show up near a baseboard, in a closet on an exterior wall, or at the corner where a ceiling meets drywall. If the spotting keeps returning, moisture is feeding it.
Visible mold or dark staining on drywall usually means the wall stayed damp long enough for growth to start on the paper facing or just behind it. The exact color matters less than the pattern and location. Specks clustered around a plumbing wall, window perimeter, garage conversion, or block exterior wall deserve a closer look, especially in Gulf Coast homes where humid air and wind-driven rain can keep materials from drying properly.
What these spots usually mean in Florida homes
Surface cleaning may remove what you can see, but it does not answer the main question. Is the drywall still wet, or did an older leak leave conditions behind that now support growth when humidity rises?
That distinction matters in practice. In newer homes, I often see localized spotting tied to one leak path, such as a window failure or a supply line inside the wall. In older Bradenton and Sarasota houses, especially ranch layouts and homes with additions, dark patches can also show up where past repairs covered over damp material without fully drying the cavity.

At that point, the job is inspection first, cleanup second.
AMPM Restoration’s free inspection is built for that. We check the visible area, map surrounding moisture with meters, and use thermal imaging to see whether the problem is isolated to the surface or extends into the wall cavity. That helps Florida homeowners avoid two expensive mistakes. Cleaning a wall that still has active moisture behind it, or tearing out more drywall than the situation requires.
Use a cautious approach while you wait for an inspection:
- Do not scrub or sand the area: Disturbing mold growth can spread particles through the room.
- Limit airflow across the spot: Avoid pointing fans directly at the wall until the source is identified.
- Photograph the pattern and location: Wide shots and close shots help document whether the area grows or changes.
- Watch nearby materials: Baseboards, trim, and adjacent carpet or flooring often show related moisture effects.
- Treat recurring spots as an active warning: If it comes back after cleaning or painting, the wall has not been properly addressed.
Small spots can still lead to a contained repair. Widespread growth, soft drywall, or moisture that extends into insulation usually shifts the plan toward removal, drying, and reconstruction. AMPM handles that full process, from inspection and moisture control to remediation, drywall replacement, and final restoration, so the repair solves the cause instead of covering the symptom.
6. Warping, Buckling, or Waves in Drywall
A flat wall should stay flat. When drywall starts looking wavy, bowed, swollen, or uneven, moisture has already changed the shape of the material. That deformation often remains even after the wall seems dry on the surface.
This isn’t always dramatic at first. In many Sarasota and Bradenton homes, you notice it by side lighting from a window or lamp. The wall suddenly reflects light unevenly, or you can feel a ripple when you run your hand across it. Around kitchens, laundry rooms, and exterior walls, subtle warping often points to a slow leak or repeated intrusion rather than one obvious flood event.
What warping changes about the repair
Warped drywall usually doesn’t return to its original condition just because the leak stops. The board has expanded, weakened, and dried irregularly. In practical terms, that often pushes the repair toward removal and replacement of affected sections rather than simple patching.
A straightedge or even the side of a level can help you see whether the wall plane has shifted. If one section bows out or dips in compared with the rest, that distortion tells you the moisture exposure was significant enough to alter the board physically.
- Use side light: Flashlight glare across the wall reveals waves better than overhead lighting.
- Compare adjacent walls: If one surface looks noticeably uneven, document it.
- Check nearby trim: Warped drywall often affects baseboards, casing, or caulk lines too.
- Act before it worsens: Continued wetting can spread distortion into larger sections.
In Florida homes, warping around exterior walls should always raise questions about windows, stucco transitions, roof edges, and moisture trapped by humid conditions.
7. Separation of Drywall Seams or Tape Loosening
Drywall seams should stay tight and fairly invisible. When joint tape starts lifting, cracking, bubbling, or pulling away, moisture is often involved. The joint compound and tape bond weaken when water gets behind the finished surface.
This sign is easy to dismiss because seam cracks can also come from minor settling. The difference is in the look and location. Moisture-related seam issues often appear puffy, bubbled, or soft, especially near bathrooms, around ceiling lines, beside windows, or below plumbing areas.
How to tell this from ordinary cosmetic cracking
A hairline crack that stays dry, narrow, and stable may be cosmetic. A seam that looks swollen, discolored, or loose at the tape edge deserves a moisture investigation. Corners and ceiling-wall transitions are especially important because water often travels and collects there before showing elsewhere.
In condos, townhomes, and two-story homes around the Gulf Coast, ceiling seams below upstairs bathrooms or HVAC lines are common trouble spots. In single-story homes, window head corners and exterior wall joints often reveal rain intrusion first.
Watch the seam and the wall around it together. If both are changing, it’s rarely just drywall finishing failure.
A smart response looks like this:
- Photograph the seam close-up and wide-angle: You want both detail and room context.
- Check for softness nearby: Seam failure plus soft drywall points to active or recent moisture.
- Don’t retape immediately: New compound won’t hold if the wall is still damp.
- Inspect after storms: Rain-related seam movement often becomes more noticeable afterward.
This is one of those signs that seems small until you open the wall and find the larger path the water took.
8. Increased Weight or Sagging Areas in Drywall
Sagging drywall is an urgent sign. When drywall absorbs enough water, it gets heavier and can begin pulling away from framing or drooping between supports. On ceilings, this can become a safety issue quickly.
You might first notice a shallow dip, a bulge around a fastener line, a ceiling stain that now looks swollen, or a wall section that seems to be slumping near the top. In kitchens and bathrooms, this often follows roof leaks, tub overflows, or plumbing failures from the floor above. In older Florida homes, long-term roof intrusion can leave the drywall visibly loaded even after the surface has dried.

When sagging becomes a hazard
If the area is overhead, keep people, pets, and furniture away from it until it’s inspected. Drywall can fail suddenly once fasteners let go or the core loses too much strength. If you hear creaking, cracking, or popping near a sagging section, treat that as a priority call.
The bigger lesson is that sagging almost never happens early. By the time the wall or ceiling visibly droops, the material has been wet enough and long enough to lose structural stability.
- Clear the area: Don’t let anyone stand under a sagging ceiling.
- Avoid poking or puncturing it: That can trigger collapse or release contaminated water.
- Take photos from a safe distance: Documentation helps, but safety comes first.
- Call for inspection immediately: Severe saturation may require containment, removal, drying, and reconstruction.
For many property owners, this is the point where a hidden leak becomes obviously serious. The safest move is to stop guessing and get professionals on site.
8-Point Comparison: Hidden Drywall Water Damage Signs
| Indicator | Detection complexity | Resource requirements | Expected outcomes | Ideal use cases | Key advantages |
|---|---|---|---|---|---|
| Discoloration and Staining on Drywall Surface | Low, visible marks | Minimal, visual inspection, optional moisture meter | Localizes likely intrusion; may be surface or deeper | Routine checks, post-storm or roof-leak suspicion | Easily noticed; helps prioritize inspections |
| Soft or Spongy Drywall Material | Moderate, tactile inspection needed | Moderate, professional assessment, moisture mapping, likely removal | Confirms significant saturation; affected sections usually removed | Suspected prolonged leaks or repeated moisture events | Definitive indicator of structural compromise |
| Musty or Moldy Odor | Low–Moderate, subjective olfactory detection | Minimal to moderate, inspection, possible mold testing | Early warning of hidden microbial growth; prompts targeted inspection | When no visible signs but persistent odors appear | Often detected before visual clues; enables earlier intervention |
| Peeling Paint or Wallpaper Bubbling | Low, visible surface failure | Minimal to moderate, moisture meter, removal of finish to assess drywall | Reveals moisture under finish; may prevent escalation if fixed | Renovation, cosmetic anomalies, or post-leak checks | Clear visual evidence useful for documentation and claims |
| Visible Mold Growth or Dark Spots | Low, visible and unmistakable | High, professional remediation, testing, containment, possible drywall replacement | Requires remediation; health and structural risks addressed | Active mold colonization or health-related complaints | Undeniable evidence prompting immediate professional action |
| Warping, Buckling, or Waves in Drywall | Low, visual/straightedge detection | High, drywall replacement, possible framing inspection/repair | Permanent deformation; replacement and structural check required | Long-term moisture exposure, widespread damp conditions | Obvious sign of major moisture impact and urgency |
| Separation of Drywall Seams or Tape Loosening | Low–Moderate, visual near seams | Moderate, drying, seam repair, possible tape/compound replacement | Indicates moisture behind seams; requires professional finishing | Early-to-mid stage water intrusion along joints | Pinpoints likely water pathways for targeted repairs |
| Increased Weight or Sagging Areas in Drywall | Low, visually and by touch; safety risk | Very high, emergency support, structural engineer, replacement | Urgent structural remediation; risk of collapse if ignored | Emergency response for ceilings/walls showing droop | Clear indicator of severe damage and immediate hazard |
Don't Guess, Get a Free Professional Inspection Today
A ceiling stain after a Gulf Coast storm or a soft wall near an older shower line can look small on day one. In Bradenton and Sarasota homes, especially block homes with furring strips, older ranch layouts, and properties that run the AC hard for most of the year, that small warning sign can point to moisture trapped behind the drywall long after the surface feels dry.
The next step is to inspect the wall correctly. Surface clues help, but they do not confirm whether the leak is active, how far moisture has spread, or whether insulation, framing, or adjacent rooms are affected. Repainting, patching, or spraying deodorizer often delays the actual repair and makes the scope harder to document for insurance.
AMPM Restoration handles this problem the way it should be handled. We start with a free inspection and estimate, check for active moisture with professional meters and thermal imaging, trace the water source, and determine whether the drywall can be dried in place or needs controlled removal. In Florida homes, that distinction matters. Saving dryable material keeps costs down, but leaving wet backing, damp framing, or hidden mold behind a fresh patch usually leads to a second repair bill.
If mold is present, the work changes. Drying alone is no longer enough. The area may need containment, safe removal of affected materials, air treatment, and reconstruction after the moisture issue is corrected. That is why a proper inspection matters more here than guesswork based on appearance.
For homeowners who want more background on why inspection comes before repair, this overview of damp and timber survey costs and what those reports cover gives useful context on professional moisture assessment.
If you have noticed any of these signs of hidden water damage behind drywall, call AMPM Restoration at 941-946-7807 for a free inspection and estimate. We help homeowners across Bradenton, Sarasota, Lakewood Ranch, St. Petersburg, Tampa Bay, and nearby Gulf Coast communities with water mitigation, mold remediation, reconstruction, insurance claim assistance, and financing options, so you can get a clear plan before the damage spreads further.
If you see signs of hidden water damage behind drywall in your Bradenton, Sarasota, St. Petersburg, or Tampa Bay property, contact AMPM Restoration Services today at 941-946-7807 for a free inspection and estimate. Our team can help with water damage restoration, mold inspection and removal, storm cleanup, repairs, insurance claim assistance, and financing options so you can move from uncertainty to a clear plan fast.