

AMPM Restoration: Structural Drying Methods
You just walked into the room and found the damage. Maybe it’s a kitchen floor with water creeping under the cabinets, maybe it’s a ceiling stain spreading after a storm, or maybe a pipe failed behind a wall and now the baseboards feel swollen. In that moment, the question isn’t just how to get the water out. It’s which structural drying methods will protect the building, keep the loss from spreading, and stop hidden moisture from turning a repairable problem into a larger one.
For Florida homes, that decision matters even more because humidity works against you from the start. A surface can look dry while moisture stays trapped in framing, drywall, insulation, or beneath tile and slab assemblies. That’s why professional structural drying methods are less about blasting air into a room and more about choosing the right sequence, the right equipment, and the right drying target for the materials in the building.
Why Structural Drying Methods Matter After Water Damage
A typical Florida water loss starts with a familiar scene. A homeowner wakes up after heavy rain or a burst supply line and sees water in the hallway, damp drywall, or pooled water around a refrigerator line. The instinct is to mop, open a few windows, and put out a couple of fans. That can reduce surface wetness, but it doesn’t solve the part that causes the significant trouble, moisture that has moved into the structure itself.
That’s where structural drying methods come in. They’re the bridge between initial extraction and full restoration, and the difference between a controlled job and a lingering problem often comes down to whether the dry-out plan reaches the hidden materials. If the wall cavity, sill plate, subfloor, or insulation stays wet, the building can keep deteriorating long after the puddles disappear. For a practical first-response checklist after water damage, this Florida homeowner guide is a useful companion.
Practical rule: if you can still feel moisture in baseboards, notice musty odors, or see swelling in trim, the job is not done yet.
Why appearance can fool people
Dry-looking surfaces are not proof of a dry structure. In Florida, ambient humidity slows evaporation and gives trapped water more time to linger inside assemblies. That can complicate insurance documentation too, because a homeowner who assumes the space is fine may miss the baseline records that show what was wet and what returned to normal.
The better approach is systematic. Professionals use extraction, airflow, dehumidification, and temperature control in a set order, then keep checking the structure until the readings confirm the materials are back within acceptable range. That is what separates structural drying methods from simple cleanup, and it’s why the right response is usually faster, safer, and more defensible than improvising with household fans.
The Science Behind Effective Structural Drying
A soaked room can look calm on the surface and still be wet inside the walls, under the flooring, or in the framing. The science behind structural drying methods is straightforward once you strip away the jargon. Water has to be removed in stages, and each stage solves a different problem. First comes physical extraction, which removes bulk liquid. Then evaporation moves remaining moisture from the material into the air. Finally, dehumidification pulls that moisture out of the air before it settles back into the building.
The order matters because every gallon left in place makes the rest of the job harder. Wringing out a sponge versus waiting for it to air-dry on the counter shows the difference clearly. Skipping the wringing asks the air to do too much work. Industry guidance says removing bulk liquid first can be up to 500 times more efficient than relying on dehumidification alone, which is why the best drying plans start with extraction before any evaporation-based equipment does the heavy lifting. The sequence is explained in structural drying guidance.
Why airflow and humidity work together
Air movement matters because it breaks the boundary layer of damp air sitting on the material surface. Once that barrier is disturbed, moisture can evaporate more efficiently into the surrounding air. Airflow alone does not finish the job, because the air has to be dried out again or it stops accepting more moisture.
That is where dehumidifiers and temperature control come in. Warm air in the 70 to 90°F range supports better evaporation and helps dehumidifiers work in the first 36 to 48 hours when losses are still changing quickly. Field practice also depends on psychrometric readings, humidity ratio tracking, and daily moisture-content checks so the drying chamber keeps moving moisture out instead of letting it settle back in. This humidity and mold resource helps explain why Florida interiors can stay damp longer than expected, especially when outside air already carries a lot of moisture.
Why the sequence matters
The sequence is not a preference, it is the strategy. Extract first, then move air, then control humidity, then verify the readings. If standing water is still present, fans and dehumidifiers are fighting the wrong battle. If hidden moisture remains after the surface looks fine, the process is still incomplete.
Drying is finished when the material readings say it is finished, not when the room looks comfortable to stand in.
That is the core science of structural drying methods. It is also why experienced restoration crews judge the work by what the meters show, what the materials are still holding, and whether the structure can be preserved without leaving moisture behind.
Core Structural Drying Techniques and Equipment
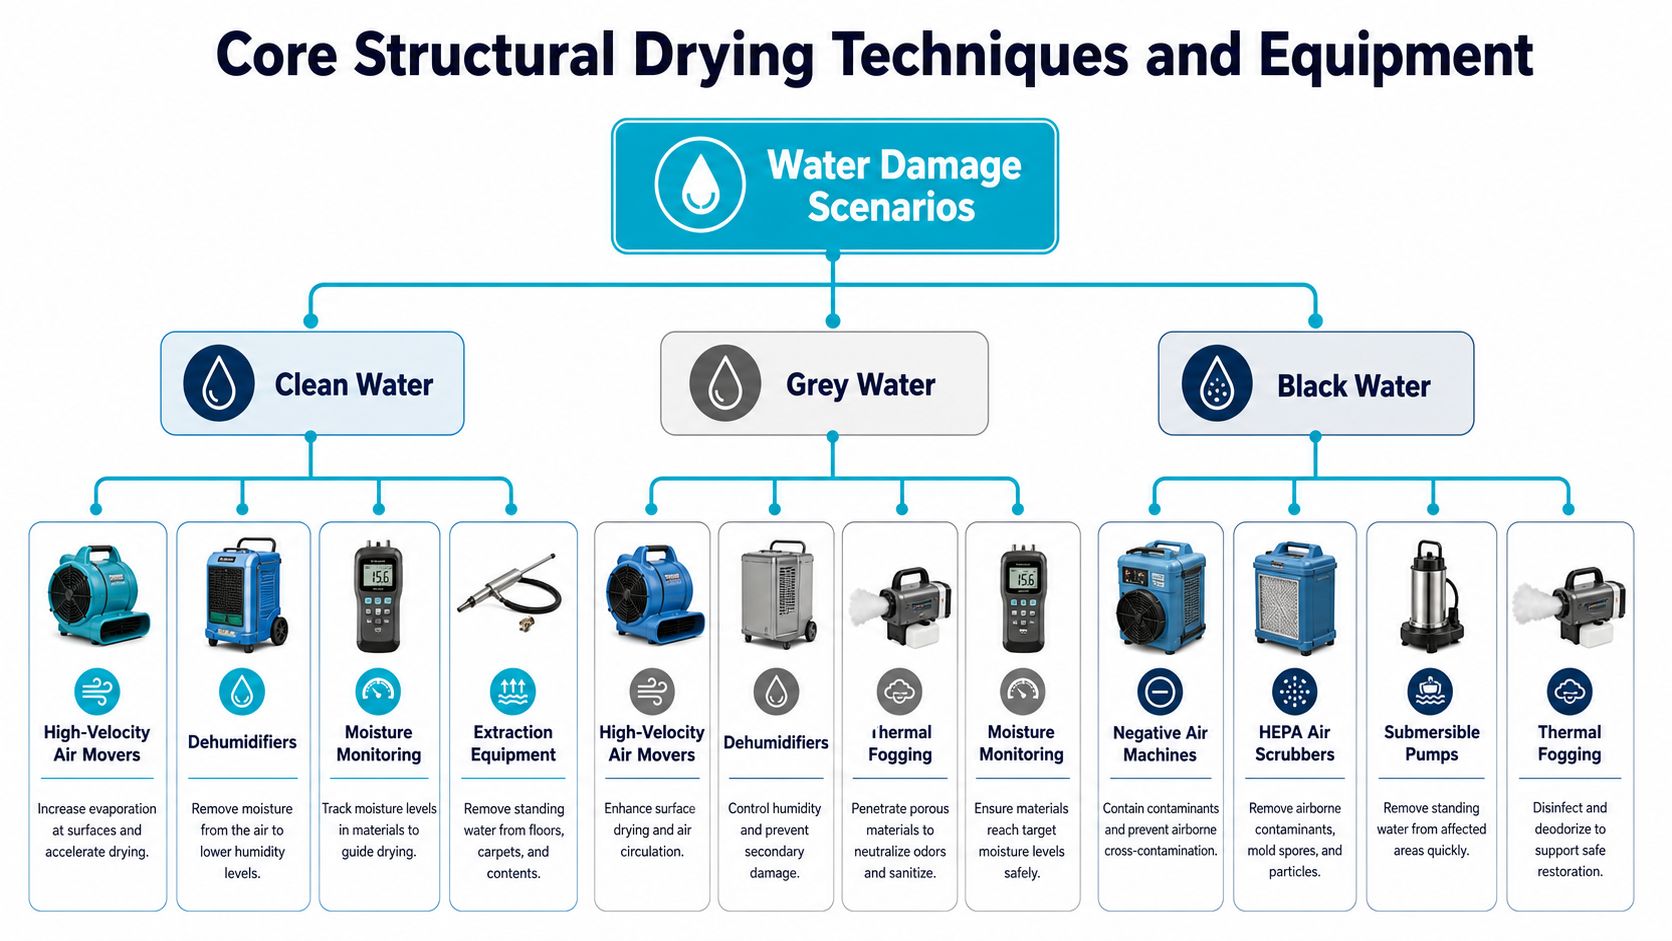
The right structural drying methods depend on where the water is, what got wet, and whether the materials can be preserved. A flooded carpeted room is not the same as a soaked wall cavity or a tile floor over concrete. Professionals match the method to the assembly instead of forcing one setup onto every loss, which is precisely where many DIY attempts fall short.
Air movers, dehumidifiers, and the job each one does
High-velocity air movers are the workhorses of evaporation. On open floor areas, they can be arranged in a circular vortex pattern to keep air moving across the wet surface and around the space. On wall surfaces, the airflow is often directed with direct impingement, so the moving air strikes the material and pushes moisture out more quickly. For the placement logic many technicians use, see air-mover guidance for water damage.
Dehumidifiers serve a different purpose. Refrigerant units are common when the air can be cooled and condensed efficiently, while desiccant units are often chosen when conditions call for more aggressive moisture removal. Florida’s humidity can make capacity matter more than convenience, especially in enclosed buildings where outside air is already moisture-heavy.
When cavities and trapped moisture change the plan
Some losses dry well from the surface, while others need access to hidden spaces. Wall cavities, floor cavities, and ceiling assemblies may need opened paths so dry air can reach trapped moisture. In those situations, injectidry-style systems and similar cavity-drying setups force conditioned air where passive drying can’t reach. Drying mats can also be used on hardwood floors when the goal is to preserve the finish and avoid full removal.
Negative air machines become important when contamination control matters. They’re used to manage air movement and reduce cross-contamination risk during more serious water events, especially when the water category or building conditions make containment a priority. A full structural drying plan should include the access method, the airflow pattern, and the equipment capacity, not just a pile of machines in the room.
What the field setup looks like
A basic field layout often includes:
- Air movers to speed evaporation across wet surfaces.
- Dehumidifiers to remove moisture from the air before it re-enters materials.
- Cavity drying tools for hidden assemblies.
- Containment or negative pressure when the environment needs isolation.
A separate set of guidance linked to the IICRC S500 framework recommends one air mover for about 50 to 70 square feet of wet floor area, and roughly 4 to 6 air changes per hour in standard spaces. Another field reference places one air mover for every 100 to 150 square feet of wet wall or ceiling above 2 feet and notes that drying completion depends on objective moisture readings, not elapsed time. See that placement framework in this S500 field guide.
Most homeowners don’t need to memorize equipment names. They do need to know that structural drying methods are chosen in layers, and the wrong tool in the wrong place can waste time while hidden moisture keeps spreading.
How Professionals Measure and Monitor Drying Progress
The hard part of structural drying methods is not turning on the equipment, it is proving the structure is dry. A room can feel comfortable long before hidden materials have returned to normal, and that false sense of finish is where many callbacks start. The safer approach is to track the job with measurable readings, daily notes, and a baseline that shows what “normal” looks like inside that specific building.
What gets measured
Professionals begin with moisture mapping and baseline psychrometric readings, then record conditions at marked points as drying continues. Those readings are checked again every day, because moisture shifts with temperature, airflow, and time of day, and a structure can stall when conditions drift. The monitoring process continues until the affected area matches target moisture content or lines up with unaffected reference materials in the same building.
For wood framing, one commonly cited drying goal is ≤19% moisture content. That benchmark matters because wood can look stable while still holding enough moisture to support deterioration or later mold-related problems. A surface that feels dry is not a reliable finish line.
Why hidden areas need extra attention
Hidden assemblies are often the last parts of a loss to dry. Sill plates, the lower framing close to slabs and base materials, can retain moisture longer than visible finishes. If a technician checks only room conditions and ignores those hidden points, the drying record can look better than the structure really is.
Documentation protects the homeowner and the project. Insurance adjusters, project managers, and reconstruction crews need a paper trail that shows what was wet, what changed, and when the materials reached acceptable levels. For property managers who want a practical early-warning tool, the guide for property managers on leak detection is worth keeping on hand.
Documentation tip: keep the moisture log, not just the final photo. The readings tell the story that pictures can’t.
How “done” is verified
Final verification is not visual. It is a return to the reference materials, the baseline notes, and the target readings established at the start, along with an eye on the overall restoration timeline, which is explained in this guide to how long water damage restoration takes. If the numbers line up and the structure holds those readings on consecutive checks, the drying phase can be closed with confidence. That is the practical standard behind professional-grade structural drying methods.
When to Preserve Materials Versus Remove and Replace
One of the biggest decisions in structural drying methods is whether to save materials in place or remove them. The wrong call can trap moisture, lengthen the job, and leave a hidden problem behind the finished surface. The right call can preserve original materials, reduce demolition, and keep the repair smaller.
When preservation makes sense
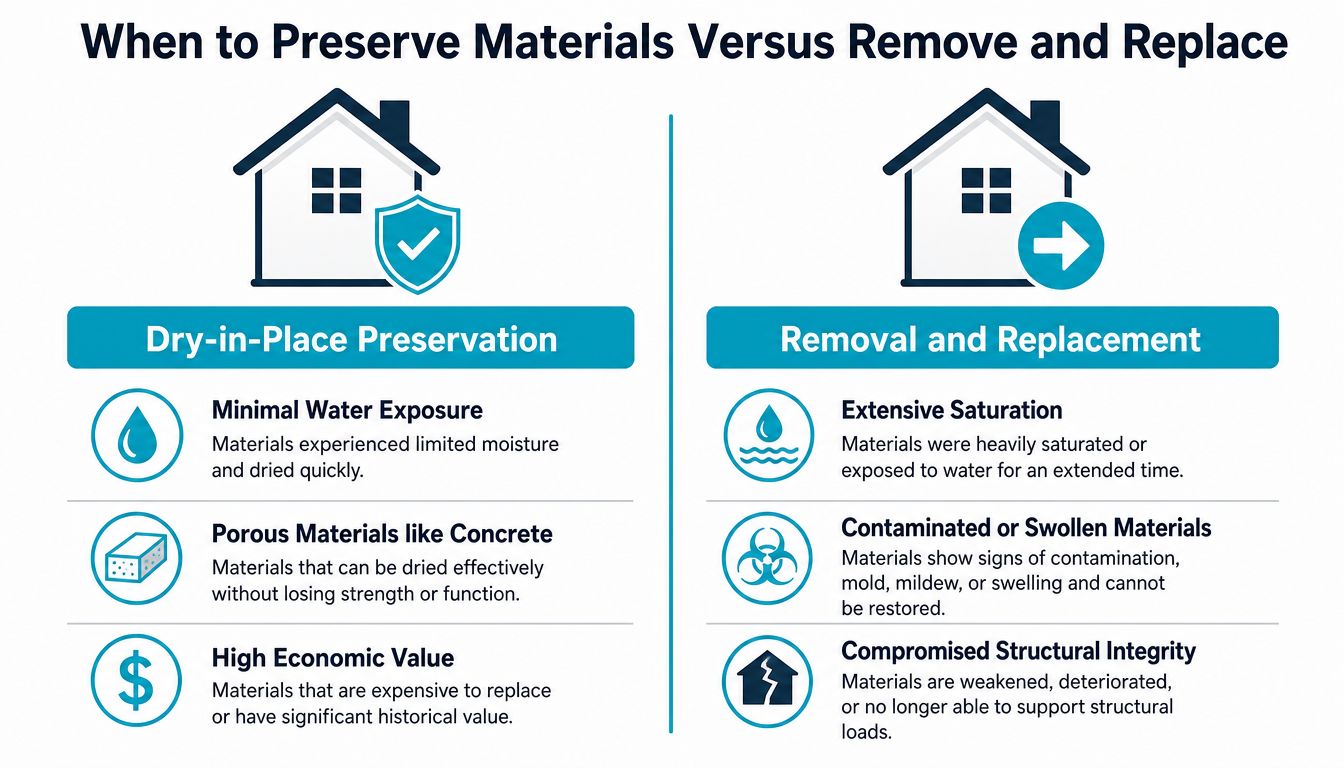
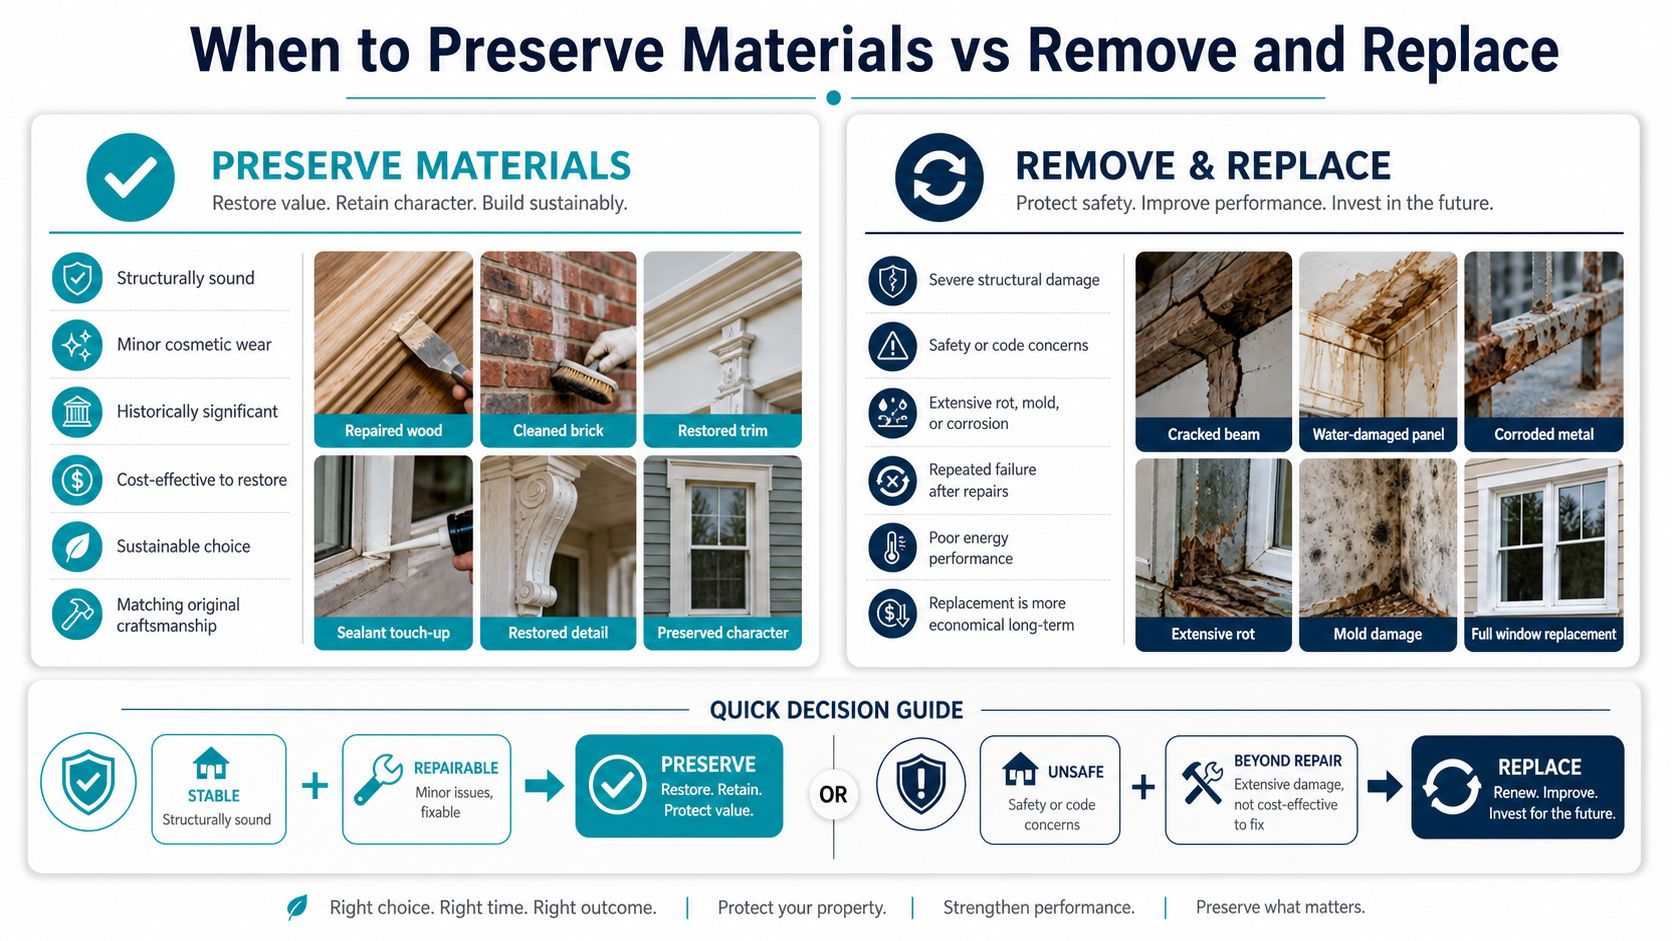
Dry-in-place drying is usually the better fit when the loss is smaller, the water is clean, and the materials haven’t been saturated. A small experiment reported that gypsum board, sill plate, trim, and insulation could dry in place within 48 to 72 hours only when the intrusion was minimal and the water was Category 1. That kind of result depends on fast response and limited wetting, not luck.
Preservation also makes more sense when the material is costly to replace or when removal would create more disruption than the water itself. But even then, the drying plan still has to be based on the category of water, the evaporative load class, and daily moisture logging, not just what the surface looks like.
When removal is the safer choice
Removal becomes the smarter option when contamination is involved, cavities are heavily saturated, or a material can’t be reliably dried back to a safe condition. Insulation is a common example because it often holds water longer than the assemblies around it. If a material swells, stays wet in hidden layers, or loses structural integrity, preserving it can cost more than replacing it.
That’s why disruptive drying is often the safer default after testing and removal decisions are made. It sounds more aggressive because it is. But in the field, a controlled removal often prevents a longer loss cycle, hidden mold growth, and repeated callbacks.
A practical decision frame
Use three questions:
- What kind of water is it?
- How saturated is the material and what’s behind it?
- Can moisture be verified down to acceptable levels?
If the answers point toward deep contamination, trapped moisture, or questionable materials, removal is usually the cleaner outcome. If the loss is minor, the water is clean, and the readings respond quickly, dry-in-place can save time and preserve the original build.
For more on the repair side of that decision, this water damage repair guide gives useful context for what comes after the drying call is made.
Florida-Specific Challenges and Structural Drying Considerations
Florida changes the drying equation fast. Structural drying methods that work in a drier climate can stall here because outside air often already carries a heavy moisture load, especially along the Gulf Coast. Opening windows or running a few fans can move humid air through a wet house, and that can slow the job instead of helping it.
Why climate and construction matter
Homes in Bradenton, Sarasota, Tampa Bay, Saint Petersburg, and Lakewood Ranch often use concrete block walls, stucco exteriors, and tile flooring over slab. Those assemblies do not dry the same way lightweight framing does. Dense materials, slabs, and hidden cavities hold moisture longer, so a crew has to watch the readings and not just the surface. In practice, standard residential drying for Class 1 to 2 losses commonly takes 3 to 5 days, while concrete slabs and other dense materials can take 7 to 14 days or longer to return to acceptable moisture levels according to structural drying guidance.
Florida storm and flood losses also bring more variables than a simple pipe burst. Category 2 or Category 3 water may require containment, material removal, and tighter drying controls because the priority shifts from speed alone to safety and contamination management. A local technician has to weigh the water source, the substrate, and the humidity at the same time.
What extended drying looks like
Government guidance on flood-damaged buildings notes that a combined drying approach may use the building’s heating system, desiccant dehumidifiers, fans, refrigerant dehumidifiers, natural ventilation, and temporary heating. In a best-case scenario, the overall process is generally expected to take about 4 to 8 weeks depending on the extent of flooding and the depth of water as outlined in flood-damage building guidance. That timeline shows why big losses are not solved by speed alone. They are solved by matching equipment to the building and keeping moisture from moving back into already-dried areas.
In Florida, the job is often about controlling moisture migration, not just drying what you can see.
How homeowners can help the process
The most useful thing a homeowner can do is limit re-wetting. Keep doors closed to affected areas, avoid running the air conditioning in a way that works against the drying setup, and don’t pull materials apart without a clear reason. If a contractor proposes a plan, ask how they’ll document moisture, how often they’ll check readings, and whether the strategy accounts for slab, block, or cavity moisture.
One local option for homeowners who need emergency mitigation, drying, and claim coordination is AMPM Restoration Services, which handles water damage recovery for Florida properties. The right plan in this climate matches the building, the water source, and the humidity, not just the fastest-sounding approach.
Your Next Steps After Water Damage
Start with safety, then documentation, then extraction. If the area is still actively leaking, shut off the source if you can do it safely. Take photos before moving materials, protect electrical hazards, and contact a restoration company that documents moisture instead of guessing at it.
Expect the drying process to be measured, not rushed. Minor residential losses often fit the 3 to 5 day range, while dense assemblies and larger flooding can take much longer under common structural drying guidance. Ask for moisture logs, baseline readings, and a clear explanation of what counts as dry for your specific materials.
If you’re in Bradenton, Sarasota, Tampa Bay, Saint Petersburg, or Lakewood Ranch and you need a team that can respond quickly, coordinate insurance, and guide the dry-out from extraction through final verification, call 941-946-7807 for a free inspection and estimate. Financing options are available, and the right drying plan can save materials, time, and a lot of stress.
AMPM Restoration Services handles water damage restoration, moisture documentation, drying, mold-related concerns, and reconstruction for Florida homes and businesses. If you’re dealing with water damage right now, visit AMPM Restoration Services to get help with the drying plan, insurance claim coordination, and next-step recovery.