

How to Sanitize Air Ducts
Learning How to Sanitize Air Ducts usually starts after a leak, a musty blast from the vents, or dust that keeps returning no matter how often you clean. The useful question isn’t which spray to buy. It’s whether your system has ordinary dust, a moisture problem, or actual contamination that needs source removal first.
The Smell in the Hallway and the Question Behind It
The AC kicks on in a Bradenton hallway and the air smells damp for the first minute. You check a register, see gray dust on the fins, and start searching How to Sanitize Air Ducts before the system cycles off. That smell might justify action, but it doesn’t prove the ducts themselves are the source.
Odors can come from wet insulation, drain pans, coils, filters, or building materials, not only from duct surfaces. Sanitizing the sections you can reach while a coil pan stays slimy or attic insulation stays wet leaves the cause in place. The smell returns because the system keeps pulling air across the actual reservoir.
Why Routine Spraying Is Not the Default
EPA guidance does not treat duct cleaning as a routine chore, because the health benefits remain uncertain and light household dust in ducts hasn’t been shown to pose a health risk, as explained in EPA guidance on whether home air ducts should be cleaned. That position surprises homeowners who expect a calendar schedule. It also protects them from paying for chemical fogging when filtration, moisture repair, or a targeted inspection is the better response.
When odor follows a leak, flood, or visible growth, the decision changes. At that point you’re no longer debating cosmetic dust. You’re deciding whether the entire air side needs assessment, cleaning, drying, replacement of damaged porous material, or testing. A homeowner unsure what the air is carrying can start with air quality testing for mold rather than guessing from smell alone.
Practical rule: Treat sanitizer as a conditional finishing step after inspection and physical cleaning, not as the opening move.
A wrong call has three costs. It wastes money on surfaces that weren’t contaminated, it can spread material if a suspect system keeps running, and it can create false confidence while moisture continues feeding growth. Florida cooling systems run long seasons, so a small drainage or insulation failure gets repeated exposure to humid air. The decision pathway is therefore simple. Inspect first, identify the source, correct moisture, remove contamination physically, then decide whether a labeled chemical belongs on the remaining surfaces.
Deciding Whether Your Ducts Actually Need Sanitizing
Start with the system off and your phone camera ready. Pull a supply register and a return grille, shine a flashlight inside, and photograph what you can see without forcing tools into flexible duct. Then open the air handler area only if you can do so safely, and check the filter, coil face, and condensate pan for standing water or visible growth.
The Triggers That Justify Escalation
EPA’s stronger triggers are visible substantial mold growth, pest or vermin infestation, or substantial debris deposits. Add post-flood contamination, fire residue, and sewage or stormwater exposure to that escalation list, because those events introduce material that ordinary vacuuming can’t characterize. If none of those conditions is present, changing a loaded filter and correcting dust sources may be more proportionate than sanitizing.
Use this quick screen before touching chemicals:
- You see substantial growth: Photograph it, avoid running the system if contamination is suspected, and get an assessment.
- You find wet or moldy liner: Don’t plan to spray it clean, because porous insulation is handled differently from sheet metal.
- You see only light, dry dust: Consider cleaning and filtration, not automatic disinfection.
- Water entered the system: Document dates, sources, and damaged areas for insurance before disturbing evidence.
Professionals also have a measurable benchmark. NADCA defines an acceptable cleanliness threshold for certain verified surfaces as less than 0.75 milligrams of collected debris per 100 square centimeters on a filter cassette, roughly 0.0075 mg per square centimeter, according to NADCA’s general specification for HVAC cleanliness verification. You won’t run that test with a household vacuum, but the number matters. It shows that clean is verifiable, not just a technician saying the duct looks better.
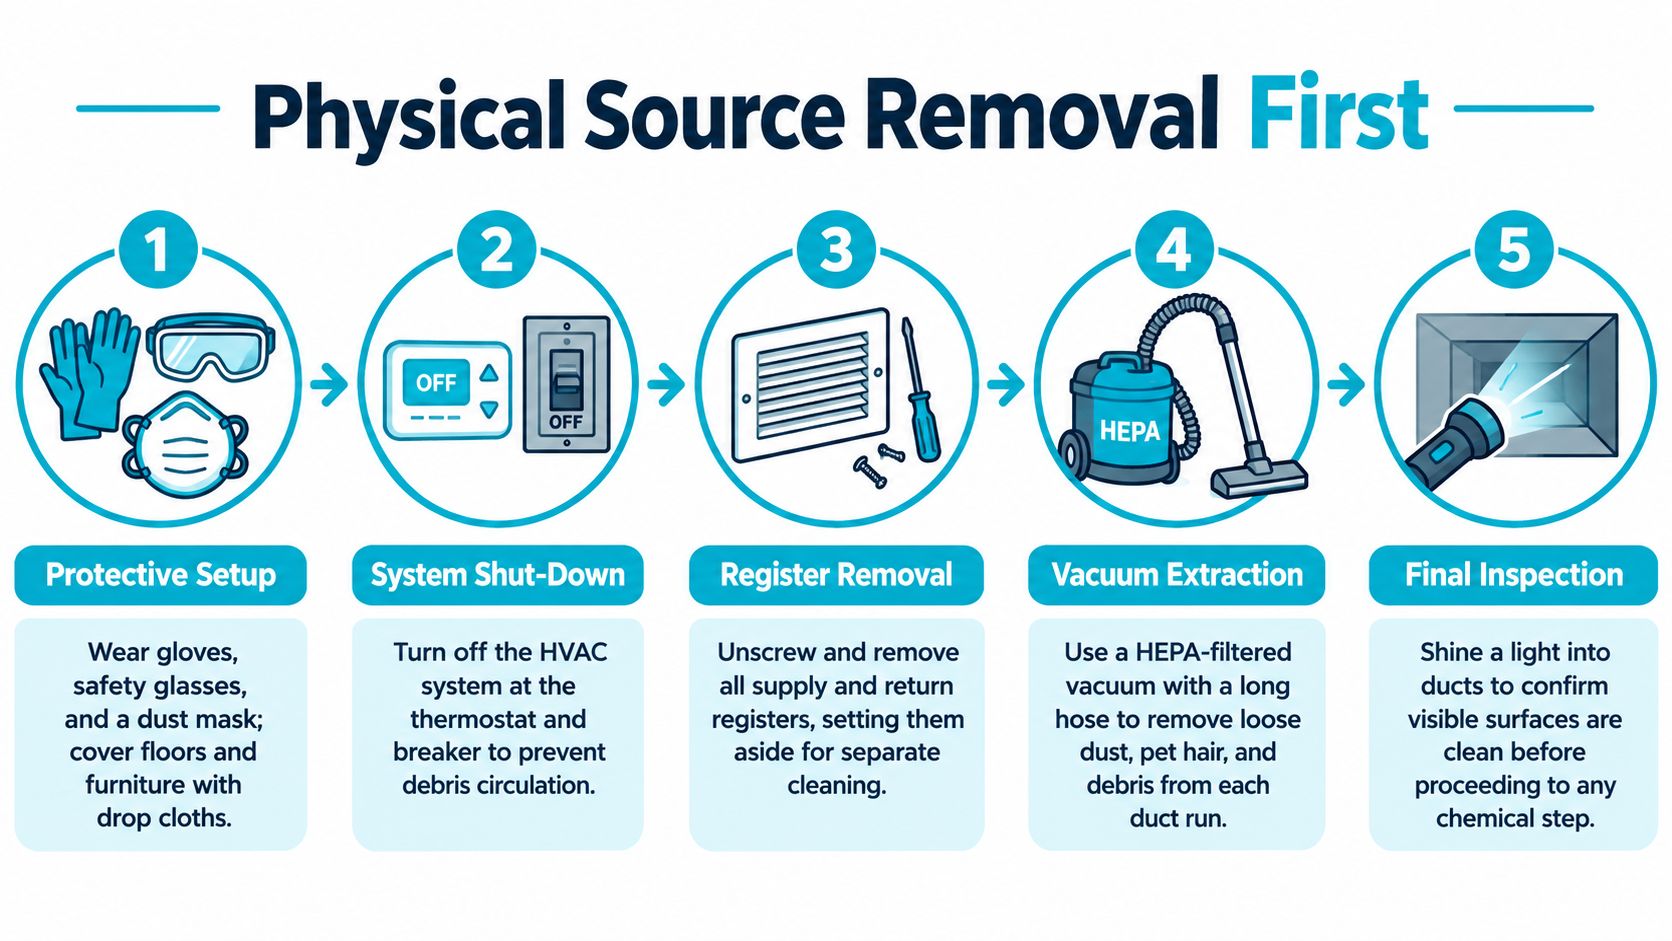
Inspection before and after work defines the scope. A pre-cleaning look tells the crew which components are affected, what access is needed, and whether porous material must be replaced. A post-cleaning look confirms debris was removed. Homeowners comparing a simple dust problem with biological growth can review how to remove mold from air ducts to understand where ordinary cleaning ends. If growth is extensive, occupants have health concerns, or floodwater reached the air handler, stop at documentation and call for help.
Physical Source Removal Before Any Chemical Goes In
A proper job begins away from the duct opening. The crew protects floors and furnishings, shuts the system down at the thermostat and breaker, and plans access so loosened debris moves toward collection equipment instead of into rooms. Registers and grilles come off for separate cleaning, because washing a grille while leaving the boot and duct behind it loaded accomplishes little.
Work the Whole Air Side
Source removal means mechanically loosening adhered dust and debris, then extracting it under controlled negative pressure. Technicians use agitation tools suited to the duct material, paired with HEPA-filtered vacuum collection. Sheet metal tolerates different brushes and whips than flex duct or duct board, and using the wrong tool can tear liner or separate joints. Access panels may be needed so the crew isn’t pretending a hose through one register cleaned an entire trunk line.
The return side deserves the same attention as supply runs. Return plenums collect household dust, pet hair, and construction debris before air reaches the filter and coil. If a Palmetto rental has clean supply registers but a loaded return plenum, the blower keeps pulling from the dirty reservoir and occupants keep noticing dust and odor. The coil, blower wheel, air handler cabinet, and drain pan are part of the same pathway, not optional extras.
This whole-system logic has a long history. Professional cleaning moved from early fire-prevention work into a standardized discipline when NADCA formed in Kansas City in February 1989 and later published Standard 1992-01 after nearly two years of monthly standards work, as documented in NADCA’s history of air duct cleaning standards. Its source-removal approach rejected merely sealing contaminants against duct surfaces. Later standards expanded attention to assessment, cleaning, and restoration of complete HVAC systems.
In a Florida attic, the crew also checks flex duct for crushed sections, loose inner liner, disconnected collars, and insulation damaged by roof leaks. Cleaning can’t restore a collapsed run or make wet porous material sound. The drain pan must be cleared and checked for proper drainage, filters replaced after dusty work, and access openings restored and sealed. Those details explain why professional duct cleaning services scope the air handler, coils, fans, supply ducts, and returns together. Only after visible soil is gone can anyone judge whether a chemical finish is warranted.
When and How to Apply Disinfectant the Right Way
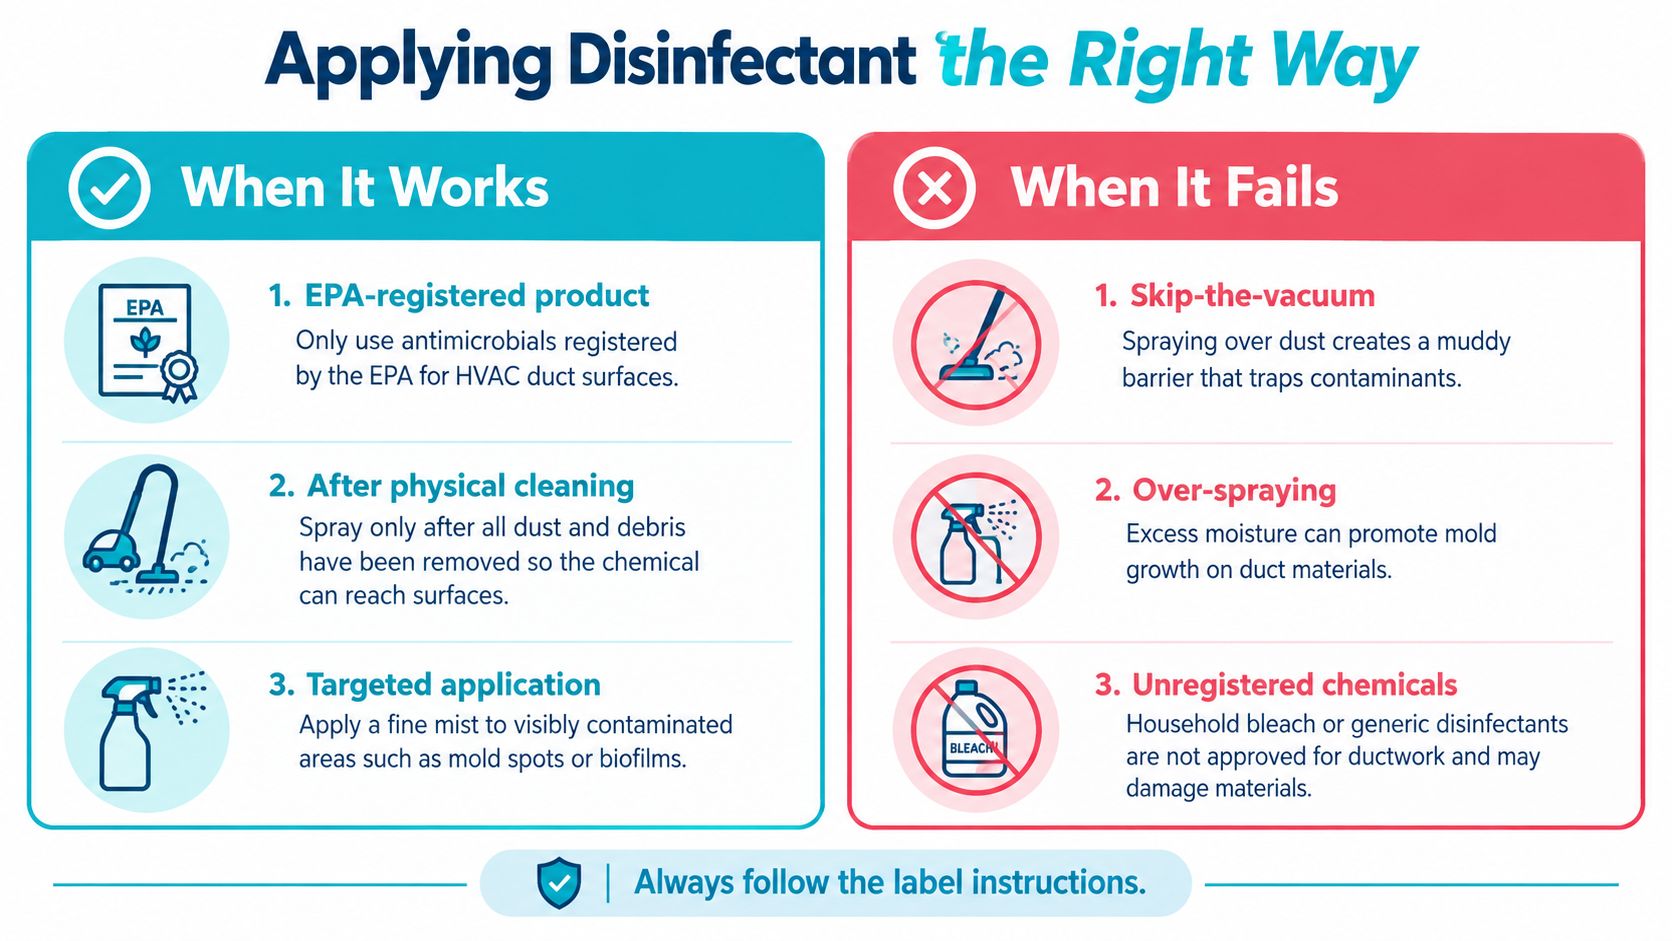
Disinfectant belongs in the plan only when active biological growth is reasonably suspected or unacceptable biological contamination has been verified. Even then, the product doesn’t compensate for soil. Dust and biofilm shield surfaces, consume chemical activity, and prevent even coverage, so spraying first creates wet debris rather than a sanitized duct.
Read the Label Like a Work Order
In the United States, antimicrobial pesticides used in HVAC systems must be EPA-registered and applied exactly as the label directs. Registered sanitizing claims generally apply only to thoroughly precleaned, nonporous HVAC surfaces, and one EPA-cited protocol specifies wetting target surfaces for at least 10 minutes before allowing them to air-dry, with respiratory protection for applicators, according to CDC guidance for reopening buildings after disasters. Check the label for permitted surfaces, dilution, contact time, ventilation, evacuation, and re-entry requirements before anyone opens the container.
- Surface match: Confirm the label authorizes the exact HVAC material and application method.
- Contact time: Keep the surface wet for the stated period, rather than misting and immediately restarting airflow.
- Occupant controls: Follow evacuation, ventilation, and re-entry directions, especially around children, pets, and sensitive occupants.
- Verification: Reinspect after drying and confirm the moisture source that caused growth has been corrected.
Porous material changes the answer. Wet or moldy internal fiberglass liner and insulation generally can’t be effectively cleaned and should be removed and replaced. Fogging them can wet the material further while leaving contamination inside the fibers. A Tampa Bay homeowner who fogs ducts but ignores a slow condensate drain is treating the symptom while the pan keeps supplying moisture. Offices face the same label and moisture logic at larger scale, which is why commercial sanitizing for offices should still begin with source identification rather than indiscriminate application.
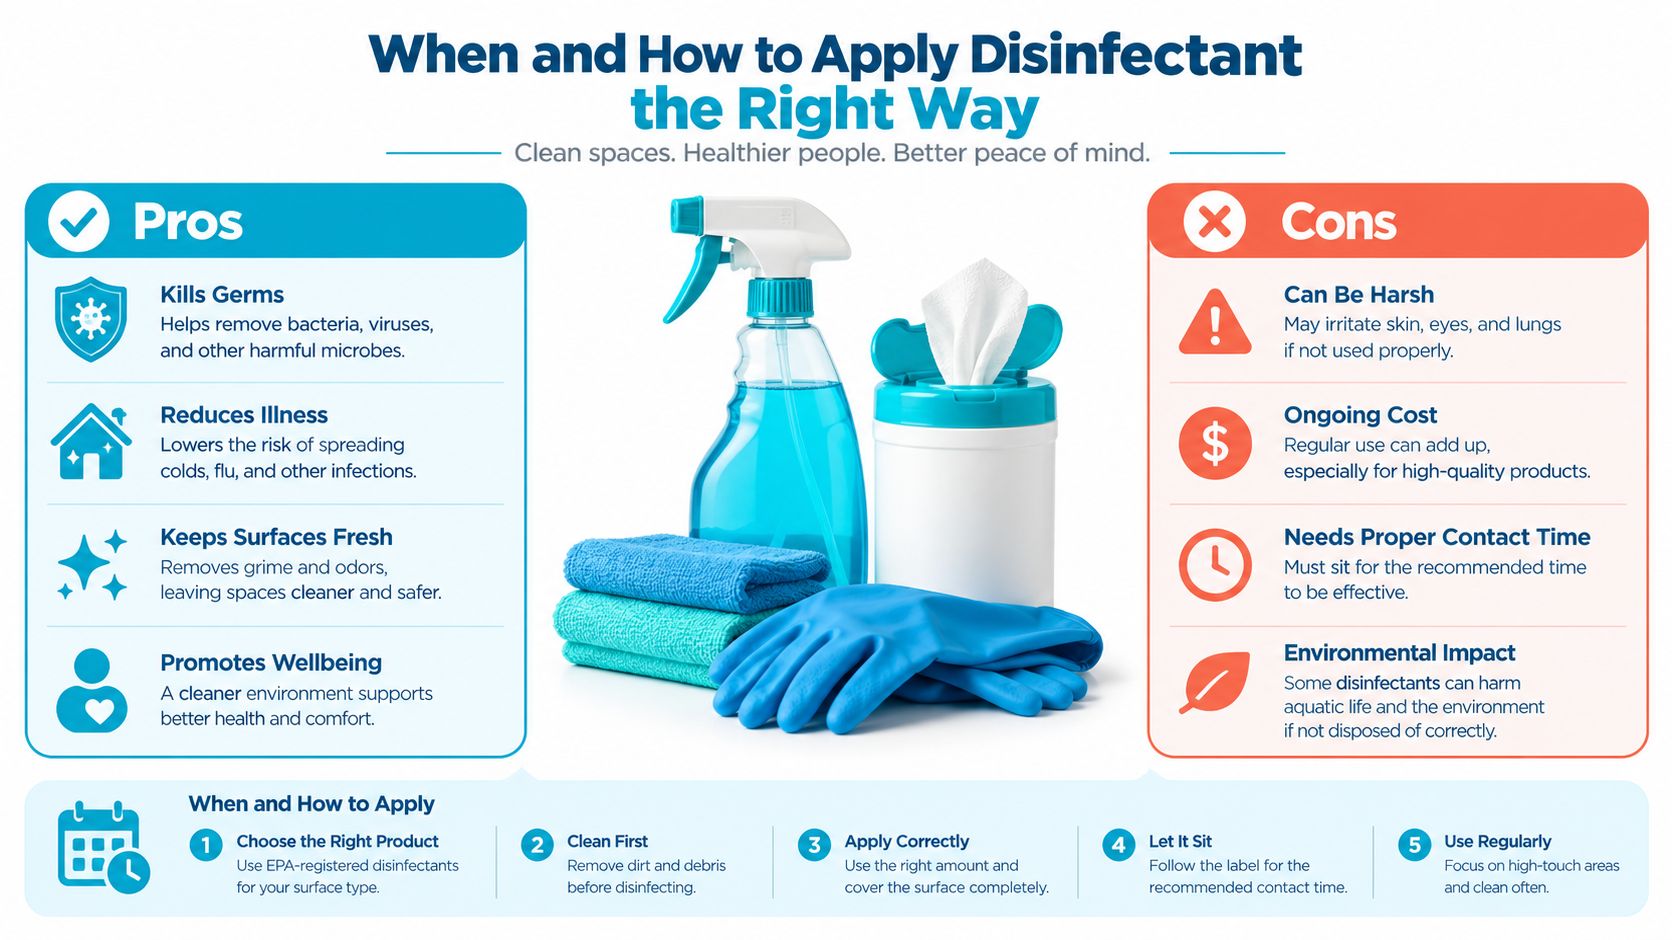
Avoid promises of a universal microbial kill rate. Performance depends on the organism, surface, soil load, concentration, coverage, and contact time stated for that product. If a seller can’t show the EPA label or explain why your duct material qualifies, don’t authorize the application.
Mistakes That Make Sanitization Worse or Useless
The most damaging mistake is running a system you suspect is contaminated. CDC guidance says contaminated HVAC systems shouldn’t be operated because they can disperse microorganisms through a building, as stated in CDC disaster guidance on contaminated HVAC systems. A Sarasota office that keeps cooling after a ceiling leak may feel comfortable while the blower distributes material from wet components into occupied rooms.
Adding Water to a Moisture Problem
EPA advises against steam cleaning and other moisture-involving methods on ductwork because added water can raise humidity and create conditions favorable to microbial growth. That warning applies even when the equipment sanitizes hard floors well. Duct interiors, liner, and insulation dry slowly, and Florida humidity doesn’t help. A wet cleaning method can turn light dust into adhered residue and push moisture into porous material.
Sealing over contamination is another common failure. Painting or encapsulating moldy liner without removing damaged material hides the view while leaving the assembly compromised. Generic household disinfectant creates a similar problem if its label doesn’t authorize HVAC use. A product being suitable for a countertop doesn’t make it suitable for an air stream, duct board, coil, or internal insulation.
Watch for these warning signs in a proposal:
- Fog everything pricing: Chemical treatment is sold before inspection or moisture diagnosis.
- No return-side work: The quote covers supply registers but ignores plenums, coils, blower, and drain pan.
- No label available: The applicator can’t identify the product, permitted surfaces, or re-entry interval.
- Guaranteed sterilization: The claim ignores organism, soil load, coverage, and contact time.
Don’t let a pleasant fragrance substitute for evidence that debris was removed and moisture was corrected.
After flooding, even ductwork that wasn’t submerged may need evaluation if operating the system could spread contamination. Barriers, negative pressure, exhaust ventilation, and respiratory protection may be necessary during remediation. Those controls aren’t upsells when contamination is real. They’re how the work avoids making unaffected rooms part of the loss.
DIY Cleaning Versus Hiring a Florida Pro
A careful homeowner can remove and wash registers, vacuum accessible openings with a HEPA-filtered machine, replace filters, and photograph visible conditions. That’s maintenance, not whole-system source removal. Household vacuums usually can’t maintain negative pressure across trunk lines, reach every branch, clean coils properly, or verify cleanliness deep inside the system.
Matching the Response to the Situation
| Scenario | Realistic DIY Scope | When to Hire a Pro |
|---|---|---|
| Light dry dust at registers | Wash grilles, vacuum openings, replace filter | Dust is heavy throughout or access is limited |
| Musty odor with no visible source | Check filter, pan, and nearby materials | Odor persists or moisture is found |
| Visible mold or wet liner | Photograph and avoid disturbance | Growth is substantial or insulation needs replacement |
| Flood, fire, or sewage exposure | Shut system down and document damage | Always, before restarting the HVAC system |
If you're deciding whether to book a residential clean for general housekeeping, keep that scope separate from HVAC remediation. Cleaning floors and surfaces doesn't address a contaminated blower or return plenum. Homeowners weighing their limits can compare the risks in can I remove mold myself or should I hire a professional before disturbing growth.
A professional quote should identify components included, containment and collection methods, access needs, porous materials requiring replacement, any proposed antimicrobial and its label basis, filter replacement, and post-work verification. It should also explain drying and drainage corrections when water caused the problem. Ask how findings will be documented for insurance, because photographs and moisture readings taken before demolition are difficult to recreate later. If the quote promises disinfection but contains no physical cleaning, keep looking.
After the Cleanup, Preventing the Next Problem
Prevention is mostly moisture discipline. EPA identifies moisture control as the most effective way to prevent biological growth in ducts, recommending prompt leak repair, sloped condensate pans, free-flowing drains, sealed and insulated attic or crawl-space ducts, annual inspections, and regular filter changes, according to EPA advice on preventing biological growth in air ducts. Water-damaged materials should be dried within 24 to 48 hours where possible. Build those checks into broader mold prevention strategies, especially after roof leaks and plumbing failures.
After a loss, shut down a suspect system, stop the water source, document damage, and get a qualified assessment before restarting. Knowing How to Sanitize Air Ducts correctly means knowing when replacement, drying, and verification matter more than spray.
Frequently Asked Questions
Does bleach sanitize air ducts? Don't use it unless an EPA-registered label specifically authorizes that HVAC surface and method.
Can I run the AC after flooding? Avoid operating a suspected contaminated system until it's assessed.
How often should ducts be sanitized? Not on a routine calendar. Base the decision on inspection findings and contamination triggers.
Will sanitizer remove musty odors? Only if the treated surface is the source. Wet coils, pans, filters, and insulation must also be addressed.
Can moldy duct insulation be saved? Wet or moldy porous insulation generally requires removal and replacement.
What should happen after cleaning? Install a new filter, restore access panels, verify drainage, and visually confirm the system is clean.
If your Bradenton, Sarasota, Lakewood Ranch, St. Petersburg, or Tampa Bay property has duct contamination after water, mold, fire, or storm damage, contact AMPM Restoration Services or call 941-946-7807 for a free inspection and estimate. The team provides 24/7 emergency restoration from 4301 32nd St W b18, Bradenton, FL 34205, with insurance claim assistance and financing options available.