

How to Get Rid of Mold in Attic
Most advice about attic mold starts in the wrong place. Homeowners are told to spray, scrub, and move on, but how to get rid of mold in attic really comes down to finding why the attic got wet in the first place. The EPA’s mold guidance is blunt about the order of operations, mold control depends on moisture control, wet or damp areas should be dried within 48 hours, and indoor relative humidity should stay below 60%, ideally 30% to 50% (EPA mold course, chapter 9). In Florida, that matters even more because warm, humid air and roof leaks can keep feeding growth long after the surface looks clean.
A lot of attic jobs fail because people treat the stain, not the system. A small patch of discoloration can hide a leak, a disconnected bath fan, blocked ventilation, or warm indoor air leaking through the ceiling plane. One attic-focused guide notes that 95%+ of attic mold growth issues are due to condensation (Environix attic mold guide), which is why a true fix usually means air-sealing, venting, drying, and then cleaning, not the other way around.
Practical rule: If the attic is still wet, any cleaning you do is temporary.

For homeowners who want a broader overview of the removal problem, this attic mold removal guide explains why visible cleanup alone rarely solves the issue.
Why Scrubbing Mold Is Not Enough
Scrubbing visible mold can feel like progress because the attic looks better right away. The problem is that mold is usually a symptom, not the root cause. If the wood, insulation, or roof deck is still being fed by condensation or leakage, the growth comes back, often in the same general area.
Why moisture comes first
The EPA’s cleanup guidance says mold control depends on fixing the moisture source before treatment, and it warns against painting or caulking over contaminated surfaces until they’re fully cleaned and dried. That is not a cosmetic preference. It separates real cleanup from covering a problem so it looks finished.
Attic mold in Florida usually points to a building-envelope failure. Roof penetrations, failed flashing, bathroom exhaust terminating in the attic, or unsealed ceiling leaks can all create the conditions for recurring growth. Bleach, a spray bottle, or a quick wipe does not reset an attic that is still pulling in moisture.
The other mistake is treating every attic stain the same way. A dusty film on a few boards is very different from blackened sheathing, damp insulation, or soft wood members. If the attic feels musty, the surfaces keep sweating, or the mold pattern repeats after cleaning, the job is moisture diagnosis.
Bottom line: If you only clean what you can see, you haven’t fixed attic mold.
That is why how to get rid of mold in attic starts with a moisture-management mindset, not a cleaning checklist. The target is a dry attic assembly, not just a brighter-looking one. In a humid climate like Florida, that difference decides whether the problem stays gone or keeps coming back as another repair bill.
For a plain-language overview of why surface cleanup alone falls short, see this attic mold removal guide.
Inspecting Your Attic and Assessing Mold Severity
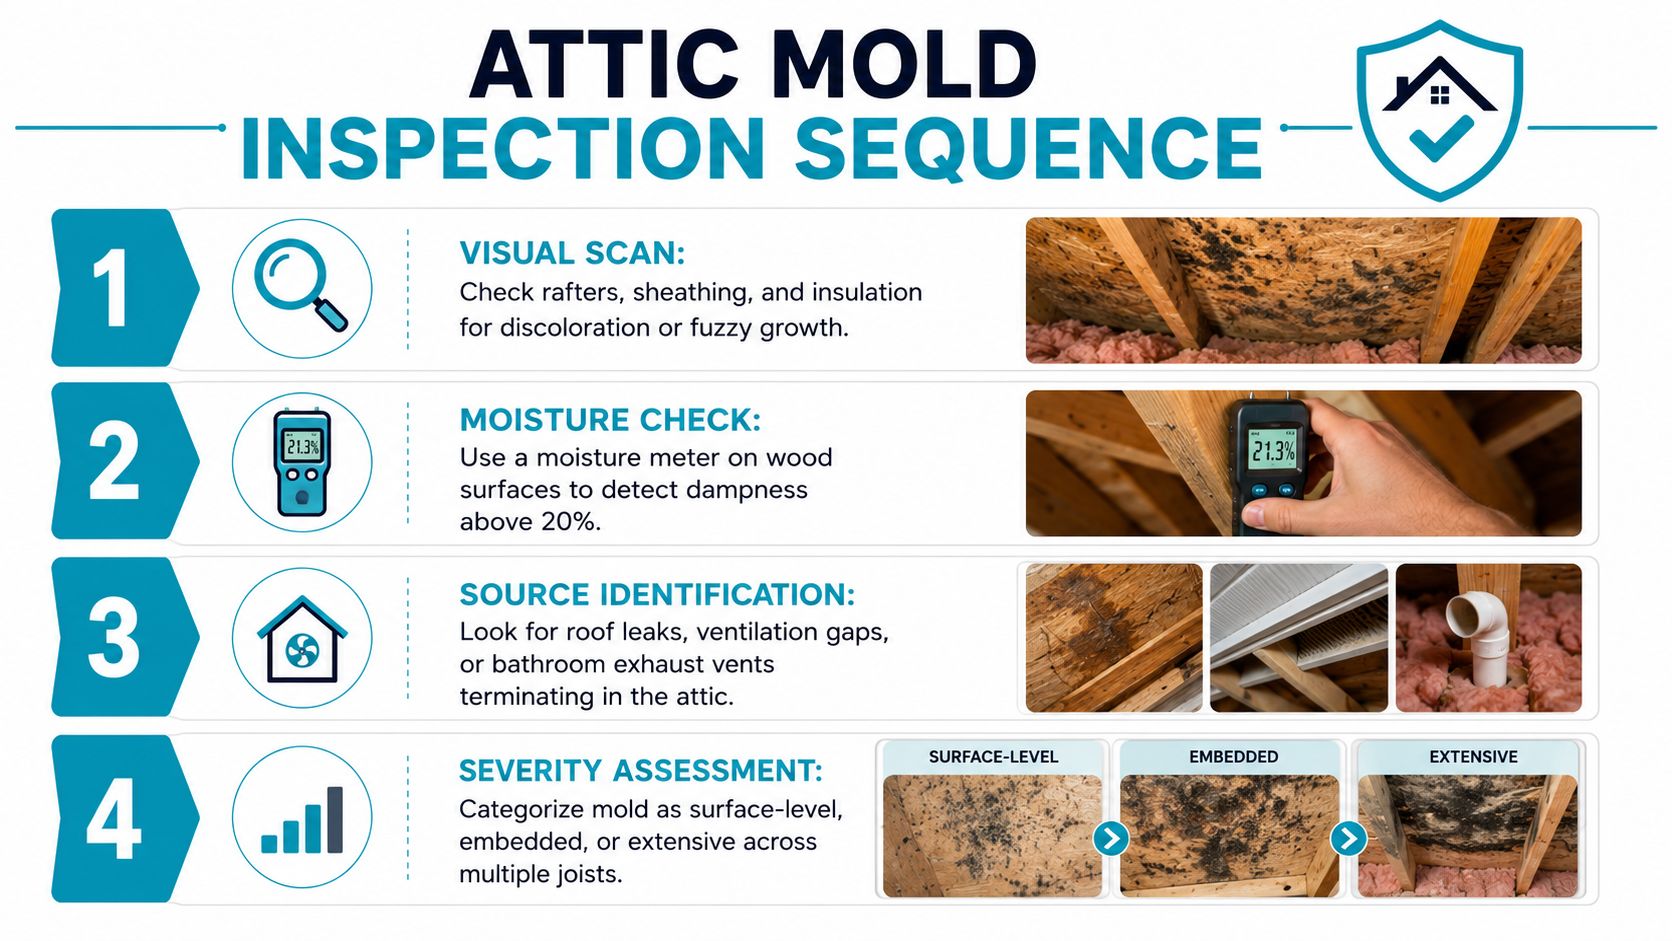
Before touching anything, I want the attic mapped out in a simple order. Start at the access point, then scan the roof decking, rafters, trusses, insulation, vents, and any HVAC penetrations. You’re looking for visible growth, staining, damp insulation, rusted fasteners, darkened plywood, and any place where humidity has left a trace.
What to check first
- Rafters and sheathing: Look for patchy discoloration, fuzzy growth, or widespread staining along roof slopes and ridge areas.
- Insulation: Wet, matted, or dark insulation usually means the moisture problem is active, not historic.
- Vent openings: Soffits, ridge vents, gable vents, and exhaust terminations should be clear and working together.
- HVAC and bath penetrations: Unsealed ducts or a bath fan dumping into the attic often leave the strongest clues.
A moisture meter helps separate surface stains from active dampness. If wood remains high in moisture, the attic isn’t ready for cleanup alone. It’s still a drying and diagnosis problem.
How to judge severity
Use the EPA’s common threshold as your first divider, mold-affected areas under 10 square feet may sometimes be handled by homeowners, while larger areas usually need certified pros (EPA mold course, chapter 9). That cutoff matters because attic mold often spreads across multiple framing members and into insulation after a leak or ventilation failure.
Document everything with photos before anything is moved. If you plan to make an insurance claim, pictures of staining, wet insulation, damaged materials, and the probable source are more useful than after-the-fact cleanup shots. A practical home-mold checklist is also available in this guide to checking a home for mold.
Safety Gear and Containment Before You Start
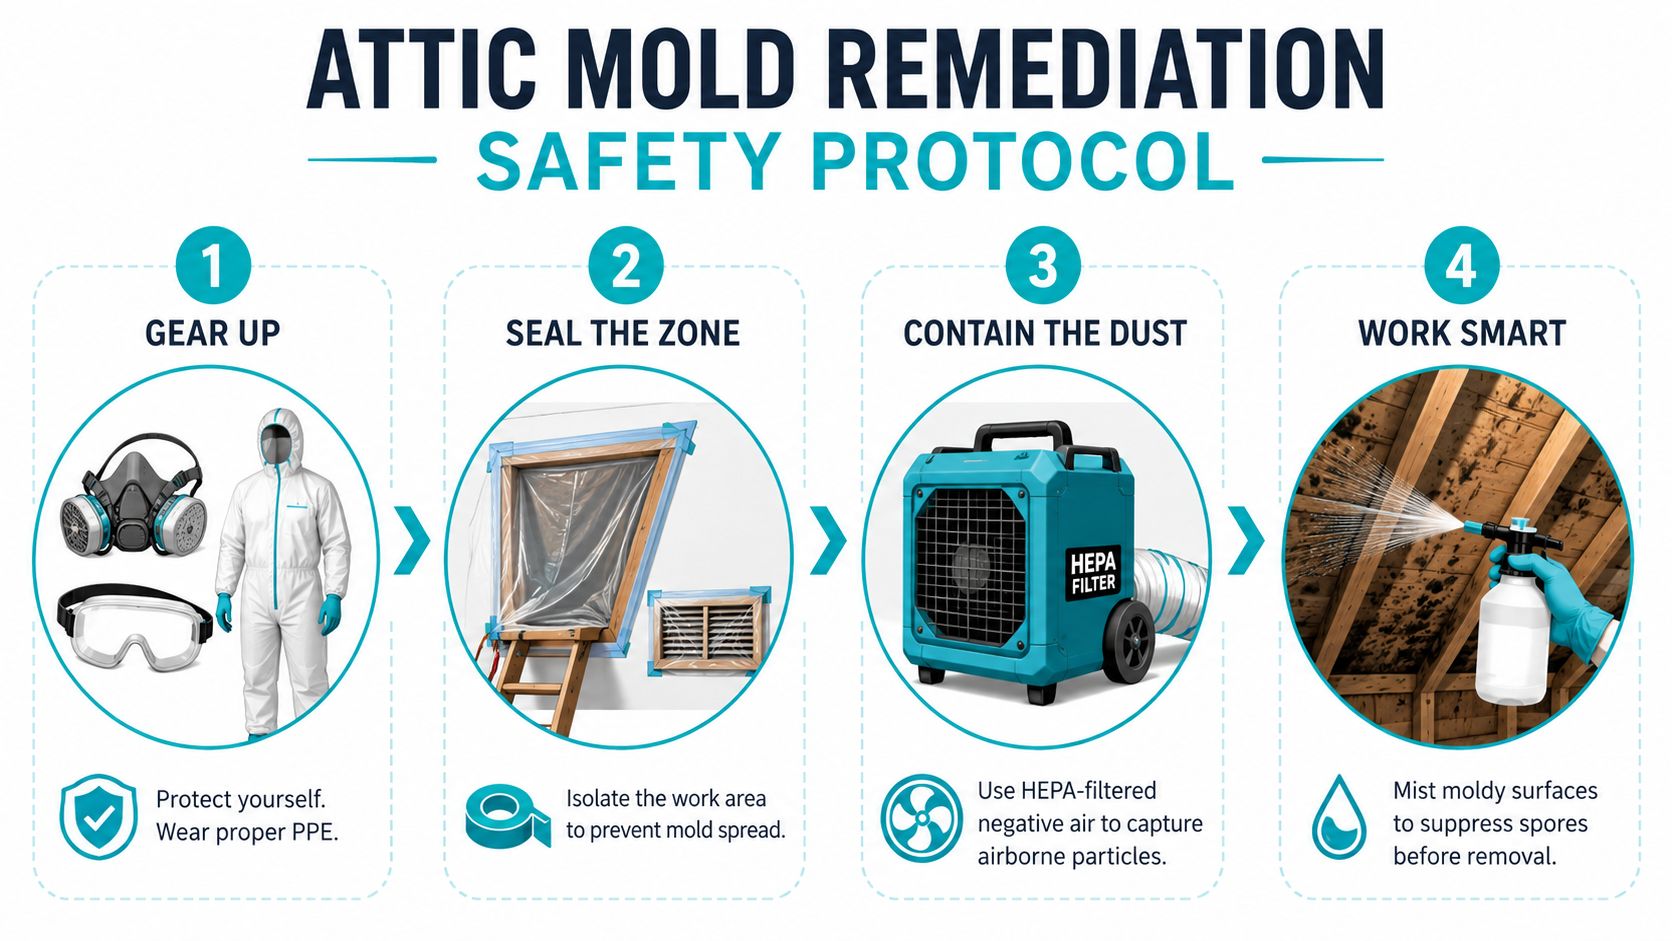
Attics trap heat, dust, and spores in a tight space, so safety gear isn’t optional. A good setup starts with a respirator, goggles, disposable coveralls, and gloves. If you’re crawling through contaminated insulation or scraping overhead surfaces, that protection keeps spores off your skin and out of your lungs.
Containment needs to come first
Seal the attic access so dust doesn’t drift into the living space. Cover nearby HVAC registers and return openings, then set up plastic sheeting to isolate the work zone as much as possible. An outward-facing exhaust fan helps create negative pressure so disturbed spores move outside instead of down into the house.
Practical rule: If you can smell attic dust in the hallway, the containment isn’t doing its job.
Before removing anything, lightly mist the moldy surface to reduce airborne debris. Don’t soak the wood, just suppress the dust. The EPA’s cleanup guidance is clear that porous materials may need disposal, and contaminated surfaces should not be painted or caulked before they’re fully cleaned and dried (EPA basic mold cleanup steps).
How to handle debris
Bag insulation, broken drywall, and disposable wipes as you work, then keep the bags sealed until they’re out of the home. Loose debris in a hallway or garage defeats the whole containment setup. If the attic contains items stored by the homeowner, those should be moved carefully, not dragged through clean rooms.
For a deeper look at containment and safe removal methods, see this drywall mold removal safety guide. The same principle applies here, control the space first, then clean it.
Cleaning Mold From Wood, Insulation, and Hard Surfaces
Once the attic is isolated, the work gets more selective. Hard, non-porous surfaces can often be cleaned. Porous materials usually can’t be trusted once mold has settled into them. That’s why insulation is often treated as removal material, while framing lumber can sometimes be salvaged if it’s dry, sound, and not structurally damaged.
Wood framing needs mechanical cleaning
Start with a HEPA vacuum to remove loose dust and spores from joists, rafters, and the roof deck. After that, scrub the wood with a stiff nylon brush and a cleaning solution. One attic-specific protocol uses 3% hydrogen peroxide, left in place for at least 10 minutes, then wiped away. That dwell time matters because short contact often just spreads residue around.
For larger or more stubborn growth, a controlled remediation workflow usually pairs cleaning with drying and ventilation. A practical attic treatment guide recommends cross-ventilation, an outward-facing fan, and keeping a dehumidifier running for 48 to 72 hours after cleaning to pull residual moisture out of the wood. A commercial dehumidifier rated at at least 70 pints per day is commonly suggested in humid conditions or summer weather.
When insulation should go
If insulation is contaminated, wet, or packed with growth, it usually doesn’t make sense to save it. Bag it, remove it, and plan for replacement once the attic is dry and the source problem is fixed. Trying to keep moldy insulation in place is one of the fastest ways to create a repeat job.
Hard surfaces are different. Framing lumber, plywood, and some metal components can often be cleaned if the structure is sound. For wood-specific cleanup detail, see this guide to treating mold on wood.
What not to do
Don’t paint, caulk, or seal over mold and expect it to disappear. That only hides the evidence and can trap moisture against the material. If you’re wondering when an exterior surface problem shifts beyond attic DIY, the same logic used for siding damage applies.
Fixing the Moisture Source to Prevent Mold From Returning
Attic jobs succeed or fail based on the source of moisture. If the roof leaked, the bath fan dumped into the attic, or warm indoor air kept finding its way into the cold roof deck, cleaning alone won’t hold. In Florida, that failure shows up fast because the attic is already fighting exterior humidity.

The usual moisture culprits
- Roof penetrations: Flashing, vents, and chimneys can let in water if the seals fail.
- Ventilation failure: Soffit and ridge vents need a clear path for cross-flow, not blockages from insulation or debris.
- Interior humidity: Bath and kitchen fans must exhaust outdoors, not into the attic.
- Air leaks and insulation gaps: Warm indoor air leaking through the ceiling plane condenses on colder surfaces above.
A useful benchmark for attic airflow is 1 square foot of net free area per 300 square feet of attic floor space, with intake and exhaust balanced across the system. Some guidance used during treatment targets approximately 1 square foot of ventilation for every 150 square feet of attic space while work is underway. Those numbers are about airflow, not guesswork.
Practical rule: If air can’t move through the attic correctly, moisture stays put long enough for mold to return.
Air-sealing matters just as much as venting. Gaps around attic access hatches, can lights, plumbing chases, and duct penetrations let indoor moisture migrate upward.
For homeowners trying to track down a leak source before any cleanup, this free water leak detection page is relevant because the right repair often starts with finding the exact entry point.
When to Call a Certified Mold Remediation Professional
DIY has a limit, and attic mold reaches it quickly. If the affected area is larger than 10 square feet, if mold is in HVAC components, if structural wood is softened or damaged, or if the growth keeps returning after cleanup, it’s time to bring in a certified team. The EPA’s size threshold is a practical line, not a challenge to test in a hot attic (EPA mold course, chapter 9).
Signs the job is too big for DIY
- Widespread growth: Mold across multiple joists, trusses, or large sections of sheathing usually means deeper contamination.
- Hidden moisture: If you can’t explain why the attic is wet, the problem is probably not solved yet.
- HVAC involvement: Contamination near ducts or air handlers can spread spores beyond the attic.
- Recurring growth: If the same area keeps coming back, the source repair hasn’t held.
Professional remediation adds containment, HEPA filtration, source diagnosis, and post-remediation verification. That verification matters because an attic can look clean and still stay too damp to close back up. In Florida, where humidity loads are high and roof assemblies get punished, choosing an IICRC-certified company is a sensible filter.
If you’re preparing an insurance claim, document the attic before and during the work. Keep dated photos, notes about the source, invoices, and proof of any moisture repairs. A practical guide to filing a homeowners insurance claim can help you stay organized before the adjuster gets involved.
AMPM Restoration is one option for homeowners who want inspection, remediation, drying, and repair handled as one coordinated job. The company also offers AMPM Restoration Services for local homeowners who need a full-service response rather than a piecemeal cleanup.
Protecting Your Florida Home With Professional Mold Remediation
The right answer to attic mold is rarely just “clean it off.” The sequence is simple, inspect carefully, protect the house, remove contaminated material where needed, dry the attic completely, and fix the source that made it wet. That approach lines up with EPA guidance, and it’s the only one that makes recurrence less likely.
In Florida, the moisture load in an attic can be relentless. Roof leaks, bad vent terminations, and air leaks all push the attic back toward the same failure point unless someone corrects the building envelope, not just the surface growth. A professional team can handle that job with containment, moisture control, and repair coordination that a one-day wipe-down can’t match.
AMPM Restoration serves Bradenton, Sarasota, Tampa Bay, Saint Petersburg, Lakewood Ranch, and surrounding Gulf Coast communities with 24/7 emergency response, insurance claim assistance, and financing options. If the attic smells musty, the insulation is damp, or the mold keeps coming back, fast action can prevent more damage and more expensive repairs.
If you’re dealing with attic mold in Bradenton, Sarasota, Tampa Bay, or nearby Gulf Coast communities, AMPM Restoration Services can inspect the attic, track down the moisture source, and handle remediation, drying, and reconstruction as needed. Call 941-946-7807 for a free inspection and estimate, and ask about insurance claim assistance and financing options when you visit AMPM Restoration Services.