


Ceiling Leak Repair and Restoration in Bradenton
A ceiling stain rarely stays a ceiling stain for long in Bradenton. You notice a brown ring over the living room, then a drip starts during a storm, or the drywall begins to sag after an upstairs plumbing issue. At that point, ceiling leak repair and restoration in Bradenton stops being a simple patch job and becomes a time-sensitive damage-control problem.
What matters most in the first hours is doing the right things in the right order. Stop the source. Protect people and contents. Dry what’s hidden, not just what’s visible. In Florida’s humidity, the homeowners who get into trouble are often the ones who fix the appearance first and the moisture second.
That’s why ceiling leak work has to be approached as restoration, not just repair. If you’re dealing with an active leak or a fresh stain, this guide will help you sort out what to do now, what a professional should do next, and how to avoid paying twice for the same damage.
A Bradenton Homeowner’s Guide to Ceiling Water Damage
The call usually starts the same way. “It was just a spot yesterday.” By the time a homeowner reaches out, that spot has spread, the paint has bubbled, or water has started tracking along a seam and dripping somewhere that isn’t directly under the source.
That’s normal for ceiling leaks. Water moves sideways, follows framing, and settles in insulation long before the visible damage tells the full story. In Bradenton, storms, roof failures, plumbing leaks, and HVAC-related moisture can all show up in the ceiling first.
A lot of people assume the hard part is patching drywall. It usually isn’t. The hard part is figuring out whether the ceiling is only stained, or whether the cavity above it is still wet and unstable. That difference is what separates a quick repair from a real restoration project.
What homeowners get wrong first
The most common mistake is cosmetic urgency. People want the stain gone, the hole closed, and the room back to normal. If the leak source hasn’t been fully addressed, or if wet insulation and the backside of the drywall haven’t been dried, the repair often fails.
Practical rule: If the ceiling got wet, treat it like a moisture problem first and a finish problem second.
Another mistake is assuming the leak source is obvious. It might look like a roof issue, but water can migrate from plumbing lines, drain lines, or adjacent spaces. That’s one reason homeowners often need a full water damage cleanup process in Bradenton instead of a quick handyman patch.
What a sound response looks like
A proper response is calm and methodical:
- Protect the area below with containers, towels, and moved furniture.
- Watch for sagging drywall because a loaded ceiling can give way.
- Treat wet electrical conditions seriously if fixtures, fans, or recessed lights are nearby.
- Document what you see with photos before cleanup changes the scene.
The good news is that most ceiling leaks are manageable when handled early. The bad outcomes usually come from delay, incomplete drying, or closing up a cavity that still holds moisture.
Emergency Steps to Mitigate Ceiling Leak Damage
When a ceiling starts leaking, the first hour matters. You’re not trying to complete the repair yourself. You’re trying to slow the damage, reduce the cleanup, and keep everyone safe until a restoration crew can take over.
Local providers in the Bradenton area advertise 24/7 service and even one-hour response time, which reflects how urgent ceiling leaks can become when there’s a risk of collapse, electrical hazards, or mold growth, as noted by a Bradenton leak service describing emergency response expectations.
What to do right away
Use this checklist the way a project manager would walk you through it on the phone:
- Move contents out of the impact zone. Get furniture, rugs, electronics, and anything porous away from the drip path.
- Catch active water with buckets, totes, or pans. Put towels down only to control splash, not as the main containment plan.
- Look up at the ceiling shape. If drywall is bulging, bowing, or blistered, stay clear of the lowest point.
- Shut off the water supply if you suspect a plumbing line, supply line, or drain issue.
- Cut power to the affected area if water is near a light fixture, fan, smoke detector, or wiring path.
- Call for professional emergency help if the leak is active, the ceiling is sagging, or you can’t identify the source.
What not to do
Some homeowner actions make the restoration harder:
- Don’t patch over wet drywall. It traps moisture.
- Don’t run a ceiling fan under a compromised ceiling. Vibration can worsen separation.
- Don’t assume the drip point is the source. Water often travels.
- Don’t wait for the stain to dry on its own. In coastal humidity, hidden cavities stay wet longer than the face surface suggests.
If the room smells damp after the leak stops, there’s a good chance moisture is still present where you can’t see it.
When a temporary pressure relief makes sense
If a ceiling has ballooned badly with trapped water, controlled drainage can reduce the chance of a sudden collapse. But that’s only for situations where the area has been secured and electrical risk has been addressed first. If you’re not comfortable judging that safely, wait for a professional.
For active losses, a dedicated rapid water cleanup team in Bradenton can handle source tracing, containment, drying setup, and documentation in one response instead of turning it into three separate calls.
The Professional Restoration Process Explained
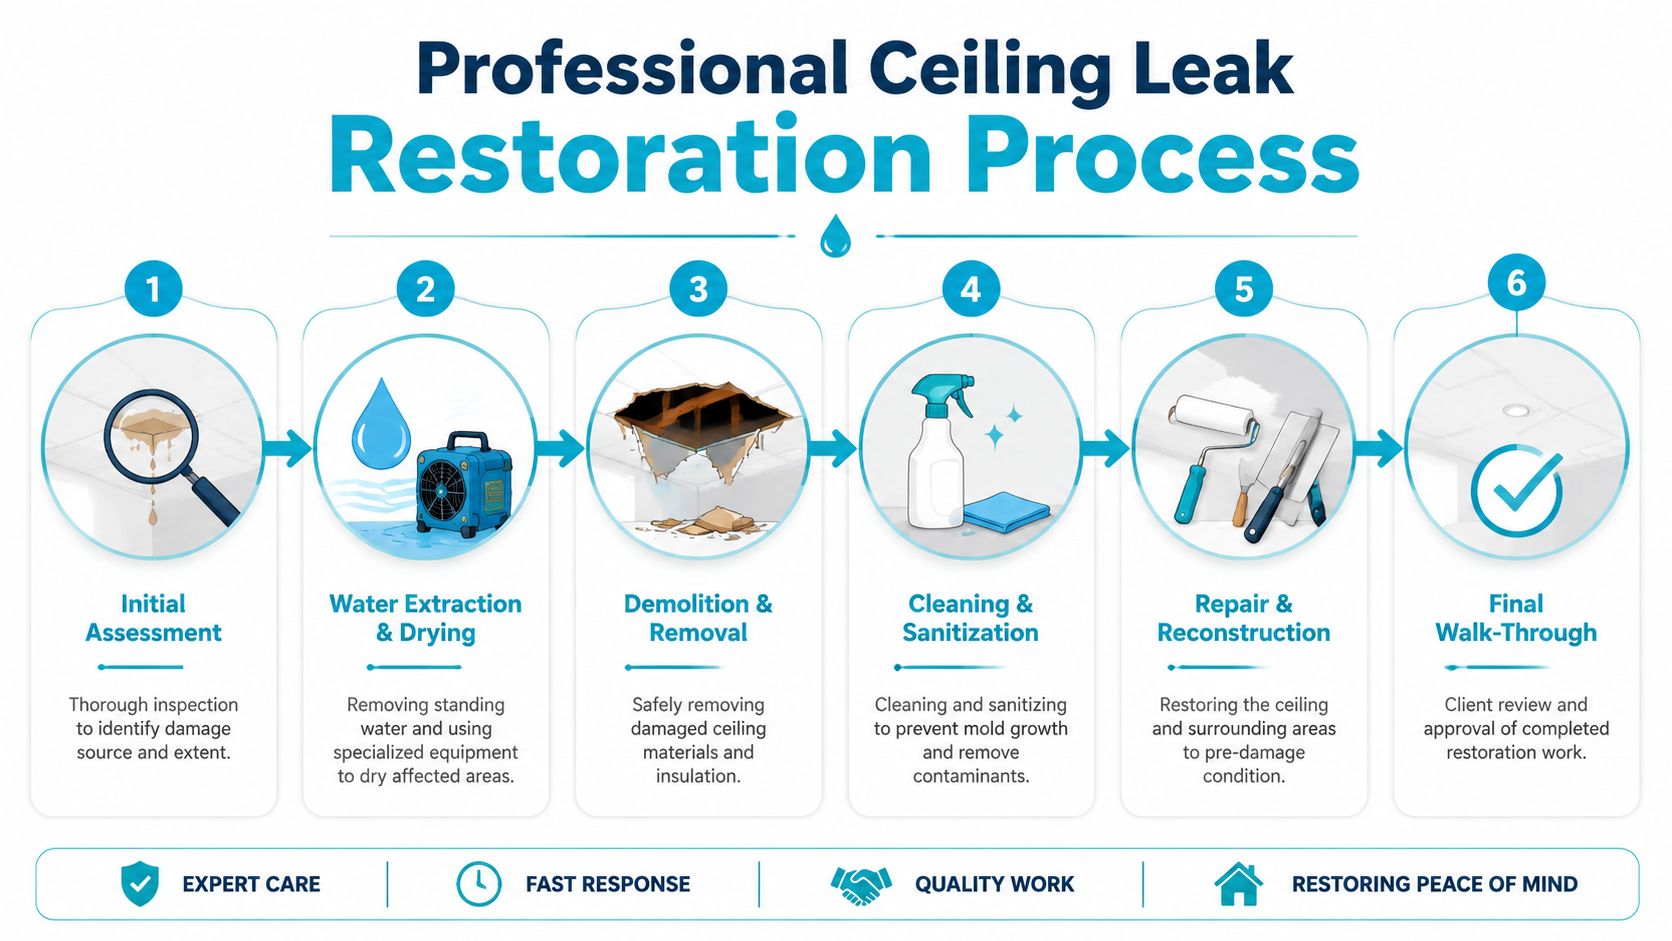
A proper ceiling leak job follows a sequence. If the order is wrong, the finish work won’t hold. That’s why professional ceiling leak repair and restoration in Bradenton starts with diagnosis, not demolition.
The correct workflow is to isolate the source, remove saturated materials, dry the cavity with fans and dehumidifiers, and verify complete dryness with a moisture meter before reinstalling any ceiling board. Skipping hidden-cavity drying is a common pitfall that traps water and raises mold risk, according to restoration guidance on roof leak ceiling repair.
Step one is finding the full footprint
Visible damage is only part of the map. A trained crew checks the stain pattern, the framing layout, insulation condition, and adjacent materials. Moisture meters help confirm whether the cavity is still wet even when the painted surface feels dry.
That matters because ceiling systems fail from the backside. Drywall paper weakens, fasteners lose hold, and insulation can hold moisture longer than homeowners expect.
Removal has to be selective, not careless
Once the source is controlled, damaged materials are removed where necessary. That can include softened drywall, wet insulation, and any finish layer that won’t recover cleanly.
The goal isn’t to tear out more than needed. It’s to remove what can’t dry properly or what would contaminate the rebuilt assembly if left in place.
A solid restoration workflow usually includes:
- Moisture mapping to define the affected area instead of guessing by stain size.
- Targeted demolition so crews open the cavity where wet material is present.
- Equipment setup with air movers and dehumidifiers placed for the assembly, not just the room.
- Cleaning and sanitization where water quality or prolonged wetness makes that necessary.
- Dryness verification before any board, tape, texture, or paint goes back.
Drying is the phase people underestimate
Shortcuts cause callbacks. The face of a ceiling can look fine while joist bays, insulation, and the backside of the board remain wet. In Bradenton’s climate, that hidden moisture doesn’t leave quickly without active drying.
Dry enough to touch is not dry enough to close.
This is also where one provider like AMPM Restoration’s water damage restoration services can be useful if you need emergency mitigation, structural drying, and rebuild coordination under one scope rather than separate vendors blaming each other.
Reconstruction only starts after measured dryness
Once the cavity is dry, rebuild work can begin. That includes replacing drywall, finishing seams, matching texture as closely as conditions allow, priming, and repainting. If framing, insulation, or adjacent trim were affected, those are addressed as part of the final scope.
Here’s the trade-off homeowners need to understand:
| Approach | What happens |
|---|---|
| Fast patch before drying | Lower upfront effort, higher chance of repeat staining, odor, joint failure, or mold concerns |
| Measured drying before rebuild | More disciplined process, better chance the repair lasts and documentation supports the file |
The cleanest-looking repair isn’t the best repair if the cavity behind it never reached verified dry conditions.
Understanding Costs and Timelines for Bradenton Ceiling Repairs
Most homeowners ask two fair questions right away. What’s this going to cost, and how long is my house going to be torn up?
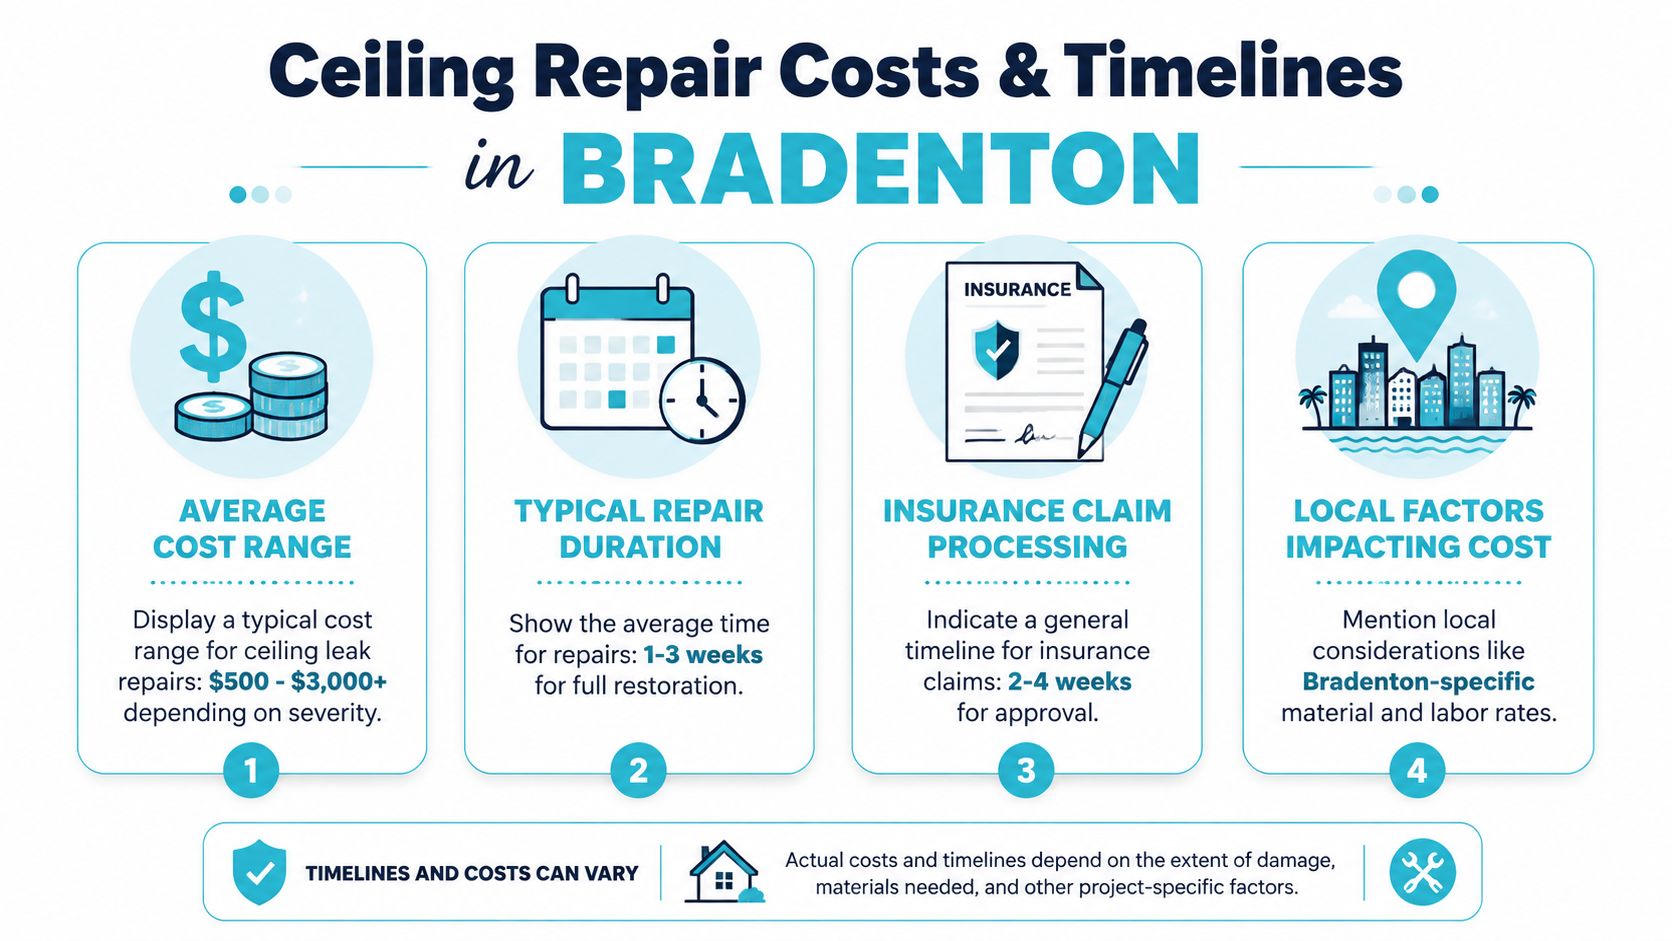
In Bradenton, the source repair and the ceiling restoration are often two separate cost drivers. One local roof-repair source places a typical roof repair at $500 to $1,500, while the same local market discussion notes an average ceiling repair cost of $800 with a wider $3,000 range depending on the extent of damage, as described in this Bradenton roof repair cost overview.
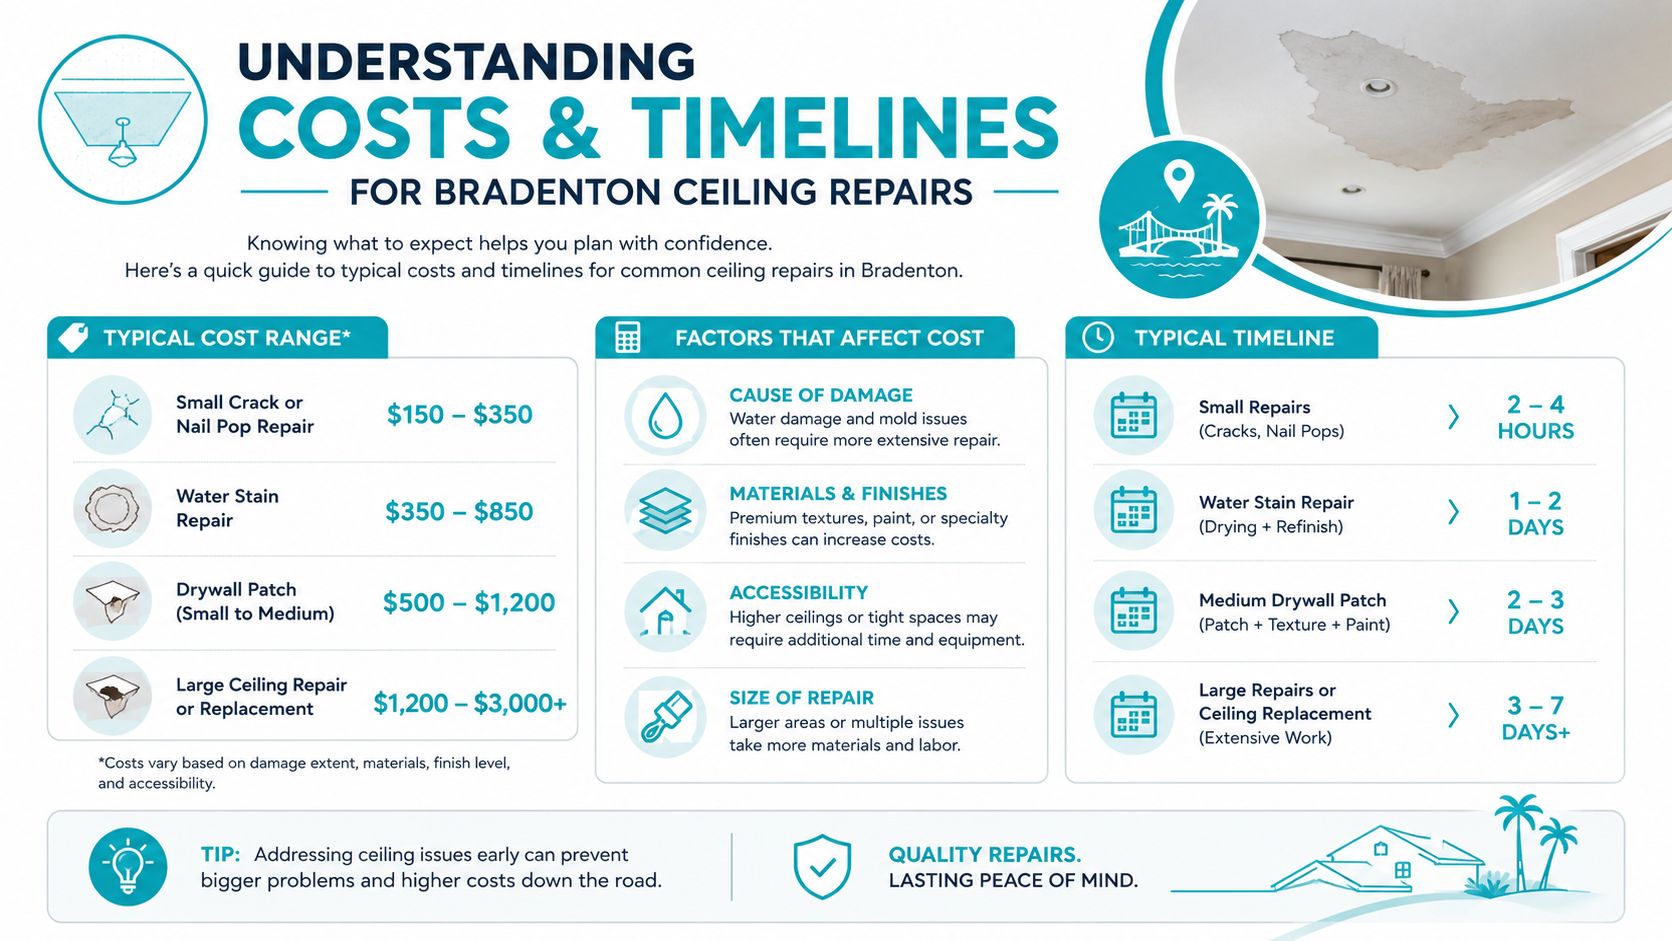
Why one ceiling stain can have very different prices
A small discoloration can be cheap if it is dry, isolated, and limited to finish work. It becomes a different job when the leak affected insulation, framing cavities, multiple rooms, or materials that need controlled drying and replacement.
The biggest pricing variables are usually:
- Cause of loss such as roof leak, plumbing line, or recurring moisture source
- Depth of saturation above the visible ceiling face
- Material layers involved including insulation and adjacent finishes
- Whether the issue stayed minor or sat long enough to become restoration work
That’s why online flat prices aren’t reliable. The visible damage rarely tells the whole story.
What timelines actually look like
A neutral industry guide estimates water removal usually takes 1 to 2 days, drying and dehumidification 3 to 7 days, and full repairs 1 to 3 weeks. The same guidance says minor leaks caught early can often be resolved in about 5 to 7 days total, while larger losses can take weeks, based on Home Depot’s water-damaged ceiling repair guidance.
That’s a useful planning benchmark, but not a promise. Humidity, access, material type, and how long the ceiling stayed wet all affect duration.
If you want a local breakdown of scope variables, this guide to the cost to repair a water-damaged ceiling in Florida is a good starting point before an on-site inspection.
Choosing a Contractor and Navigating Insurance
The wrong contractor can turn a manageable loss into a paperwork fight and a repair dispute. Ceiling leaks sit at the intersection of plumbing, roofing, drying, reconstruction, and insurance documentation. If the company only handles one slice of that chain, the homeowner often ends up coordinating the rest.

What to look for before you sign anything
A serious restoration contractor should be able to explain not just what they’ll repair, but how they’ll document the loss and prove the assembly was ready to close.
Use this screening list:
- Licensed and insured. You need basic legal and risk protections in place.
- IICRC-certified restoration training. Ceiling leaks aren’t just drywall repairs. They involve moisture management and material recovery standards.
- Emergency availability. Water damage doesn’t wait for office hours.
- Drying documentation. Ask whether they use moisture readings and job records.
- Rebuild capability or coordination. Emergency mitigation without follow-through creates delays and finger-pointing.
Ask one direct question: “How will you decide the cavity is dry enough to close?” If the answer is visual only, keep looking.
The insurance issue most homeowners miss
One of the biggest decision points is whether the problem is only cosmetic or whether it requires full water-damage restoration. In Florida’s high humidity, even a minor-looking leak can call for structural drying and mold inspection, which also makes professional documentation important if an insurance claim is involved.
That’s where contractors separate quickly. A painter may fix appearance. A restoration contractor documents cause, affected materials, drying steps, and rebuild scope in a way that supports a claim file.
How to make the claim process less painful
If there’s a possibility of coverage, do these things early:
- Photograph the damage before cleanup changes it
- Save invoices and service records from the plumber, roofer, or mitigation crew
- Write down when you first noticed the loss
- Ask for moisture and drying documentation
- Keep communication in one file so adjusters can follow the timeline
A contractor who understands claims can help you organize that package. If you’re sorting through carrier requirements, this overview on how to file an insurance claim for water damage gives a clear starting point.
Florida-Specific Leak Prevention Tips
Bradenton homes take a different kind of beating than homes in drier climates. Storm exposure, salt air, attic heat, and constant humidity all increase the odds that a small weakness turns into interior ceiling damage.
The best prevention plan is seasonal and local, not generic.
Focus on the common Florida failure points
Start with the areas that most often create ceiling damage:
- Roof penetrations and flashing after storms and before hurricane season
- Attic conditions where trapped heat and humidity can keep materials damp longer
- HVAC drain and condensate issues that show up as hallway or closet ceiling staining
- Older plumbing connections in coastal and older Bradenton housing stock
Homeowners often look only for active dripping. A better habit is checking for soft texture, faint staining, peeling paint near vents, and musty odor after heavy rain.
Prevention is partly about the building envelope
Windows, doors, roof transitions, and drainage details all affect how moisture enters and where it ends up. If you’re hardening your home before storm season, it also helps to review practical guidance on hurricane proof window treatments because wind-driven rain events rarely affect only one part of the envelope.
Coastal homes don’t just need strong materials. They need systems that work together when weather gets ugly.
One more reality matters in Florida. Minor leaks caught early can often be resolved in about 5 to 7 days, including drying and repairs, but humid coastal conditions can stretch the job when assemblies don’t dry fully the first time, as noted earlier in the Home Depot guidance. That’s why prevention isn’t only about avoiding leaks. It’s about spotting them before moisture sits long enough to become a bigger restoration project.
Frequently Asked Questions About Ceiling Leaks
Can I just paint over a ceiling water stain?
Not if the source and moisture issue haven’t been resolved. Paint may hide the discoloration briefly, but it won’t stop staining from returning if the cavity is still wet or the leak source remains active. Paint is a finish step, not a restoration step.
If my plumber fixed the leak, am I done?
Usually not. Fixing the pipe or drain stops the cause, but it doesn’t dry the ceiling assembly automatically. Wet drywall, insulation, and framing cavities can still need removal, drying, and verification before the area is closed back up.
How do I know if I need repair or full restoration?
Look at the sequence, not just the stain. If the leak was active, the drywall softened, insulation got wet, odor developed, or the ceiling sagged, you’re likely outside basic cosmetic repair and into mitigation plus rebuild territory.
Is ceiling leak damage dangerous?
It can be. The main concerns are ceiling collapse, wet electrical components, and hidden microbial growth if the area stays damp. Treat sagging sections and wet light fixtures as safety issues, not just maintenance issues.
What does IICRC-certified mean in practical terms?
It means the contractor has formal restoration training tied to industry standards for water damage work. For homeowners, that usually translates into better process discipline, especially around moisture measurement, drying setup, documentation, and decisions about what materials can stay or need removal.
Will insurance cover ceiling leak repair?
That depends on cause, policy language, and how the loss is documented. The smartest move is to document the damage immediately, keep all service records, and use a contractor who can show what was affected and what work was required. Even when coverage questions are unsettled, good documentation protects your position.
If you need ceiling leak repair and restoration in Bradenton, contact AMPM Restoration Services for fast help. Call 941-946-7807 for a free inspection and estimate. The team provides insurance claim assistance, financing options, and 24/7 emergency response for homes and properties across Bradenton and the Gulf Coast.