

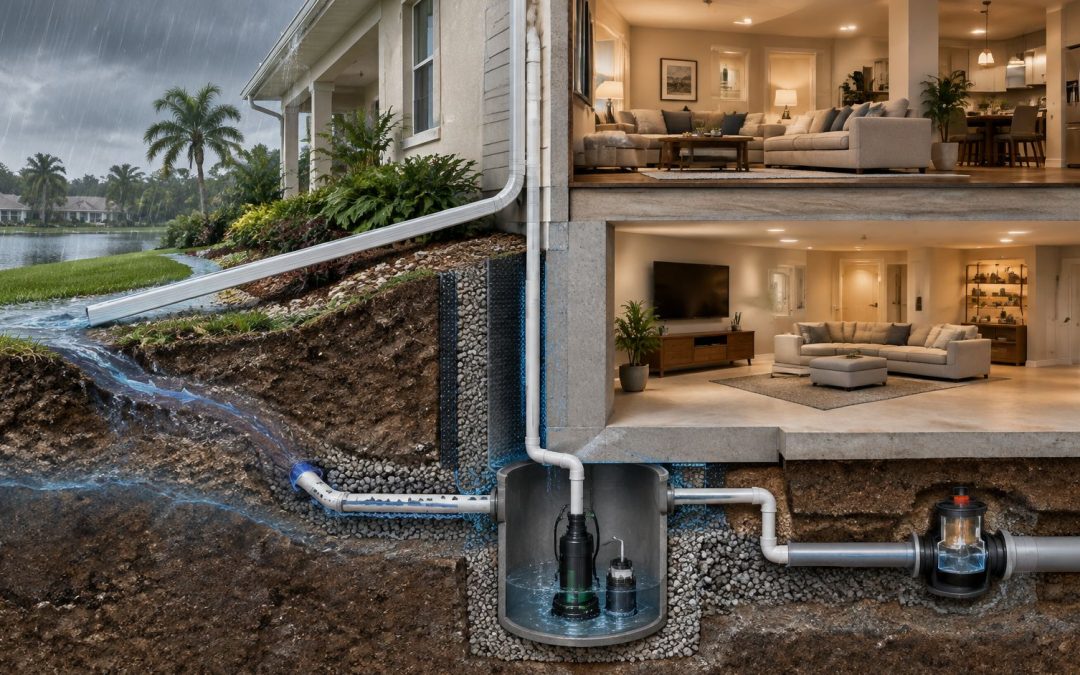
Water shows up along the back wall of a finished basement a few hours after a July thunderstorm in Bradenton. It's an inch deep, it smells like wet concrete, and it isn't anywhere near the floor drain. The first move is usually a towel and a shop vac. The second is a call about sealing the walls.
That second move is where money gets spent badly. Basement flood protection in a Florida home isn't one product brushed onto one wall. It's a set of controls, each matched to the path the water took to get inside, and the path decides everything: what to fix, what it costs, and whether the fix still holds in five years.
A sealed basement can still take on water through a sewer line, a floor drain, or a window well. A pump that ran all spring can go silent the moment the neighborhood loses power. What follows is how these failures play out on the Suncoast, which layer stops each one, and what to do in the first hours after water appears.
Match Each Protection to How Water Gets In
A Bradenton call comes in the day after a summer storm: water along the back wall of a finished basement. That detail alone doesn't name the cause. Water at the base of a wall can arrive from four directions, and two of those directions have nothing to do with rain landing on the yard.
Diagnosis comes before product. Each pathway needs its own control, and the control that fixes one pathway does nothing for another. The FEMA urban flooding guidance for homeowners and renters treats the system as layered and cause-specific: perimeter drainage and a sump pump handle groundwater and rainfall runoff, while sanitary-sewer surcharge needs a backwater valve. FEMA also notes that sump pumps may not keep up with large inflows and won't operate during a power outage unless battery storage or a generator carries them. Sizing, float-switch testing, and a discharge line aimed far enough from the foundation to prevent recirculation all belong in the specification, not the afterthought.
| Entry Path | Warning Sign | Matching Protection |
|---|---|---|
| Groundwater through walls | Damp wall joints, efflorescence after rain | Perimeter drain and exterior waterproofing membrane |
| Surface runoff | Water pooling against foundation after storms | Regrading, gutters and extended downspouts |
| Sewer surcharge | Water rising through floor drains or toilets | Backwater valve on the sewer lateral |
| Hydrostatic pressure | Water seeping through slab edges or floor cracks | Interior drain tile and sump pump |
| Power failure | Pump silent during a storm outage | Battery backup or generator for the pump |
| Window wells and vents | Water entering at grade-level openings | Well covers, sealed openings and overflow routes |
Three Questions That Narrow It Down
Where did the water appear, did it arrive with the rain or hours later, and is it rising from below the slab or running down a wall? Those answers point to the control before anyone quotes a repair.
- Wall joints that weep hours after rain stops mean groundwater is being pushed through the cove joint by a high water table. Slower arrival is the signature; the soil is still draining.
- Water that shows up during the storm and pools at the foundation is surface runoff, usually a grading or downspout problem wearing a foundation-shaped costume.
- Water rising through a floor drain or a toilet is sewer surcharge. FEMA guidance places the backwater valve on the sewer lateral outside the building or in an accessible basement-floor location, installed with a plumbing permit and professional sizing.
- Water at a window well or vent is a grade-level opening doing exactly what grade-level openings do once their drainage clogs.
A sump pump answers one question. A basement needs an answer for every pathway that can put water on the floor.
List the pathways your home has, then check which controls exist. The gaps are the to-do list. Homes that flood repeatedly usually carry one undiagnosed pathway while the owner keeps upgrading the system that already works. If your water arrives from the street and the yard rather than the slab, this storm flooding damage guide covers the exterior half of the same problem.
Build Drainage, Grading and Pump Defenses

A roof can shed water correctly while the yard still funnels it toward the basement. Build defenses in order: move surface water away from the house, collect water near the foundation, then pump it out if it reaches the pit. Each layer handles a different failure point.
Grade the soil to shed water away from the foundation. A common installer practice is to slope the ground downward for the first several feet from the wall. Keep mulch and loose topsoil from building up against the siding, where they can hold moisture. On the Suncoast, sandy fill can shift and settle, so check the slope after heavy rain. See how proper grading prevents water damage.
Move roof runoff away from the wall. Clear gutters and direct downspouts to a discharge point on a slope, not into a flower bed beside the foundation. A clogged gutter can send roof runoff down the wall and into the soil at its base.
Give perimeter drains a working outlet. Foundation drains collect water near the footing, but they cannot help if their outlet is blocked or has nowhere to discharge. HUD rehabilitation guidance says perimeter drains may be needed when site water or soil conditions warrant them, and recommends emergency surface overflow routes to keep water from reaching window wells or basement areaways (HUD guidance).
Set up the sump system as a complete unit. The pit needs a pump with a float switch, a check valve to limit backflow, and a discharge line that carries water away from the foundation. Pour water into the pit to check that the float activates the pump.
Plan for power loss before a storm. A primary pump cannot remove water if the power fails. Set up a battery backup or a generator suitable for the pump, then test the backup before storm season.
Use a backwater valve for sewer backup. A licensed plumber can install and size the valve on the sewer lateral, outside the building or in an accessible basement-floor location, with the required permit. It addresses water backing up through the sewer line, not runoff or groundwater.
Check before the wet season: Add water to the pit and confirm the pump starts. Check that discharge flows away from the foundation, and test the backup power source.
A pump that runs but sends water back toward the foundation has a discharge problem. Use this storm preparation checklist to make the seasonal inspection repeatable.
Basement Flood Protection Through Waterproofing or Wet Floodproofing
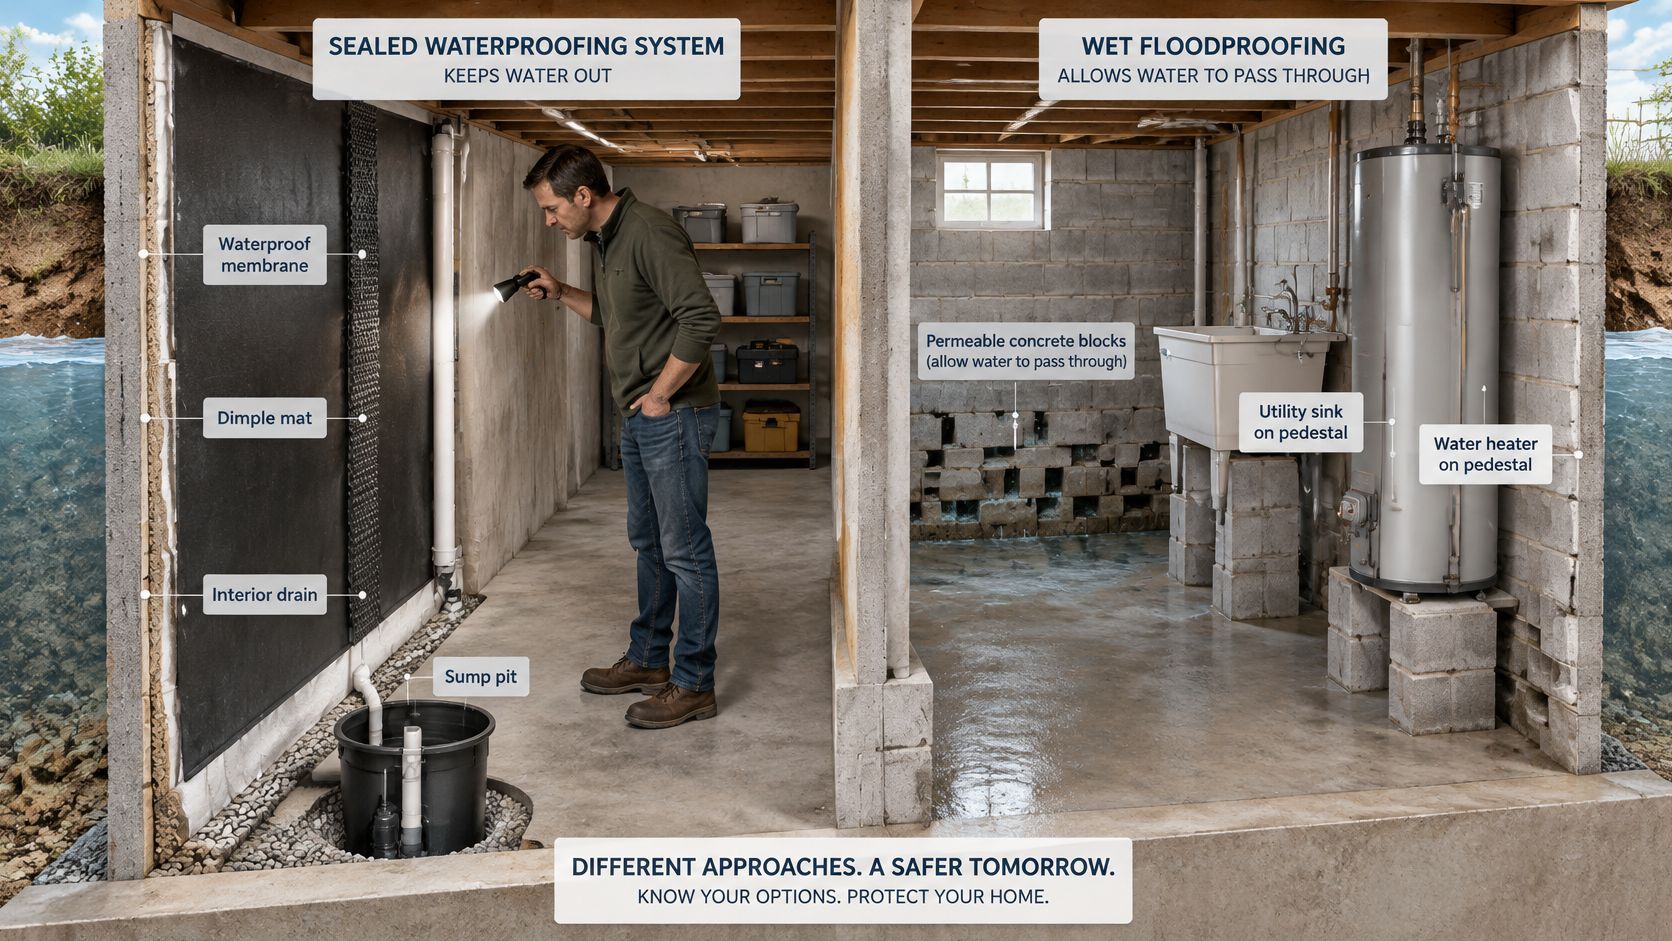
The assumption that a sealed basement is always the safest basement deserves a challenge. Sealing keeps water out right up until the pressure on the outside wins, and pressure always wins eventually. The other approach, wet floodproofing, lets water in on purpose so the walls see the same level on both sides.
| Approach | How It Works | Best Use |
|---|---|---|
| Waterproofing | Keeps water out with sealed walls, membranes and interior drains | Finished living areas exposed to seepage |
| Wet floodproofing | Lets water enter and exit through engineered openings to equalize pressure | Storage and non-living areas built with flood-resistant materials |
| Relocating utilities | Moves furnaces, water heaters and electrical panels above expected water | Every basement, as the first step |
Picture a Bradenton house with a finished den on one side and a storage room on the other. The den is dry only as long as its drywall and paint hold, which makes it a candidate for waterproofing, interior drainage, and a strict rule about what never gets stored on the floor. The storage room has a concrete floor, metal shelving, and nothing that ruins when it gets wet. That room can be wet floodproofed: engineered openings let water in and out, the slab and shelving shrug it off, and the cleanup is a hose and a fan.
Federal rules make the same point from the other direction. FEMA generally requires the lowest floor of a new residential building, basement included, to sit at or above the Base Flood Elevation, the elevation tied to the one-percent-annual-chance flood. A residential basement below that elevation requires a formal community exception and strict conditions: floodproofing must extend at least 1 foot above the BFE, or 2 feet when the elevation difference between the base flood and the 500-year flood exceeds 3 feet, and the basement floor cannot be more than 5 feet below the BFE (FEMA).
The rule of thumb I'd apply: seal the rooms people live in, floodproof the rooms that store things, and lift the mechanicals in every room.
Relocating a furnace, water heater, and electrical panel above expected water levels protects the equipment whether or not the walls ever leak, which is why it comes first in any budget. Be clear about what wet floodproofing does and doesn't do: it protects the structure and shortens the cleanup. It does not reduce the chance of flooding.
What Your Flood Policy Covers in a Basement
A flood policy is a separate contract from a homeowners policy, and it treats below-grade space as its own category with its own rules. The NFIP defines a basement as any part of a building with a floor below ground level on all sides, which pulls in certain sunken rooms and portions of split-level homes that the owner never called a basement.
| Item | Typical Treatment | Action Before a Loss |
|---|---|---|
| Furnace, water heater, pumps | Generally covered in functioning location | Raise above expected water level |
| Circuit-breaker box and utility connections | Generally covered in functioning location | Relocate higher on the wall |
| Air-conditioning equipment | Generally covered in functioning location | Elevate on a platform |
| Cleanup expenses | Generally covered | Keep receipts and photograph damage |
| Finished walls, floors and ceilings | Generally excluded | Choose flood-resistant materials |
| Personal property in a finished basement | Generally excluded | Store valuables on upper floors |
The covered side is narrower than most owners expect but more useful than they realize. Standard Flood Insurance Policy coverage generally includes cleanup expenses and building-service equipment such as furnaces, water heaters, washers and dryers, air-conditioning equipment, pumps, tanks, utility connections, and circuit-breaker boxes, provided they sit in their functioning location (FEMA).
The excluded side is where the heartbreak lives. Finished walls, floors, and ceilings in a basement are generally excluded, and so is personal property stored in a finished basement. Elevating a water heater helps the claim and the equipment at the same time. It does nothing for a carpeted floor that was never insurable in the first place, which is why material choice matters as much as coverage.
Four Steps to Take Before Storm Season
Read the declarations page, not the brochure, and find how the basement is classified.
Photograph the contents and finishes room by room, with the date visible, so a later claim has a baseline.
Ask the agent directly about finished-basement limits and whether any contents coverage applies below grade.
Keep receipts for cleanup, because cleanup is one of the categories that usually is covered.
When a claim does happen, we work closely with the insurance provider and supply the documentation the loss requires, which takes one burden off a homeowner already managing water. More detail on what adjusters look for sits in this guide to water damage insurance coverage.
How to Pump Out and Dry a Flooded Basement Safely
Safety first: do not enter a basement while standing water may be electrically energized, and do not start pumping until floodwaters no longer cover the surrounding ground.
Those two rules come straight from HUD's post-flood safety guidance, and both exist for the same reason: the water outside the wall holds the wall in. Removing the inside water while the ground is still saturated flips the pressure direction and can crack or bow a foundation that was fine an hour earlier (HUD). If you're unsure whether a circuit is live, this explanation of telling ground faults from short circuits helps you understand what an electrician is checking for.
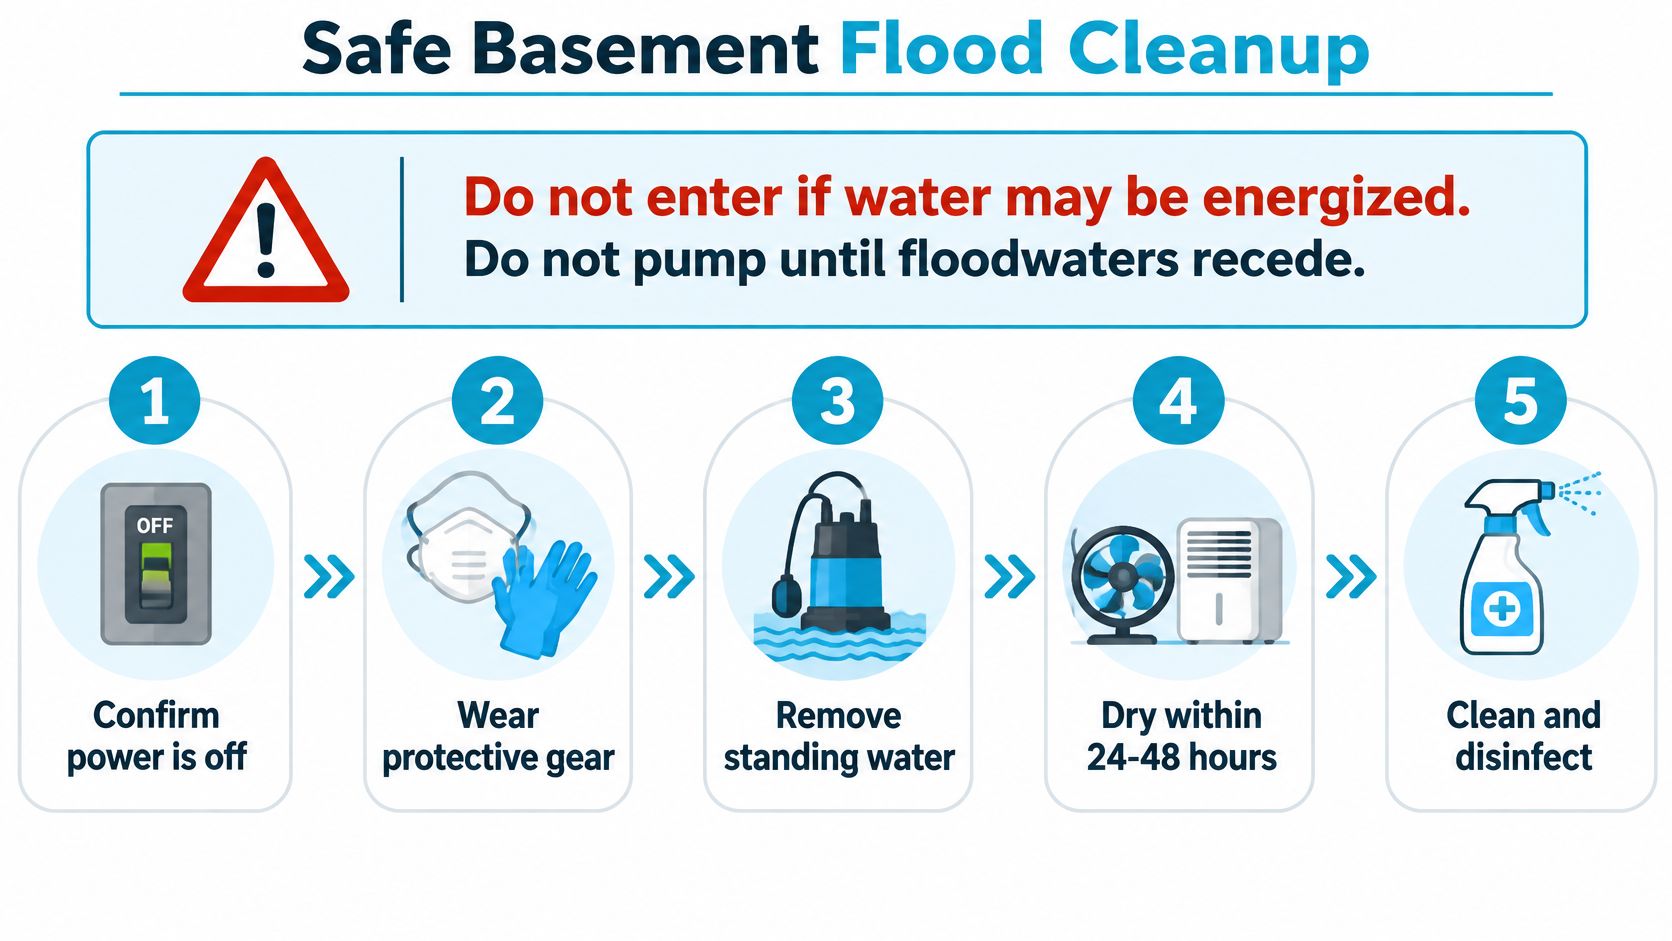
- Kill the power at the main and get an electrician to check the panel. Water and energized circuits don't share a room well, and the panel is often the first thing a flooded basement reaches.
- Wait for exterior water to drop below basement level. Pumping into a flooded yard just sends the water back through the wall.
- Lower the interior level 2 to 3 feet, then stop. HUD's guidance is to mark that level on the wall with a pencil or tape before you walk away.
- Wait overnight and check the mark. Water that has risen means groundwater pressure is still significant, and continued pumping can be unsafe for the structure.
- Repeat in 2 to 3 foot stages until the level holds steady between checks.
- Don't try to seal the walls or doors while water is still rising. HUD notes that dry flood resistance by sealing walls and closing openings such as doors, windows, sewer lines, and vents is not recommended when floodwaters are expected to rise more than 2 or 3 feet above ground level.
- Strip soaked carpet, pad, and drywall below the water line. Wet cellulose against concrete is a mold farm, and the baseboard hides it.
- Run dehumidifiers and air movers, then get moisture readings. A surface that feels dry to the hand usually isn't, and Florida humidity gives mold a head start.
Take the scenario of a Gulf Coast basement pumped dry in one afternoon by a homeowner with a rented pump. The floor looked great by dinner. By the next morning the block wall had a fresh horizontal crack at mid-height, because the saturated soil outside was still pushing and nothing inside was pushing back. That's the cost of doing it fast instead of in stages.
The professional version of the job follows four steps: assessment, water extraction with pumps and vacuums, drying and dehumidification with specialized equipment, and restoration and repair of damaged areas. The staged pumping rule fits inside step two, and the drying step is where moisture meters earn their keep. The full sequence behind those four steps is laid out in this walkthrough of drying out a flooded home step by step.
Answers to Common Basement Flood Questions
A basement can be sealed against groundwater and still flood through a sewer line. Match the response to the entry path, and check these failure points before the next storm.
How can I tell whether a backwater valve is stuck? Check its access cover and follow the manufacturer's inspection instructions. If the valve is hard to reach, damaged, or does not move freely, have a plumber inspect it. Never force the gate or open the line while sewage may be backing up.
What if the sump pump discharge is clogged or frozen? Clear debris from the outlet and confirm water can flow away from the foundation. If the line is frozen or blocked, the pump may run without lowering the pit level. Don't keep cycling it against a blocked discharge; arrange a safe way to restore drainage.
When is a flooded basement safe to enter? Stay out if water may have reached electrical outlets, appliances, or the electrical panel. Have the power shut off safely before entering, and avoid contact with floodwater that may contain sewage or other contaminants.
How should I store items that cannot get wet? Keep them off the floor and away from walls where water could enter. Choose storage that can be moved quickly, and avoid putting important belongings in a basement vulnerable to flooding.
Book a Free Inspection Before the Next Storm
Before storm season, check that the protections you chose match the ways water can enter your basement. Confirm the sump pump's backup power, make sure the backwater valve is installed on the sewer lateral, and review your flood policy's basement limits. Those measures address different risks, so one cannot substitute for another.
A free water damage inspection in Saint Petersburg or other listed Suncoast service area can help identify moisture and damage that are not obvious. AMPM Restoration offers a free inspection and estimate, and is available 24/7 for water damage emergencies. The company serves Bradenton, Sarasota, Palmetto, St. Petersburg, and the greater Tampa Bay area, and offers storm and flood damage restoration, water damage restoration, and mold removal and remediation. It also works with insurance providers on claims and offers flexible financing options.
Request a free inspection and estimate from AMPM Restoration Services before the next storm. An assessment can help you decide which repairs or protections to address first.