


Burst Pipe Repair in Tampa Bay
You hear the hiss before you see the water. Then a line of moisture creeps across the tile, the baseboard darkens, and you’re standing there in the middle of the night trying to decide whether this is a plumbing problem or a disaster.
That moment is exactly where burst pipe repair stops being a simple wrench-and-glue job. In Florida homes, the pipe break is only the first problem. The second problem is everything the water reaches after it escapes, especially drywall, insulation, cabinetry, and flooring that can hold moisture long after the visible puddle is gone.
What Happens When a Pipe Bursts in Your Florida Home
A burst pipe usually shows up as a small clue first, a sound inside the wall, a damp patch on drywall, or water appearing where it should never be. In practical terms, a burst pipe is a pressurized water line that has failed and opened enough to release water uncontrollably, which means the plumbing system has already lost normal control of flow.
That matters because the core problem is not the pipe alone. Once the line breaks, water starts moving into cavities, trim, flooring, and insulation, and the job can shift from burst pipe repair to extraction, drying, and removal of damaged materials if the leak keeps feeding hidden areas.
Why Florida homes feel this differently
Florida homes fail in a few familiar ways. Heat, humidity, older copper, scale buildup, and aging service lines all affect how a break shows up and how quickly it turns into a hidden moisture problem. In coastal and Gulf Coast properties, I have walked into homes where the visible leak looked minor while the wall cavity was already holding a heavy amount of moisture.
The pipe is only the source. The rest of the home becomes the problem once water gets past the finish materials and starts soaking the structure.
Practical rule: if water has reached framing, insulation, or the back side of drywall, the work is no longer just plumbing. It is about stopping the spread and protecting the structure before the wet materials hold moisture long enough to create a bigger loss.
That split is what homeowners need to understand. One part is the plumbing repair, and the other part is what the house does with the water after the break. In Florida, the second part often decides whether you are dealing with a small patch or a much larger mold and reconstruction job.
If you need a simple homeowner guide on the first decisions after the break, the steps at what to do after a pipe burst are a useful reference.
First 30 Minutes After a Burst Pipe
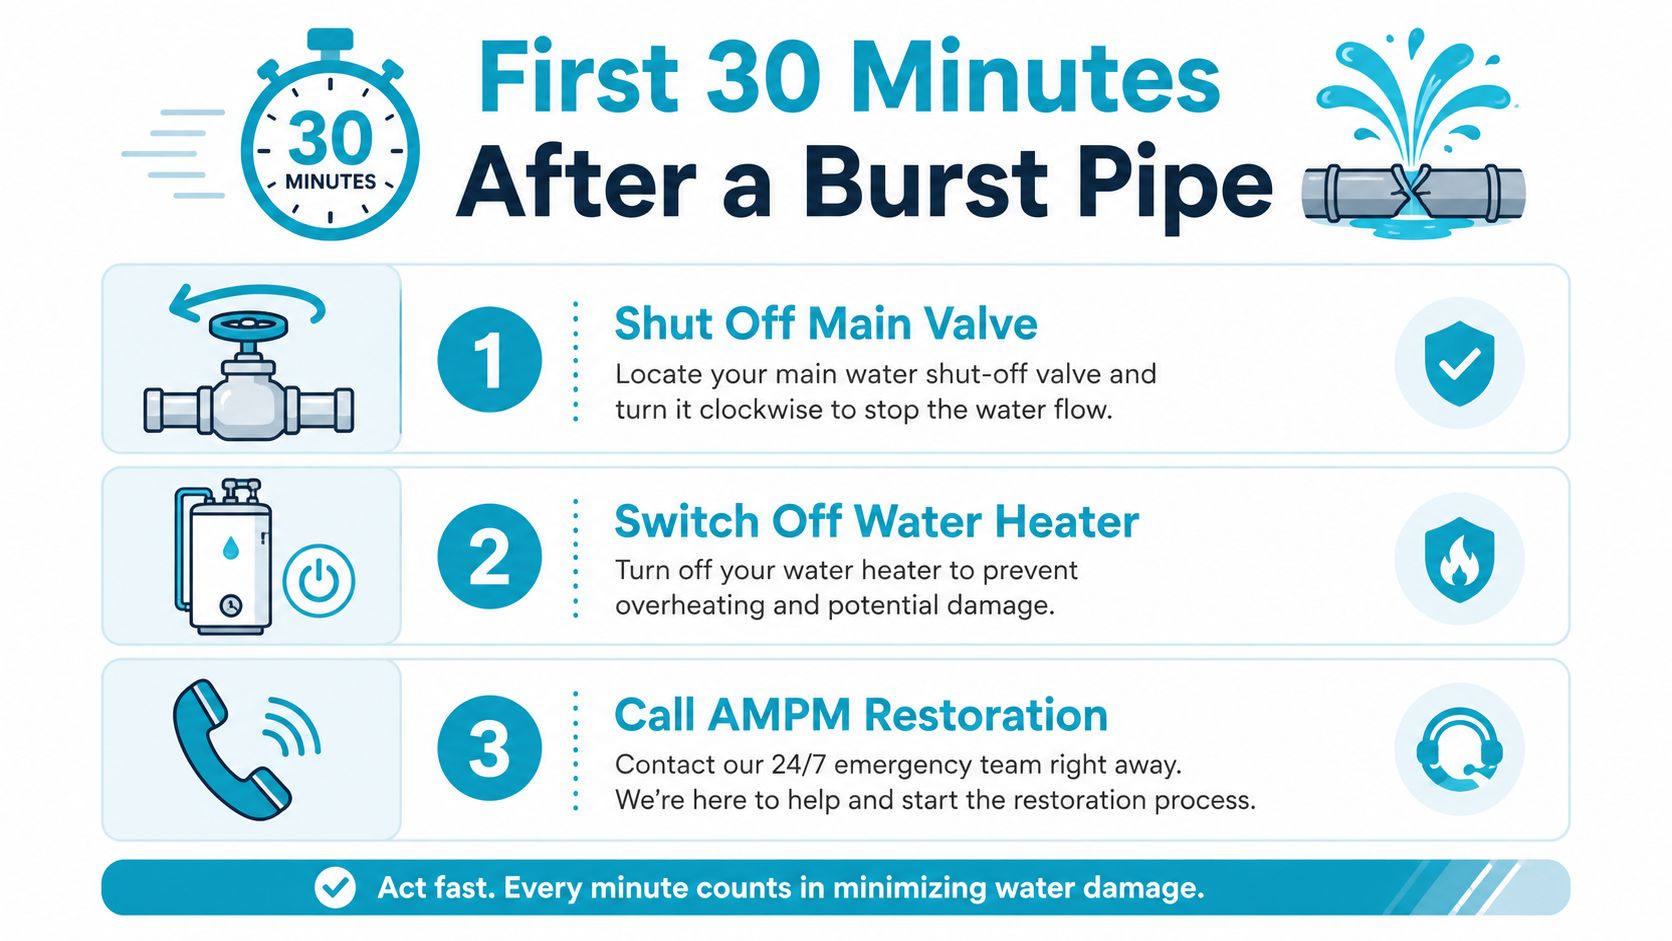
The first half hour is about control, not cleanup. A sound burst pipe repair response starts with stopping the water, making the area safe, and limiting how far moisture can travel before it gets into walls, cabinets, or flooring. If you can do those things safely, you reduce the chance that a plumbing problem turns into hidden damage inside the structure.
The order that matters
-
Shut off the main valve. Stop the water at the source first. If you do not know where the shutoff is, learn it now, before you ever need it. In a real emergency, every minute spent searching is water still moving through the home.
-
Switch off the water heater and power to wet areas. Water near outlets, appliances, or an electrical panel changes the situation from property damage to personal danger. If you would have to stand in water to reach a breaker, stop and get help instead of forcing it.
-
Document before cleanup. Take photos and video of the damaged room, the leak source, and anything the water touched. That record helps with the insurance claim later, and it gives the restoration crew a clearer picture of what needs removal and what can stay.
Move valuables onto dry surfaces if you can do it without crossing unsafe water. Open faucets to relieve leftover pressure after the main shutoff is closed. If the leak is active in a ceiling cavity, stay away from sagging drywall.
For a homeowner who wants a plain next-step list, our local guide to what to do after a pipe burst walks through the same emergency sequence in a cleaner format.
Shut the water off, make it safe, and document the scene before you touch the damage.
That sequence protects the home and the claim. It also gives you time for proper burst pipe repair and drying instead of a rushed patch that leaves moisture trapped inside the wall.
Locating the Burst and Making a Safe Temporary Fix
Once the water is off, the next job is finding the failure. Sometimes the pipe is obvious, especially when you see a split line or a wet cabinet under a sink. Other times the signs are indirect, like water staining, warped baseboards, hissing in a wall, or the meter moving even though no fixtures are running.
Where to look first
A hidden leak usually leaves a trail. Start with the room where the moisture showed up, then check the path above and below it. If the water is coming from a supply line in a wall, the clue is often the dampest point on the opposite side of the finished surface, not the place where the leak first started.
A temporary bypass only makes sense when the line is isolated and the area is safe to work in. Manufacturer guidance for a SharkBite Max temporary repair calls for cutting 5 inches in each direction from the burst site, removing at least 10 inches of pipe, and keeping 2 to 3 inches of space between existing fittings and the push-to-connect fitting so the seal can seat correctly (SharkBite). That’s useful when a homeowner needs time, not a full replacement.
When a patch is enough, and when it isn’t
A clamp, push-to-connect fitting, or similar bypass can buy time if the failure is isolated and the remaining pipe is sound. It’s not the answer when the line is brittle, corroded, or failing in more than one place. If you see repeated leaks or suspect the same branch has already been repaired before, stop treating it like a one-off break.
For homeowners who need diagnostic help, a free water leak detection visit can help identify whether the failure is local or part of a bigger line issue.
The safest temporary repair is the one that keeps water from spreading while you wait for the right crew. If the bypass feels improvised, the pipe probably needs more than a patch.
Why the Real Damage Starts After the Plumber Leaves
The plumber fixes the line, and a lot of people assume the crisis is over. That’s usually where the expensive part begins. Water doesn’t stay where you can see it, especially in a Florida home with drywall cavities, trim pockets, insulation, and humid indoor air that slows natural drying.
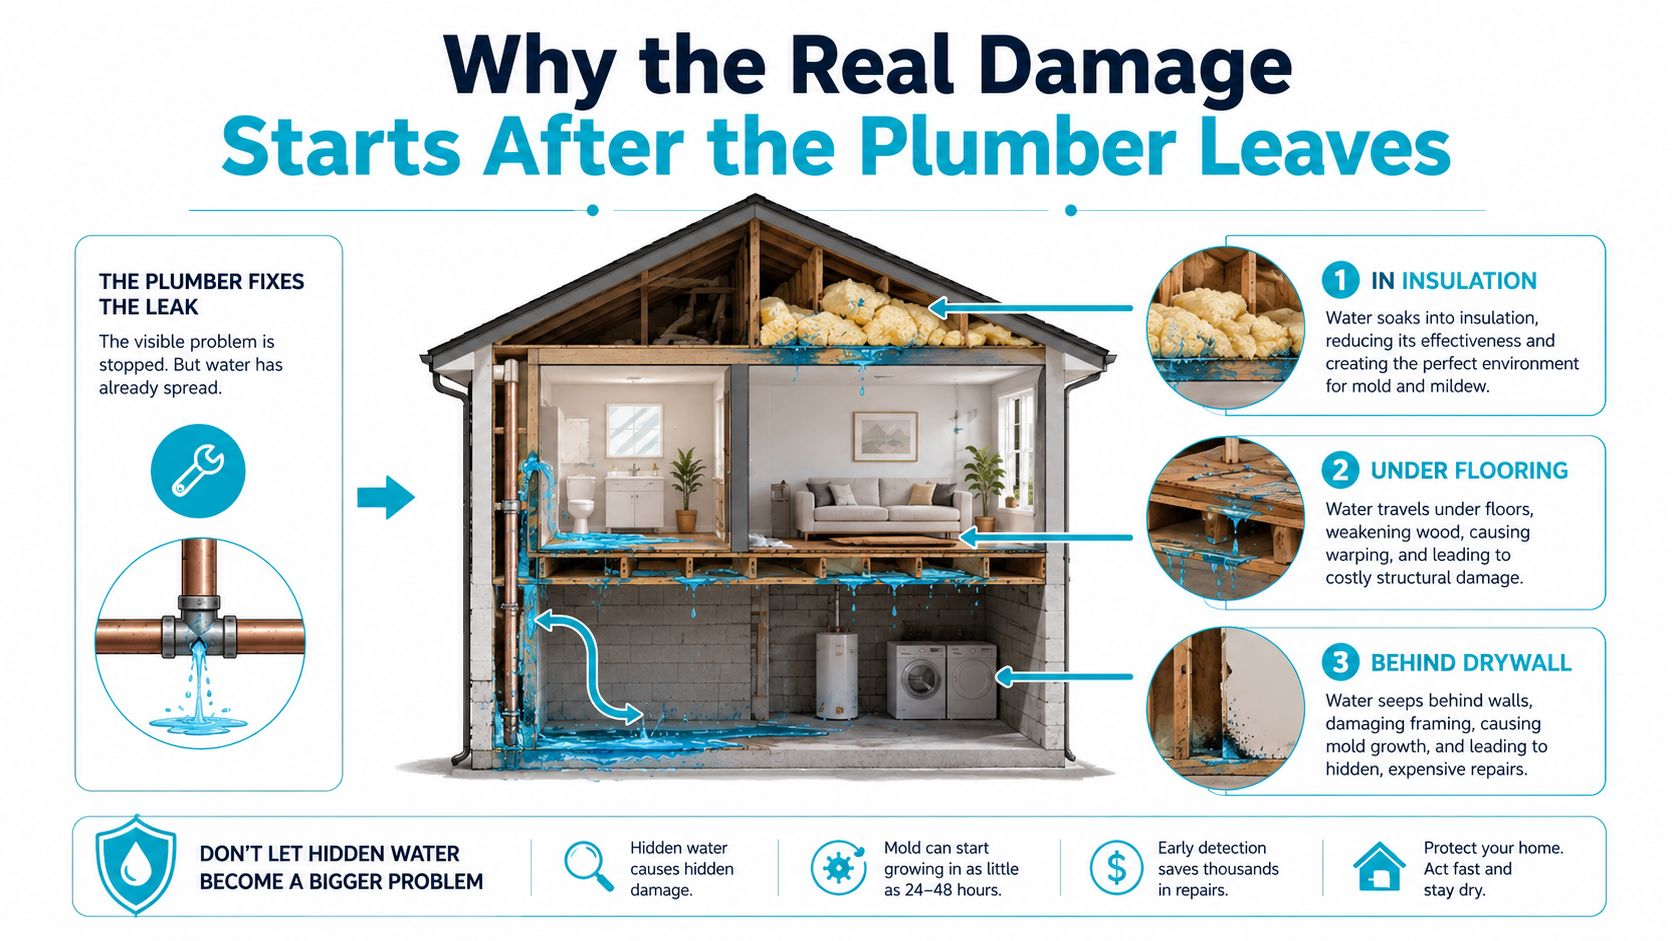
Hidden water moves fast in the wrong places
Moisture runs behind baseboards, under flooring, and into insulation long before the surface feels wet again. That’s why a room can look passable while the wall cavity is still holding water. A concrete repair standard notes that damaged surfaces should be cleaned and dried before repair, which is the same basic logic restoration crews use when they remove affected materials and dry the structure instead of sealing moisture inside (ACPA RCP guidance).
In Florida, that matters even more because humid indoor conditions make unfinished drying a poor bet. If drywall stays wet behind the paint, or insulation stays damp inside the wall, the home can move from a simple plumbing event to a mold problem very quickly.
What moisture mapping actually shows
A restoration crew uses moisture meters and thermal imaging to map where the water traveled. That tells the technician which materials can be dried in place and which ones need to be removed. Drywall, insulation, trim, and some flooring assemblies often need different treatment depending on how much water they absorbed and how long they stayed wet.
Homeowners often ask what should stay and what should go. The answer is based on material, saturation, and access, not guesswork. A wet surface that feels dry to the touch can still hide a saturated cavity behind it.
For a deeper look at timing, the guide on mold growth timeline after water damage is useful because it explains why the drying window matters so much in Florida. That’s the difference between a controlled mitigation job and a demolition-heavy claim.
Burst pipe repair ends when the pipe is fixed. Water-damage recovery starts there.
What Professional Restoration Looks Like From Start to Finish
A professional response should feel organized from the first truck pull-up. At the inspection stage, the crew should identify the source, assess the affected areas, and take moisture readings before anything gets torn out. That early map decides the rest of the job.
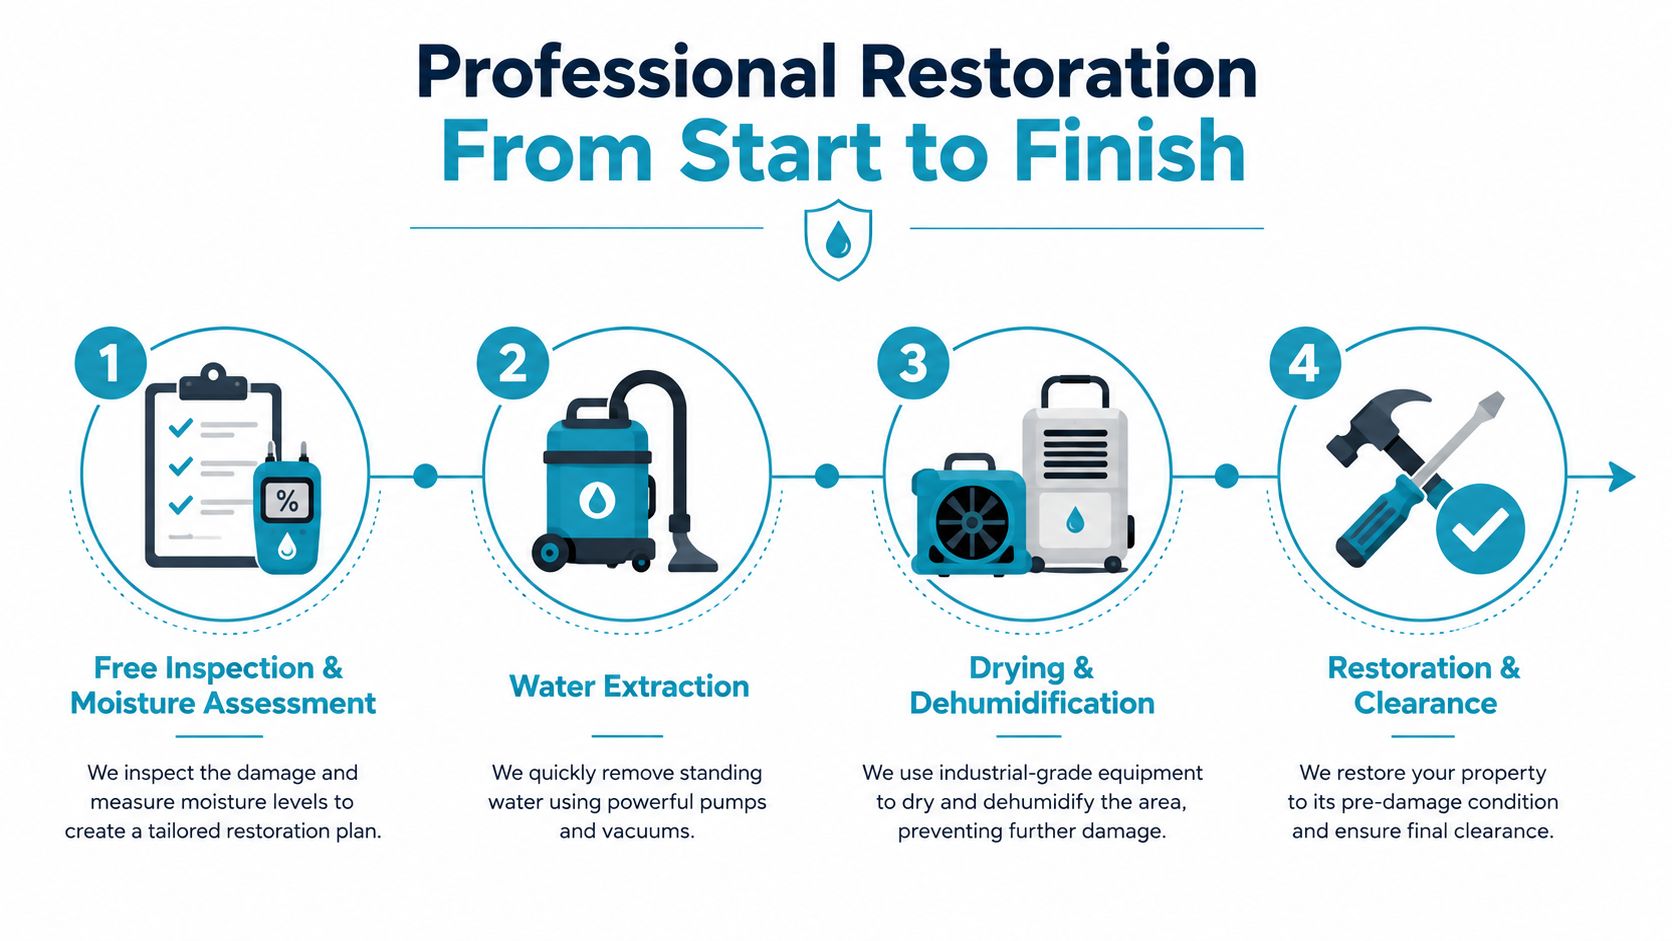
The sequence that keeps losses smaller
A proper project usually moves through four stages. First comes inspection and moisture assessment, where the crew measures the scope instead of guessing. Then comes water extraction with pumps or vacuums, followed by structural drying with air movers and dehumidifiers. The final stage is restoration, which brings back drywall, flooring, trim, and any removed finish materials.
That same logic is why what does a restoration company do is a practical question, not a marketing one. In a burst pipe event, restoration is the part of the work that prevents the plumbing fix from turning into a reconstruction job.
What good on-site work looks like
You should see documentation, containment, and equipment placement that matches the loss. A crew may remove wet materials, treat affected surfaces with antimicrobial products, and monitor drying progress until the structure is ready for rebuild. If mold is already present or likely to develop, the team should treat the impacted area before closing it back up.
AMPM Restoration Services is one option homeowners use for emergency mitigation, drying, sanitization, and repairs after a burst pipe. That kind of response is most valuable when water has already crossed into hidden spaces and the job needs both extraction and structural drying, not just plumbing.
If the contractor only talks about the pipe and never mentions the wall cavity, the floor assembly, or the dry-out plan, the home isn’t fully being protected.
The right team should also coordinate the claim paperwork while the loss is still fresh. That keeps the repair, dry-out, and rebuild tied together instead of turning into disconnected scopes.
Burst Pipe Repair Costs and Insurance Tips for Florida Homeowners
The plumbing bill is usually the smallest part of the event. Industry cost guides in 2026 put the average burst-pipe repair at about $234 to $771 nationally, while broader estimates often cite $400 to $2,000 for the plumber’s repair alone and $150 to $250 per linear foot for pipe replacement work (Thumbtack cost guide). Once extraction, drying, drywall, and flooring enter the picture, the total climbs because the pipe itself was never the whole loss.
Cost comparison by scenario
| Scenario | Typical Cost Range | What Drives the Cost |
|---|---|---|
| Simple accessible pipe repair | $234 to $771 | Pipe access, material type, and labor |
| Plumber repair only | $400 to $2,000 | Wall access, repair complexity, emergency timing |
| Pipe replacement work | $150 to $250 per linear foot | Length of line, access, and material |
| Full burst-pipe event | Varies widely | Water spread, drying, demolition, and rebuild |
The reason insurance matters is that burst pipe losses are often treated as sudden and accidental when the source is obvious and the response is fast. Documentation helps more than many realize. Save photos, the plumber's invoice, the mitigation report, and anything that shows when you shut the water off and when drying began.
For a broader claims playbook, insurance advice from Admiral's Yard is a useful reminder that insurers respond better to organized records and early mitigation than to after-the-fact explanations. That principle applies directly to burst pipe claims in the home.
If you're comparing options, an organized restoration team can help with the claim file, the mitigation scope, and the rebuild estimate. Our own water damage insurance claim tips page explains what to save and how to keep the paperwork clean.
Fast mitigation protects the structure, and clean documentation protects the claim.
That's the financial trade-off in burst pipe repair. A quick plumbing fix may stop the leak, but if water keeps sitting in the home, the downstream cost can rise fast.
Preventing the Next Burst Pipe in Suncoast Conditions
A lot of prevention advice is written for freezing winters. That's not the main Florida story. On the Suncoast, pipe failures are more often tied to pressure problems, corrosion, age, heat cycling, and small leaks that go unchecked until they become structural failures.
The pressure and corrosion checks that matter
Start with water pressure. If the home doesn't have a regulator, or if the existing one is failing, the plumbing system can take more stress than it should. Pressure spikes can make weak joints, older copper, and aging service lines fail at the worst possible time.
Hard water and mineral buildup also matter because scale narrows the effective passage inside a line and stresses fittings over time. Add attic heat, slab movement, and the occasional weather swing, and the pipe is working harder than a homeowner might assume.
Small habits that prevent bigger losses
- Watch the water bill closely. An unexplained jump can be the first clue that a line is leaking behind a wall or under a slab.
- Schedule annual plumbing inspections. A licensed plumber can spot corrosion, aging valves, and failing shutoffs before they split.
- Replace weak pressure parts early. Pressure regulators and relief components don't last forever, and failure often starts with the parts no one checks.
- Fix tiny leaks right away. A drip under a sink is cheap. A hidden leak under flooring is not.
- Check attic and cabinet piping. Heat cycling in exposed spaces stresses joints, especially in older homes.
For homeowners who want a second prevention checklist, how to avoid pipe bursts is a useful comparison point because it reinforces the same big ideas, regular inspection, insulation where needed, and early replacement of aging components.
In my experience, the homes that stay out of trouble are the ones with a maintenance habit, not the ones that wait for an emergency. A burst pipe usually starts as a small weakness long before it becomes a visible break.
If you're dealing with burst pipe repair right now, AMPM Restoration Services can help with extraction, drying, mold treatment, and rebuilding after the plumbing stop is done. Call 941-946-7807 for a free inspection and estimate, and ask about insurance claim assistance and financing options. If you want a fast, local crew on the Suncoast, visit AMPM Restoration Services and get the home moving back toward dry, safe condition today.