The Cost to Repair a Water-Damaged Ceiling in Florida
You notice a brown ring over the hallway after an afternoon storm. Two days later the paint starts to bubble, and the drywall feels soft when you press it. In Florida, that is rarely just a stain. On the Suncoast, moisture hangs in the air, attic spaces stay hot, and a small ceiling leak can turn into wet insulation, hidden cavity damage, and mold growth faster than many homeowners expect.
That is why the cost to repair a water-damaged ceiling in Florida has such a wide range. The ceiling repair itself is only one part of the bill. In many homes, there are three separate cost buckets: stopping the leak source, repairing or replacing the damaged ceiling materials, and addressing contamination if microbial growth is present. Homeowners often combine those into one number, then get blindsided when the estimate includes more than drywall and paint.
Around Bradenton, Sarasota, and Tampa Bay, pricing also shifts for local reasons. High humidity slows drying, storm-driven roof leaks can affect larger sections than the visible stain suggests, and texture matching on older Florida ceilings can add labor. If the ceiling cavity stayed wet long enough to support growth, the job may also require a separate mold remediation cost breakdown for Florida homeowners.
At AMPM, we tell people the same thing on inspection day. The stain you see is the symptom. The price depends on how long the area stayed wet, what materials were affected, whether the source has been fixed, and whether the damage is limited to a small patch or extends into insulation and framing. A small repair can stay relatively contained. A sagging ceiling after a roof leak or upstairs plumbing failure is a different project entirely.
Florida Water-Damaged Ceiling Repair Costs by Severity
A homeowner in Bradenton calls after a summer storm. There is a brown ring over the living room, the drywall feels a little soft, and everyone wants one number. In the field, that number depends on severity first.
For Florida homes, I break ceiling damage into three practical buckets: minor, moderate, and severe. That gives homeowners a more realistic starting point because the price changes fast once moisture gets past the paint layer and into insulation, framing, or multiple rooms. It also helps separate ceiling repair from the other costs that often get mixed into the same conversation, like fixing the roof or plumbing leak and dealing with microbial growth.
Minor damage
Minor damage usually means a small stain, light discoloration, or a localized wet spot where the drywall is still holding its shape. As noted earlier, published benchmarks put this kind of repair in the lower hundreds, and that tracks with what Florida homeowners often see when the problem is caught early.
A true minor repair often stays in the roughly $300 to $800 range.
That assumes the leak has already been stopped, the wet area is limited, and the crew can dry the cavity without finding larger hidden damage. The work usually includes opening a small section if needed, checking the insulation above, drying the area, replacing a patch of drywall, sealing the stain, matching texture, and repainting so the repair does not stand out.
On older Suncoast homes, texture matching can be the part that frustrates homeowners most. The stain may be small, but matching knockdown or an older sprayed finish overhead still takes skilled labor.
Moderate damage
Moderate damage is the range where bills start climbing. Common signs include soft drywall, bubbling texture, sagging in one section, a broader stained area, or insulation above the ceiling that got wet and needs to come out.
A moderate repair often falls around $800 to $2,500.
The higher cost comes from labor and scope. Ceiling work is slower than wall work because crews are protecting floors, working overhead, removing damaged material carefully, drying the cavity, and rebuilding the finish so the patch blends with the surrounding ceiling. In Sarasota and Tampa Bay homes, high indoor humidity can also slow drying enough to add equipment time or require a return visit before repairs can start.
If the ceiling feels soft to the touch or keeps staining after repainting, the job should be treated as an open, dry, and repair project. Cosmetic paint work alone usually does not hold up.
Moderate damage is also the point where homeowners need to ask whether they are dealing with simple water damage or contamination too. If there is musty odor, visible spotting, or long-term wetness above the ceiling, review these mold removal cost factors for Florida homes before approving the full scope.
Severe damage
Severe damage usually involves active dripping, major sagging, partial collapse risk, repeated wetting, or water that spread beyond the original room. After hurricanes, roof failures, or upstairs plumbing breaks, this category is common because the visible ceiling damage is only the bottom layer of a larger moisture problem.
Severe ceiling damage often starts around $2,500 and can reach $10,000 or more.
At that level, the invoice may include containment, demolition, drying equipment, insulation replacement, multiple drywall sections, texture work, stain-blocking primer, painting, and repairs to framing or adjacent materials if they stayed wet too long. If the source leak is still active, that repair is separate. If contamination is present, that is separate too.
This is also the category where safety matters. A bulging or sagging ceiling can hold a surprising amount of water, and the failure can happen without much warning.
Estimated Ceiling Water Damage Repair Costs in Florida 2026
| Damage Severity | Common Signs | Estimated Cost Range |
|---|---|---|
| Minor | Small stain, light discoloration, stable drywall | $300 to $800 |
| Moderate | Soft drywall, bubbling paint, sagging area, insulation affected | $800 to $2,500 |
| Severe | Large wet area, active leak, collapse risk, widespread saturation | $2,500 to $10,000 or more |
For homeowners in Bradenton, Sarasota, and Tampa Bay, the main point is simple. A stained ceiling can be a small patch job, or it can be the visible end of a much larger moisture event. AMPM inspects for the full scope first, then breaks the estimate into the parts that drive the bill so you can see what belongs to ceiling repair, what belongs to leak-source repair, and what belongs to remediation.
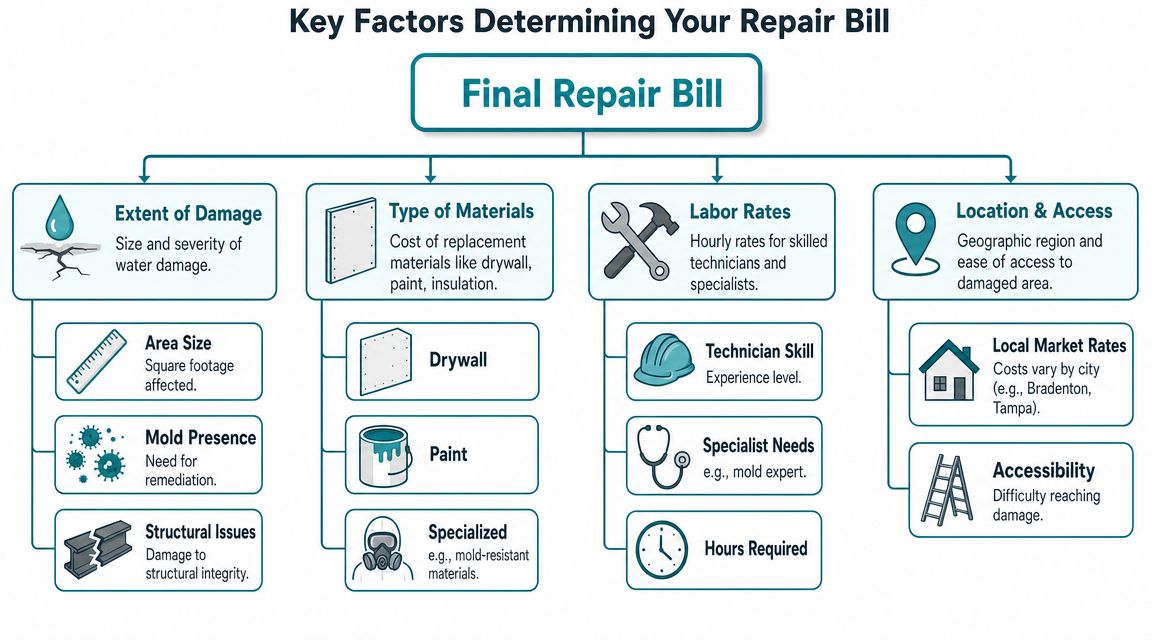
Key Factors That Determine Your Final Repair Bill
A ceiling stain is one of the most misleading things a homeowner can look at. Two spots can appear nearly identical from the room below, while one needs a small drywall repair and the other turns into drying, insulation replacement, and mold work above the ceiling line.
Ceiling repair is not the same as leak repair
This is the cost split that confuses Florida homeowners more than anything else. The ceiling repair covers the damaged drywall, texture, primer, paint, and any insulation or finish materials affected in that area. It does not automatically include the work needed to stop the leak itself.
If the moisture came from a roof issue, plumbing failure, AC drain backup, or an upstairs bathroom problem, that source repair is usually estimated by a different trade and billed separately. If the ceiling stayed wet long enough for microbial growth, remediation becomes its own scope as well.
That separation matters in Bradenton, Sarasota, and Tampa Bay because high humidity slows drying and gives hidden moisture more time to spread. A stain you noticed after a summer storm may involve roofing work, interior ceiling repair, and moisture cleanup in the cavity. Those are related problems, but they are not the same line item. If you want a clearer breakdown of what may be causing the damage, this guide on a water-damaged ceiling from a leak explains the common source issues.
What usually pushes the price higher
In the field, the final bill usually rises for practical reasons, not mystery charges. The biggest cost drivers are the conditions behind the ceiling and the amount of finish work needed to make the repair disappear.
Common examples include:
- Wider spread than the visible stain: Water often travels along drywall paper, joists, and insulation before it shows in the room below.
- Wet insulation above the ceiling: Once insulation is saturated, it usually has to be removed, dried around, and replaced.
- Texture matching: Knockdown, orange peel, skip trowel, and older hand textures add labor because patching is the easy part. Blending is harder.
- Difficult access: High ceilings, tight attic entry, crowded rooms, and multi-room containment all increase setup and labor time.
- Repeat exposure: A ceiling that has been wet more than once often has weaker drywall, stained framing, and a larger repair footprint.
- Mold or odor concerns: In Florida, trapped moisture can turn a simple repair into a controlled cleanup job.
I tell homeowners to pay close attention to what the estimate includes above the visible ceiling surface. That is where low bids often leave things out.
Labor is usually the real variable
The material cost on most ceiling jobs is not the part that surprises people. Drywall, tape, compound, insulation, primer, and paint are fairly predictable. Labor is where estimates spread apart, because ceiling work is slower than wall work, overhead finishing is more demanding, and matching an existing finish takes skill.
The ceiling type also affects repair difficulty:
| Ceiling Condition | Why It Changes Cost |
|---|---|
| Standard drywall ceiling | Usually the simplest to cut, replace, finish, and repaint |
| Textured ceiling | Matching the surrounding finish takes more labor |
| Older patched ceiling | Existing uneven surfaces make blending harder |
| Ceiling with hidden utilities | Plumbing, wiring, or HVAC components slow demolition and repair |
One more Florida-specific factor is timing. In the Suncoast region, delays after a storm or leak often increase the scope because moisture sits longer in a humid house. Fast action can keep the bill closer to a repair. Waiting can turn it into repair plus remediation.
When AMPM writes an estimate, the goal is to separate those costs clearly so you can see what belongs to ceiling repair, what belongs to source repair, and what belongs to mold or moisture remediation. That makes it easier to compare bids and easier to discuss with insurance if a claim is involved.
The Professional Ceiling Repair Process Step-by-Step
A Bradenton or Sarasota homeowner usually sees the stain first. The underlying work starts above that stain, where trapped moisture, wet insulation, and hidden microbial growth can turn a small ceiling repair into a larger restoration project if the area is closed up too soon.

Step 1 and Step 2
The first priority is making the area safe and stopping active water intrusion. That can mean shutting off a supply line, protecting floors and furniture, opening a light fixture area carefully, or bringing in the right trade if the source is a roof leak, AC issue, or plumbing failure.
Then the ceiling gets inspected from both sides whenever access allows. A proper inspection checks more than the visible bubble or stain. It also looks for saturated insulation, softened drywall, framing moisture, and signs that humidity has kept the cavity wet longer than the homeowner realized. For local warning signs and what to do first, see this guide on a water-damaged ceiling from a leak.
Step 3 and Step 4
Once the leak is under control, the next decision is whether the ceiling can be dried in place or needs selective demolition. In Florida, that choice matters. High indoor humidity after storms and summer rains often keeps moisture in the cavity even after the drip stops.
If drywall is sagging, crumbling, or has lost its shape, crews cut out the damaged section instead of trying to save it. If insulation is wet, it usually comes out too. Drying equipment then runs long enough to get the cavity dry before any rebuild starts. On some jobs, antimicrobial treatment is part of the scope. On others, mold remediation is a separate line item, which is one reason homeowners need estimates that clearly separate ceiling repair from contamination cleanup.
At this stage, a solid crew will usually:
- Remove unsalvageable drywall and other affected materials
- Expose the cavity enough to verify drying
- Dry framing and surrounding materials with air movers and dehumidifiers
- Recheck moisture before closing the ceiling
- Document anything that changes the repair scope
Skipping those steps is how stains come back and patches fail.
Step 5 and Step 6
Rebuild starts after moisture readings show the area is ready to close. New drywall is installed, joints are taped and finished, texture is matched as closely as the existing ceiling allows, and the repaired area is sealed with primer before paint. Older homes in Tampa Bay and the Suncoast often take more finish work because previous patches, texture changes, and paint fade make the blend harder.
The final walkthrough should answer three plain questions. What caused the damage. What got removed and replaced. What still needs to be handled by another trade, insurer, or remediation crew. AMPM documents that separation clearly because homeowners often assume the leak repair, ceiling repair, and mold work are one price when they are usually three different scopes.
Navigating Homeowners Insurance for Water Damage Claims
Insurance questions usually start before the ceiling dries. That makes sense. People want to know whether they should file, what to photograph, and whether the adjuster will view it as a sudden loss or a maintenance problem.

What carriers usually want to see
For a ceiling water damage claim, documentation matters almost as much as the repair itself. Carriers typically want a clear timeline, photos of the damage, notes on the suspected source, and records showing that you acted promptly to prevent further damage.
That’s why professional mitigation records help. Moisture readings, demolition photos, drying logs, and repair scopes give the adjuster something concrete to review. Without that paper trail, a homeowner can end up arguing over whether the damage was sudden, ongoing, or worsened by delay.
Where homeowners get confused
The largest point of confusion is scope. A policy may treat the resulting ceiling damage differently from the failed plumbing part or another original cause. That’s one reason claim conversations become frustrating. A homeowner sees one event. The carrier often sees multiple categories of loss.
This practical guide on how to file an insurance claim for water damage can help you organize photos, notes, and communication before the claim process gets messy.
What helps your claim go more smoothly
- Take photos early: Capture the stain, active dripping, damaged contents, and any visible source clues.
- Prevent additional damage: Move furniture, catch drips safely, and don’t leave active water unchecked.
- Keep every invoice and report: Emergency mitigation paperwork often becomes part of the claim file.
- Ask for line-item clarity: You want to know what portion applies to mitigation, rebuild, source repair, and any separate remediation work.
A contractor can’t rewrite your policy, but good documentation can keep the claim centered on facts instead of assumptions.
Local Repair Estimates for Bradenton, Sarasota, and Tampa Bay
Suncoast homeowners don’t deal with ceiling leaks in a vacuum. Salt air, wind-driven rain, aging roofs, busy AC systems, and long periods of humidity all affect how ceiling damage behaves once water gets in.
What this looks like in real homes
In a Bradenton condo, a small AC line issue may show up as a contained ceiling stain near a hallway or closet. If the drywall is still solid and the source was caught quickly, the repair often stays closer to the lower end of the ranges already covered.
In a Sarasota single-family home, roof-related intrusion after a storm often spreads wider than expected. By the time staining appears in the living room ceiling, the insulation above may already be wet, and texture matching becomes part of the finish work. That pushes the job into a broader repair scope.
A Tampa Bay or St. Petersburg property with an upstairs plumbing leak often creates a different problem. Water can move through subfloor penetrations, light fixtures, and ceiling seams, so the visible stain below may not represent the full path of travel.
Why local response matters
A local team understands the practical issues that shape these jobs:
- Humidity control: Drying strategy matters more when ambient moisture stays high.
- Construction style: Older plaster-adjacent finishes, popcorn textures, and layered repairs require judgment, not just patchwork.
- Storm exposure: Wind-driven intrusion behaves differently from a small interior plumbing leak.
- Insurance coordination: Local documentation habits matter when a homeowner is trying to move a claim forward without delays.
For homeowners in Manatee County, this page on water damage cleanup in Bradenton, FL gives a good picture of the local emergency response side of the work.
If the ceiling is sagging, dripping, or cracking around the wet area, don’t wait for it to “dry on its own.” Ceiling material can fail without much warning once it’s saturated.
The cost to repair a water-damaged ceiling in Florida always comes back to the same core questions. How big is the affected area, how wet did the assembly get, and was the source stopped fast enough? Those answers matter far more than the size of the stain alone.
Your Top Questions About Ceiling Water Damage Answered
Can I repair a water-damaged ceiling myself
If the issue is only old discoloration and you have already confirmed the area is completely dry, a repaint may be possible. But if the drywall is soft, sagging, stained repeatedly, or there’s any chance the cavity is still wet, DIY repair usually covers the symptom and misses the problem. That’s where homeowners end up repainting the same spot again.
Is a stained ceiling always a sign of active water damage
Not always. A stain can be leftover evidence from a past leak. The problem is that you can’t safely assume that without checking the source and the material condition. If the stain grows, darkens, or the paint starts bubbling, treat it as active until proven otherwise.
How dangerous is it to leave ceiling water damage alone
The main risks are material failure, hidden mold growth, and a larger repair area later. Wet drywall loses strength. In some homes, the ceiling stays intact longer than expected, then suddenly cracks or drops a section once enough moisture accumulates.
What should I do first when I notice water damage overhead
Start with safety. Move valuables, place a container under active drips if you can do it safely, and avoid standing directly under a sagging area. Then work on identifying whether the source is plumbing, roof-related, or HVAC-related. If you want a broader primer on how mitigation and restoration fit together, this comprehensive water damage overview is a useful outside resource.
How long does ceiling water damage repair take
That depends on whether the job is only surface repair or a full dry-out and rebuild. The visible patching is often the shortest part of the project. Drying, verification, scheduling related trades, and matching finishes usually determine the timeline. A contractor should explain the sequence clearly before work starts so you know what is mitigation and what is reconstruction.
What questions should I ask before hiring someone
Ask these before approving any estimate:
- What caused the damage: If they can’t discuss likely source pathways, they may be pricing only the patch.
- What materials will be removed: You want to know whether wet insulation or compromised drywall is included.
- How will they confirm dryness: A real repair should include a moisture-check process.
- Will they match texture and paint: Finish quality is a major part of ceiling work.
- What is excluded: Source repair, specialty trades, and separate remediation should be listed clearly.
If you want more plain-language answers on emergency response and restoration concerns, review these water damage frequently asked questions.
If you need help understanding the cost to repair a water-damaged ceiling in Florida, contact AMPM Restoration Services for a free inspection and estimate. We serve Bradenton, Sarasota, Tampa Bay, Saint Petersburg, Lakewood Ranch, and surrounding Gulf Coast communities with 24/7 emergency response, insurance claim assistance, and financing options. Call 941-946-7807 to get your ceiling inspected before a small leak turns into a much bigger repair.