

You notice a few pink specks along the grout, then a black line beneath the silicone. You scrub until the shower looks clean, leave the fan running briefly, and expect the problem to stay gone. In a Florida bathroom, that often isn't enough. Warm, damp surfaces can hold moisture after the room appears dry, allowing mold and mildew to return.
To remove mold and mildew from a shower, treat the job as moisture control first and cleaning second. The right method depends on whether the growth sits on tile, grout, glass, caulk, stone, or fabric. Surface cleaning can solve a small, isolated problem, but recurring staining, persistent odor, and damp building materials call for a different response.
Why Shower Mold Keeps Coming Back in Florida Homes
A Sarasota homeowner may scrub pink and black speckles from the grout every Saturday and still see them bloom again within days. The problem isn't necessarily poor cleaning. Gulf Coast bathrooms receive repeated moisture from showers, humid outdoor air, wet towels, and condensation. If the room can't release that moisture, the shower stays biologically favorable long after the water disappears from the floor.
The Florida humidity and mold connection matters because mold doesn't need standing water. Cement grout, aging latex caulk, unsealed stone, soap film, and dust can retain enough dampness to support growth. A surface may look bright after scrubbing while moisture remains inside pores, joints, or the back edge of a caulk bead.
The EPA identifies moisture control as the central defense against mold and recommends drying wet areas and materials within 24 to 48 hours, because mold can begin growing when wet conditions persist beyond that period (EPA mold and moisture guidance). Showers add moisture to indoor air, so recurring growth usually points to inadequate drying, weak ventilation, or a leak rather than a shortage of cleaning chemicals.
The surface is often the real problem
Tile usually gives you a cleanable, nonporous face. Grout behaves differently. Its texture catches organic residue and holds water, while cracked or separated caulk can allow moisture behind the joint.
A homeowner who keeps spraying the same darkened bead may be cleaning the exposed surface while leaving contaminated or deteriorated material underneath. Once silicone or caulk has cracked, peeled, or blackened through its depth, replacement is generally more reliable than repeated treatment.
Practical rule: If the stain returns after the surface has been cleaned and thoroughly dried, stop asking which spray to use and start asking where the moisture is staying.
Start with the water source, then improve airflow and drying. After that, choose a cleaner for the specific material. That moisture-first sequence is what separates a temporary cosmetic improvement from a durable attempt to remove mold and mildew from a shower.
Safety Gear and Setup Before You Scrub
Mold cleanup starts with protecting your breathing zone and your eyes. Use an N95 or P100 respirator, not a loose dust mask, along with nitrile gloves, splash goggles, long sleeves, and clothing you can wash separately. Mold debris can become airborne during brushing, while bleach, peroxide, and other cleaners can irritate the lungs and eyes.
People with asthma, allergies, immune compromise, or unusual symptoms should avoid being present during cleanup. The long-term breathing risks associated with mold exposure deserve serious attention, especially when a bathroom has a persistent odor or visible growth beyond a small surface patch. NIEHS lists possible effects including cough, eye irritation, nasal and sinus congestion, skin rash, sore throat, and worsening asthma (NIEHS mold health information).
Set up airflow before applying chemicals
Open the bathroom window if outdoor conditions permit, turn the exhaust fan on high, and position a box fan to push air out through the doorway. If the bathroom has an HVAC return, close or cover it temporarily so disturbed particles aren't pulled into the home's air system. Keep the shower door closed while the product works, but don't create a sealed room without an exhaust path.
Gather everything before starting:
- Respirator and gloves: Put them on before moving or brushing contaminated material.
- Splash goggles and old clothing: Protect exposed skin and eyes from spray and runoff.
- Stiff nylon and grout brushes: Use firm agitation without metal bristles that can scratch finishes.
- Spray bottles and microfiber cloths: Label bottles and keep clean cloths separate from contaminated ones.
- Stiff squeegee: Remove water from glass and tile during the final drying stage.
Never mix bleach with ammonia or another cleaner. The CDC permits a bleach option for hard surfaces at no more than 1 cup of household bleach per 1 gallon of water, and the CDC and EPA cleanup guidance emphasizes cleaning and complete drying rather than careless chemical use. Confirm that any GFCI outlet is dry before plugging in a fan, and keep children and pets out of the bathroom during treatment and while surfaces dry.
Matching the Right Cleaner to Each Shower Surface
A cleaner that is safe for ceramic tile can damage polished stone, weaken caulk, or cloud a glass door. Choose the product by surface, test it in a hidden spot, follow the label, and keep airflow moving during contact time. In Florida's Gulf Coast humidity, the cleaner only handles surface growth. Moisture control determines whether the problem returns.
For sound, hard surfaces, detergent and water or soap and water are the starting point. Scrub visible growth, rinse without flooding surrounding joints, and dry the area completely. The bleach option applies only to hard surfaces and must not exceed 1 cup of household bleach per 1 gallon of water, as outlined in the CDC and EPA bleach guidance. Never combine bleach with another cleaner.
Use the material as your decision guide
Ceramic and porcelain tile generally tolerate detergent, 3 percent hydrogen peroxide, or properly diluted bleach. Cement grout holds residue in its pores, so it may need repeated, controlled cleaning rather than heavier scrubbing. An oxygen bleach paste can lift discoloration, while hydrogen peroxide may suit colorfast grout after a test spot.
Natural stone needs a narrower product choice. Marble, travertine, and slate can react to acidic products and harsh chemistry. Use a pH-neutral stone cleaner or tested hydrogen peroxide. Keep vinegar and bleach away from finishes that could etch, dull, or discolor.
Caulk marks the boundary between cleaning and removal. Light surface residue can be cleaned, but a bead that is cracked, peeling, separated, or stained through its body should be removed. Clean and dry the joint before applying an appropriate bathroom-grade replacement. New caulk over trapped moisture only seals the problem in place.
| Shower Surface | Recommended Cleaner | Never Use | Typical Contact Time |
|---|---|---|---|
| Ceramic or porcelain tile | Detergent and water, 3 percent hydrogen peroxide, or properly diluted bleach | Unapproved mixtures or abrasive metal tools | Follow the product label |
| Cement grout | Oxygen bleach paste or hydrogen peroxide after testing | Metal brushes and aggressive abrasion | Follow the product label |
| Marble, travertine, or slate | pH-neutral stone cleaner or tested hydrogen peroxide | Vinegar and harsh bleach use | Follow the product label |
| Silicone or latex caulk | Surface cleaning for light residue, replacement for damaged or deeply stained beads | Scraping that tears intact joints or sealing over damp material | Follow the product label |
| Glass doors | Isopropyl alcohol or dedicated hard-water remover | Abrasive powders and harsh scraping | Follow the product label |
| Fabric curtain | Machine washing with detergent and oxygen bleach, or replacement for deteriorated liners | Keeping fabric damp after washing | Follow the product label |
Glass doors usually need gentle handling because abrasive powders and forceful scraping can leave permanent marks. Fabric curtains can be washed with detergent and oxygen bleach, but deteriorated liners should be replaced rather than kept damp.
Vinegar may help with some bathroom residue, but it is not a universal mold treatment and does not belong on sensitive stone. For the difference between treating visible growth and addressing the moisture source, review the truth about mold removal.
Step-by-Step Removal That Actually Kills the Growth
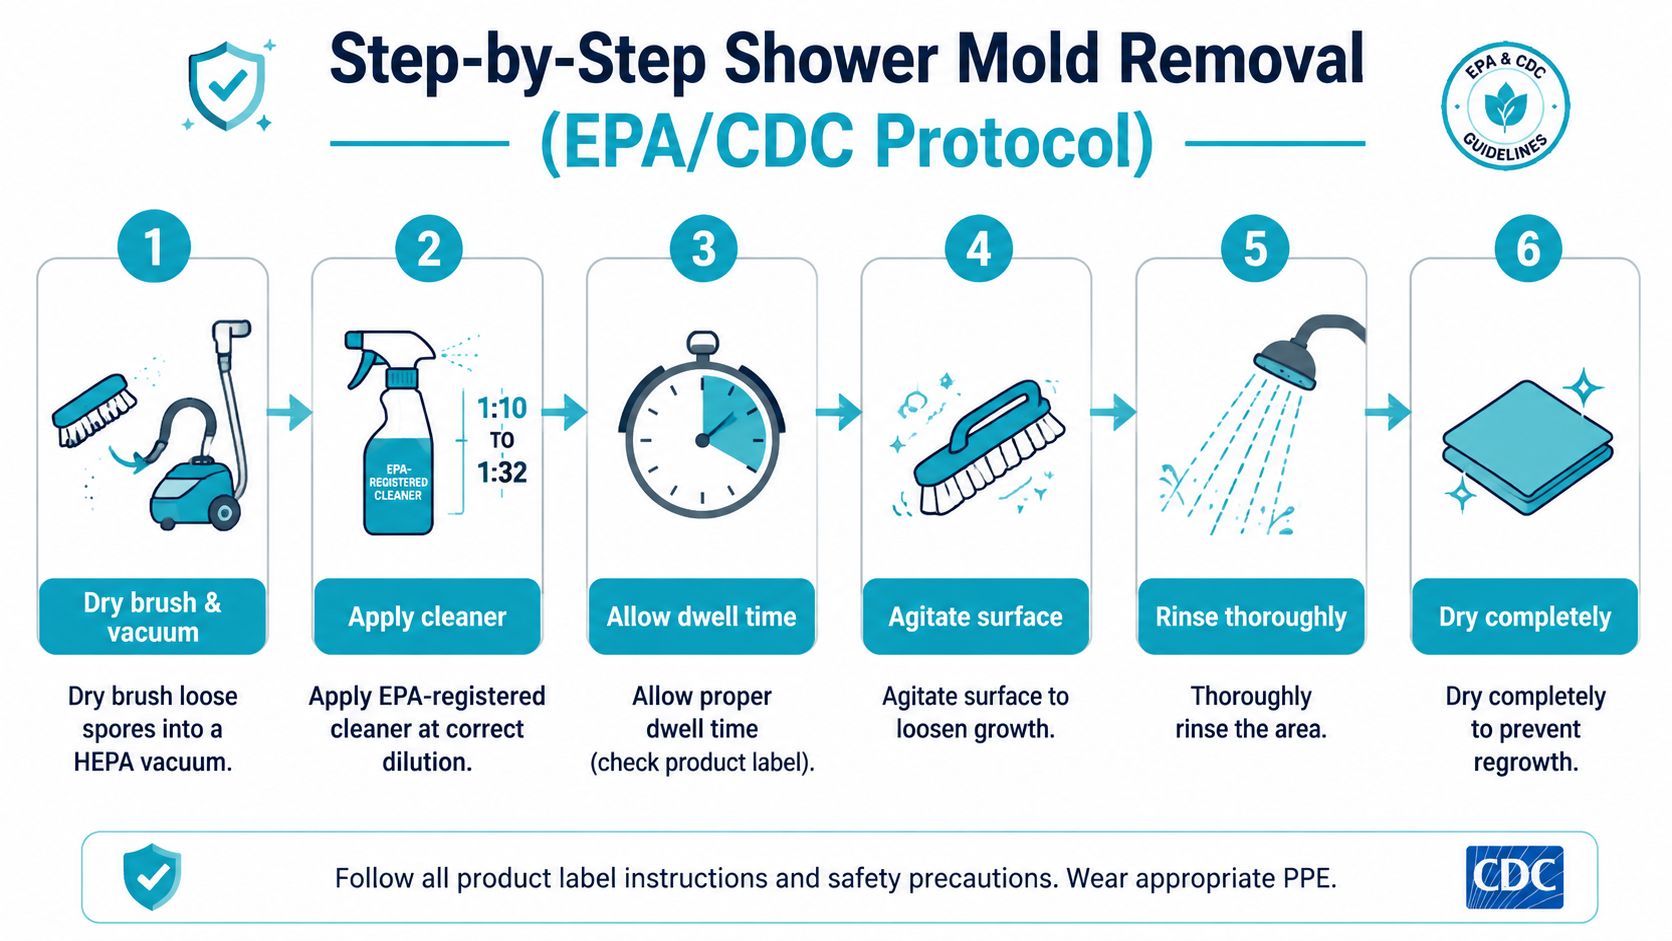
For a small amount of visible growth on sound, hard shower surfaces, work in a controlled sequence. Don't begin by flooding the area. Excess water can drive contamination into joints and make drying harder.
- Dry brush and vacuum loose material. Use a stiff nylon brush to loosen surface debris while directing it into a HEPA vacuum. Avoid aggressive brushing that scatters particles across the room.
- Apply the selected cleaner. Use the correct dilution for the surface and product. For the CDC bleach option, stay at or below 1 cup per 1 gallon of water and never combine it with ammonia or another cleaner.
- Allow dwell time. Hydrogen peroxide may need about 5 minutes, diluted bleach commonly needs 10 to 15 minutes, and vinegar solutions may need about 3 to 4 minutes for this procedure. Product labels control when they specify a different period.
- Agitate the growth. Work grout lines with a grout brush, not a soft toothbrush. Use a non-abrasive pad on smooth tile and avoid tearing an intact caulk bead.
- Rinse with low moisture. Remove residue without saturating surrounding drywall, trim, or open joints.
- Dry completely. Towel dry, squeegee glass and tile, run the exhaust fan for 30 minutes, and leave the bathroom door cracked so replacement air can enter.
Under-dwelling a cleaner can lighten the stain without adequately addressing the growth. That visual improvement can mislead homeowners into believing the material is clean when dark hyphae remain in textured grout or behind a failing seal.
Inspect the result before putting the shower back in service
Use a flashlight at a low, raking angle across grout and caulk. That angle reveals raised residue, missed corners, and dark spots hidden by glare. Look closely at the curb, vertical corners, plumbing penetrations, and the lower edge of the shower door.
For facility managers who need a broader maintenance perspective, the Facility Management Insights bathroom playbook offers useful context on keeping high-use bathrooms cleaner and safer. If the adjacent drywall feels soft or the odor remains after drying, don't keep escalating the chemistry. The next question is whether moisture has moved beyond the shower surface, which is where safe mold removal from drywall becomes a professional concern.
Drying and Ventilation Habits That Prevent Recurrence
In a Gulf Coast bathroom, a clean shower can show new spotting within days if damp air and wet joints remain in place. Cleaning removes visible growth. Moisture control determines whether the same conditions return. Keep indoor humidity at no higher than 50% all day long, following CDC humidity guidance. EPA guidance also uses a 24 to 48 hour drying window for water-damaged areas and materials.
Passive drying often fails during Florida's humid weather. The bathroom needs an exhaust fan that vents outdoors, a clear path for replacement air, and a routine that removes water from surfaces instead of leaving evaporation to chance.
Build a repeatable bathroom routine
Run the exhaust fan during the shower and keep it operating afterward. A dehumidifier can help in a windowless bathroom, but it cannot replace a properly vented exhaust system. Leave the door open when privacy and the layout allow it. After each use, wipe water from glass, tile, and the curb with a microfiber squeegee.
| Habit | Target Area | Typical Effect |
|---|---|---|
| Run an outdoor-vented exhaust fan | Humid bathroom air | Removes moisture before it settles into joints |
| Squeegee after each shower | Glass, tile, and curb | Reduces surface water available for evaporation |
| Dry the curtain hem | Curtain and tub edge | Prevents a wet fold from remaining against the enclosure |
| Check supply and return paths | Air movement | Helps the fan replace damp air with drier air |
| Measure humidity with a hygrometer | Whole bathroom | Shows whether the room is staying above the CDC ceiling |
| Inspect seals and plumbing | Hidden moisture points | Identifies leaks that cleaning can't solve |
A fan that rattles, vents into an attic, or moves little air can create false confidence. The Trademaster Construction bathroom ventilation guidance explains what to check in fan performance, ducting, and airflow.
Inspect caulk, grout, plumbing penetrations, and the shower curb regularly. A damaged seal can keep feeding moisture into porous backing, where wiping the surface will not solve the problem. For recurring growth, follow these moisture-control steps for stopping mold from coming back after every shower, not only after a visible outbreak.
Wipe the enclosure, dry the curtain, keep air moving, and correct leaks or damp materials. If humidity stays high despite these measures, the ventilation system or concealed moisture source needs attention rather than stronger cleaning chemicals.
When to Stop DIY and Call a Professional Remediator
DIY cleaning has a reasonable boundary. It can suit a small amount of visible growth on a hard, intact surface when the homeowner can protect the area and correct the moisture source. It becomes the wrong tool when the contamination is recurring, hidden, widespread, or connected to porous building materials.
Use observable triggers rather than guessing based on color. Black staining isn't automatically a specific mold type, and appearance alone can't show how far moisture has traveled.
Treat these signs as handoff points
- The stain returns within two weeks: Repeated recurrence suggests the joint or surrounding material remains contaminated or damp.
- The musty odor remains after drying: Odor can point to growth outside the visible shower surface.
- Blackening appears behind caulk or under the curb: These locations can conceal moisture and damaged substrate.
- Drywall feels soft near the baseboard: Softness indicates that water may have affected a porous material.
- The visible patch exceeds 10 square feet: Larger areas require more careful containment and are poor candidates for casual household cleanup.
- A resident has respiratory or immune compromise: Keep that person away from the work and seek professional assessment.
Professional remediation may involve containment under IICRC S520 practices, HEPA air scrubbing, negative pressure, antimicrobial treatment, and removal of affected porous materials. The exact response depends on the inspection findings, material condition, and moisture source.
Cleaning removes the visible layer. Remediation addresses the contaminated material and the condition that allowed it to grow.
AMPM Restoration is a 24/7 emergency restoration company at 4301 32nd St W b18, Bradenton, FL 34205, serving Bradenton, Sarasota, Tampa Bay, Saint Petersburg, Lakewood Ranch, and surrounding Gulf Coast communities. Its services include mold inspection and removal, water damage restoration, fire and smoke damage restoration, storm and flood recovery, commercial restoration, and reconstruction. Once a trigger appears, call 941-946-7807 for a free inspection and estimate rather than repeatedly scrubbing the same failure point.
Your Florida Shower Mold Action Plan and Next Steps
A Gulf Coast shower can look clean in the morning and show new spotting by the end of the week. Humidity keeps moisture available, so the lasting fix starts with drying and ventilation, not repeated scrubbing. After cleaning, measure bathroom humidity and work to keep it at 50% or below, consistent with mold cleanup guidance from the CDC and EPA mold guidance and the EPA's mold cleanup guidance. Run an exhaust fan that vents outdoors during bathing and afterward, squeegee tile and glass, and dry the curtain hem instead of leaving it folded against the tub.
Match the repair to the surface. Sound grout can be scrubbed clean and protected with a penetrating sealer once it is fully dry. Silicone caulk that is cracked, peeling, or stained should be cut out, the joint dried, and new caulk installed. Fresh sealant should never cover damp material or hide an unresolved leak.
Keep records if water damage may be involved
Photograph the shower before cleaning, record visible staining, and take moisture readings when water intrusion is suspected. Insurance treatment of mold depends on the cause, and coverage may apply when mold follows a covered water event. Policy language controls, so keep the documentation and contact your carrier promptly.
AMPM Restoration provides emergency restoration services across Bradenton, Sarasota, Tampa Bay, Saint Petersburg, Lakewood Ranch, and nearby Gulf Coast communities. The company supports mold inspection, remediation, water damage recovery, insurance claim coordination, and financing options. For a free inspection and estimate, call 941-946-7807.
Frequently asked questions
How fast can mold return after cleaning?
Mold can return whenever moisture remains available, particularly inside grout, caulk, or other porous materials. Dry the affected area within 24 to 48 hours and keep indoor humidity at or below 50%, as discussed in the EPA moisture guidance. If staining returns after those controls, the material or moisture source needs closer evaluation.
What's the difference between mildew and black mold?
Mildew is a type of mold that often appears as flatter surface growth. Dark color does not identify a particular species. Focus on moisture conditions, material damage, odor, and recurrence rather than color alone.
Is bleach safe on grout?
For hard, nonporous surfaces, the CDC describes a bleach solution of no more than 1 cup of household bleach per 1 gallon of water, with ventilation and no mixing with ammonia or other cleaners (CDC bleach guidance). Detergent and water or soap and water may be appropriate first choices. Dry the grout completely afterward, and remember that bleach will not repair porous backing or replace failed caulk.
When does a musty smell mean I should call a professional?
Call when the odor remains after the shower is cleaned and dried, or when it occurs with recurring staining, soft drywall, damaged caulk, or a suspected leak. A professional can inspect concealed areas and determine whether porous material must be removed instead of scrubbed.
AMPM Restoration serves Florida homeowners, property managers, and commercial clients with mold inspection, mold removal, water damage restoration, leak response, and reconstruction. Call 941-946-7807 for a free inspection and estimate, and ask about insurance claim assistance and financing options for eligible projects.
AMPM Restoration Services can inspect the moisture source, contain affected areas, remove contaminated materials, and restore shower-related water damage across Bradenton, Sarasota, Tampa Bay, Saint Petersburg, Lakewood Ranch, and nearby Gulf Coast communities. Visit AMPM Restoration Services to request help, or call 941-946-7807 for a free inspection and estimate with insurance claim assistance and financing options.