
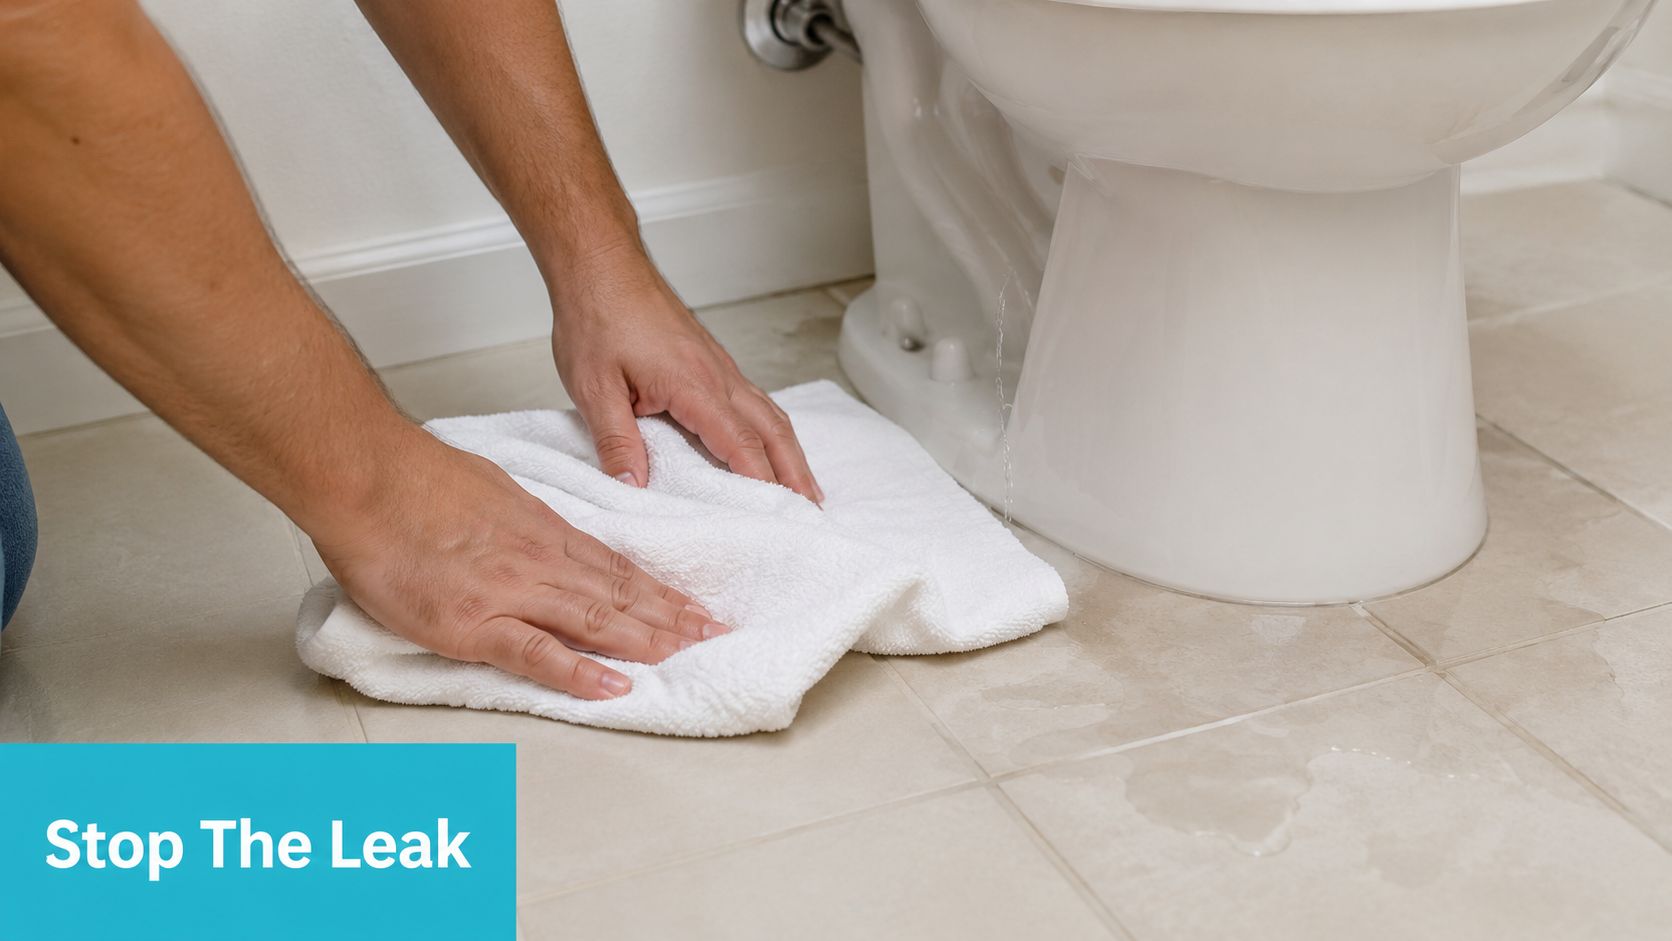
A leak in bathroom often starts the same way. You notice a damp bath mat, hear a drip after everyone is asleep, or see paint lifting along the baseboard and hope it's nothing serious. In Florida, that hope can get expensive fast.
The good news is that the first moves are simple. Stay calm, stop the water, protect the area, and document what you find before anyone starts tearing into walls or flooring. If you're in Bradenton, Sarasota, Tampa Bay, Saint Petersburg, Lakewood Ranch, or nearby Gulf Coast communities, knowing what to do in the first hour can make the difference between a manageable repair and a long restoration job.
That Drip You Hear Could Be a Disaster in the Making
A leak in bathroom doesn't need to look dramatic to cause real damage. A drip under the sink, a loose toilet seal, or water sneaking past failed caulk can soak drywall, vanity bases, trim, and subfloor before you see a puddle.
In Florida homes, speed matters because the environment works against you. Mold can begin growing within 24 to 48 hours after a water event in Florida's humid environment, which is why rapid extraction and dehumidification matter so much for protecting both materials and indoor air quality, according to Florida water damage claim guidance.

That's why the first goal isn't perfection. It's containment. You're trying to stop active water, reduce how much building material stays wet, and keep a small problem from turning into a mold job.
What homeowners usually notice first
Some leaks announce themselves. Others stay quiet and show up as side effects.
- Sound changes: Dripping, trickling, or the faint sound of running water when fixtures are off
- Surface clues: Bubbling paint, swollen baseboards, soft drywall, or darkened grout lines
- Air quality clues: A musty smell that cleaning doesn't fix
- Floor clues: Tile that feels loose, laminate edges that curl, or a spongy area near the tub or toilet
A lot of people hesitate because they're unsure whether they're seeing normal bathroom moisture or a true leak. If you need help separating everyday humidity from real water intrusion, AMPM's guide to signs of water damage in your home is a useful starting point.
Practical rule: If water is showing up where water shouldn't be when no one is using the fixture, treat it like an active leak until proven otherwise.
Your First 30 Minutes Emergency Damage Control
The first half hour after discovering a leak in bathroom is about control, not diagnosis. Don't start with caulk, cleaning spray, or guesswork. Start with safety.
If water is actively running, shut off the nearest fixture valve if you can reach it safely. For a sink, that may be the hot and cold stops under the vanity. For a toilet, it's usually the shutoff at the wall near the base. If you can't tell which fixture is leaking, go straight to the main water shutoff for the house.
Protect people before property
Water and electricity are a bad combination. If the leak is near outlets, light fixtures, a vanity with electrical connections, or a ceiling below the bathroom, turn off power to the affected area at the breaker if you can do it without stepping into standing water.
Then clear the room. Pick up rugs, towels, baskets, paper goods, and anything fabric that's holding moisture against the floor. Open vanity doors and remove stored items so air can move around wet areas.
If the floor feels soft, the ceiling below is stained, or water is coming through a light fixture, stop there and treat it as a professional-level problem.
Do only the cleanup that helps
Blot and lift water with towels. A wet/dry vacuum can help on hard surfaces. Fans can help move air, but don't point high-speed airflow at visibly moldy material because that can spread contamination to other rooms.
A few early actions make a real difference:
- Shut off water first: Stopping the source prevents new damage while you assess the room.
- Cut power when needed: This protects anyone entering the area and lowers the risk around wet fixtures or wiring.
- Remove saturated items: Bath mats, towels, and vanity contents can keep moisture trapped and slow drying.
- Avoid random demolition: Pulling materials too soon can complicate the repair and insurance process.
If you're unsure what to do during those first hours, AMPM's page on emergency water damage repair in the first 24 hours gives a good framework for immediate response.
Playing Detective How to Find the Leak Source
Once the area is stable, finding the source of the leak in bathroom becomes the next job. Most bathroom leaks fall into three buckets. Fixture leaks, seal failures, and hidden plumbing leaks. The mistake I see most often is assuming the nearest wet spot is the source. Water travels.

Check the obvious fixtures first
Start with the toilet, sink, and tub or shower trim.
A toilet leak can come from the tank bolts, the supply line, the shutoff valve, the wax ring, or a crack in the bowl or tank. Dry the area thoroughly, then flush and watch closely. If water appears at the base after flushing, the seal below may be failing. If the tank keeps cycling when no one is using it, remove the lid and inspect the flapper and fill valve.
At the sink, use a flashlight under the vanity. Run hot water, then cold water, then fill and drain the basin. Watch the supply lines, shutoff valves, P-trap, drain assembly, and the underside of the faucet base. Many “mystery” vanity leaks turn out to be a loose connection or a drip that only shows up during draining.
Don't overlook grout and caulk failure
Many Suncoast homeowners get misled. Slow, hidden leaks from deteriorated tile seals cause 40% of bathroom water damage in Florida's humid climate, and 68% of residential leak claims in Suncoast communities stem from grout failure rather than a plumbing rupture, according to American Leak Detection's discussion of upstairs bathroom leak sources.
That means the shower may be “leaking” even when the pipes are fine.
Look for cracked grout lines, missing caulk at corners, loose tile, or darkened joints that stay wet long after use. One practical test is to keep shower spray directed away from suspect wall joints for a few days and watch whether nearby moisture changes. Good shower enclosure maintenance also helps reduce water escape at doors, sweeps, hinges, and thresholds that homeowners often ignore.
A bathroom can leak through the finish layer, not just through the plumbing system.
Hidden pipe leaks need different tools
When the source isn't visible, the clues change. You may hear water with all fixtures off, find a hot spot on the floor, notice damp carpet outside the bathroom, or see stains on the ceiling below. In those cases, professionals often move beyond visual checks and use targeted methods such as acoustic listening, pressure testing, moisture measurement, and camera inspection.
Acoustic leak detection is especially useful for concealed lines because technicians can listen for the sound signature of escaping pressurized water and narrow the location without opening large areas unnecessarily, as described in this overview of plumbing leak detection equipment and methods.
If the leak source stays unclear after the basic checks, a focused service like free water leak detection is the smarter move than opening walls at random.
The Hidden Dangers of a Bathroom Leak
Water damage from a leak in bathroom rarely stays in the bathroom. It moves into trim, subfloor, drywall, insulation, closets, bedroom walls, and sometimes the HVAC system. What looks cosmetic on day one can turn into a much larger cleanup by day four.
How the damage spreads
Bathrooms have repeated moisture cycles already. Add a steady leak and building materials lose their margin for drying. Wood swells. Drywall softens. Fasteners corrode. Adhesives weaken. Floor assemblies start feeling loose or hollow because the materials below the tile or flooring have stayed wet too long.
The bigger problem is what happens beyond the visible wet spot. The “secondary damage cascade” is a real threat; 76% of bathroom leaks in the Tampa Bay area lead to mold growth in non-bathroom areas within just four days, and homeowners who wait often see remediation costs increase by 3.5x as mold spreads to the HVAC system, according to AHS guidance on silent bathroom leaks.
Why small leaks get dismissed
People tend to trust what they can see. If the bathroom floor dries by morning, it feels manageable. If the stain is in a closet and not the bathroom itself, it feels unrelated. That's how hidden moisture gets missed.
Common warning signs that point to secondary damage include:
- Musty odor outside the bathroom: Closets, hallways, and adjacent bedrooms can hold the smell first
- Changes below the room: Ceiling stains, peeling paint, or sagging drywall under an upstairs bath
- Air system clues: Odor that seems stronger when the AC runs
- Material changes: Warped baseboards, swollen door casings, or flooring that won't sit flat
Moisture doesn't respect room boundaries. If a bathroom leak lasts long enough, nearby rooms become part of the job.
Health concerns matter too. If you're dealing with lingering dampness, odor, or suspected contamination, AMPM's overview of health effects of mold exposure explains why quick containment matters.
Document Everything for Your Insurance Claim
Before heavy cleanup, cut-outs, or demolition begin, document the leak in bathroom like you're building a file for someone who has never seen your home. That's what you're doing.
Take wide photos first. Capture the full bathroom, the hallway outside, any room below, and any nearby closet or wall that shows signs of damage. Then move in close. Photograph the suspected source, wet flooring, stained ceilings, warped trim, damaged cabinets, and affected belongings.
What to capture right away
A good claim file usually includes a timeline and visuals that show both cause and effect.
- Photo coverage: Take images from multiple angles before moving items
- Video walkthrough: Narrate what you found, when you found it, and what was wet
- Damaged contents: Record rugs, cabinets, stored items, and any personal property affected
- Leak indicators: Include shutoff valves, supply lines, grout failure, stains, and any visible moisture path
Write down the date and time you noticed the issue, when water was shut off, what temporary steps you took, and whether the leak appeared sudden or ongoing. Keep receipts for towels, tarps, wet/dry vacuum rental, or emergency plumbing work if you had to make immediate protective moves.
Why this matters before repairs
Insurance carriers often want to see the original condition before materials are removed. Clear documentation helps show that you acted promptly, that damage spread from a specific event or condition, and that emergency work was mitigation, not elective remodeling.
If professionals come in, ask for moisture readings, photos, and a written scope of affected areas. Those records often make the claim process cleaner and reduce disputes over what was wet versus what was pre-existing.
When to Call a Restoration Professional in Bradenton
Some bathroom problems are still DIY territory. Tightening a loose supply connection under a sink, replacing a worn flapper, or re-caulking a dry, sound joint can be reasonable. A leak in bathroom stops being a DIY issue when the source is hidden, materials are staying wet, or damage has spread beyond the fixture.
Call for help when you notice a musty odor that cleaning won't fix, flooring that feels soft or warped, staining on the ceiling below, recurring moisture around a shower with intact plumbing, or a water bill that suddenly jumps without a clear explanation. Those are the situations where the visible symptom is often smaller than the actual wet area.
Why professional assessment can save money
In Florida, what looks minor can point to a deeper plumbing issue. The average cost to repair a slab leak ranges from $2,000 to $6,000, not including potential foundation damage repair of $5,000 to $15,000, based on Florida slab leak repair guidance. That's why unexplained moisture, hot floor spots, wall cracks, or water sounds with fixtures off deserve a professional assessment instead of a guess.
For homeowners in Bradenton and nearby Suncoast communities, one local option is water damage restoration in Bradenton with 24/7 emergency response. AMPM Restoration is based at 4301 32nd St W b18, Bradenton, FL 34205, and handles water damage restoration, mold inspection and mold removal, fire and smoke damage restoration, storm and flood damage restoration, commercial restoration services, and reconstruction.
If you can't confidently say where the water started, how far it spread, and whether the structure is dry, it's time to bring in a pro.
Frequently Asked Questions About Bathroom Leaks
A few questions come up in almost every bathroom leak call, especially when homeowners are trying to balance cleanup, cost, and insurance decisions.
Bathroom Leak FAQs
| Question | Answer |
|---|---|
| Can I clean up bathroom leak damage myself? | You can usually handle basic water pickup and removal of loose wet items. Once water has reached drywall, subfloor, cabinetry, or hidden cavities, DIY cleanup often misses trapped moisture. |
| Can I remove bathroom mold myself? | Surface cleaning may help with minor visible residue on non-porous materials, but hidden mold behind walls, under flooring, or inside HVAC-related areas needs a controlled remediation approach. |
| How long does water damage restoration take in Southwest Florida? | Minor losses typically take 1 to 2 weeks, while major losses involving multiple rooms or mold remediation can require 4 to 12 weeks for full recovery, according to Southwest Florida water damage restoration timeline guidance. |
| Will homeowners insurance cover a bathroom leak? | Coverage depends on the cause and your policy terms. Sudden and accidental damage is often treated differently than long-term seepage or deferred maintenance. Good photo documentation helps. |
| What's the biggest mistake after finding a leak in bathroom? | Waiting to see if it dries on its own. Delay gives moisture time to move into adjacent materials and can complicate both repairs and the claim. |
| How do I reduce the chance of another bathroom leak? | Check caulk and grout regularly, inspect supply lines under sinks and behind toilets, watch for recurring dampness around shower enclosures, and respond quickly to any musty odor or unexplained staining. |
A bathroom leak is stressful, but it becomes more manageable when you treat the first hour as damage control, the next step as investigation, and the rest as documentation and drying. Fast action protects both the structure and your claim.
If you've found a leak in bathroom and need help now, contact AMPM Restoration Services. AMPM Restoration is a 24/7 emergency restoration company serving Bradenton, Sarasota, Tampa Bay, Saint Petersburg, Lakewood Ranch, and surrounding Gulf Coast communities. Call 941-946-7807 for a free inspection and estimate. The team can assist with insurance claims and offers financing options to help you move quickly before moisture turns into a larger mold and restoration problem.