


How to Repair Damaged Wood Floor After Water or Fire
A pipe bursts during a Gulf Coast storm, or firefighters finish knocking down a kitchen fire and leave the living room covered in water. The hardwood looks awful, but appearances don’t tell you whether you can repair damaged wood floor boards or need to remove them. The deciding factor is how quickly the floor dries, what the moisture meter shows, and whether the subfloor still holds the installation securely.
The practical sequence is simple, but the order matters: assess the damage, stop and dry the moisture source, measure the boards and subfloor, then choose between board repair, refinishing, or replacement. Sanding or filling too early can turn recoverable cupping into permanent crowning. A floor that has stayed wet for days may cross from cosmetic repair into structural restoration.
If you’re noticing stains or movement long after a leak, review these signs of hidden water damage before disturbing the flooring.
Why Your Wood Floor Repair Starts Before the Damage Is Visible
In Florida, a small plumbing failure can spread under cabinets, rugs, and flooring transitions before anyone notices. The surface may feel dry after towels and fans run for a while, while moisture remains below the boards or inside the subfloor. That hidden moisture is what causes delayed cupping, loose fasteners, odor, and failed finish work.
A homeowner often sees raised edges and assumes the floor needs immediate sanding. That’s the wrong first move. Wood is hygroscopic, so it absorbs and releases moisture as surrounding conditions change. If the underside is wetter than the top, the board edges can rise. If you sand while that imbalance remains, the floor can change shape again as it finishes drying.
The appearance can mislead you
A fire creates a different but related problem. Charring, smoke staining, and finish failure may appear alongside water damage from hoses and suppression work. A dark board isn’t automatically a lost board, but charred fibers, softened wood, and a compromised subfloor require a more careful decision than a surface stain.
The first question isn’t, “Can I make this look better?” It’s, “Is the floor stable and dry enough to repair?” That question determines whether a local board can be saved, whether the entire room needs refinishing, or whether flooring and subfloor materials must come out.
Practical rule: Don’t let a clean-looking surface convince you that the assembly underneath is dry.
What controls the repair path
Fast response gives the floor a better chance of recovery. Remove standing water, increase airflow, use dehumidification, and measure conditions at more than one location. The longer moisture remains, the more likely boards will loosen, finishes will fail, and the subfloor will need attention.
A professional repair damaged wood floor project isn’t cosmetic work with a moisture check added at the end. Moisture measurement comes first because the floor’s current shape may change during drying. That is especially important along Florida’s humid Gulf Coast, where warm outdoor air can add moisture instead of removing it.
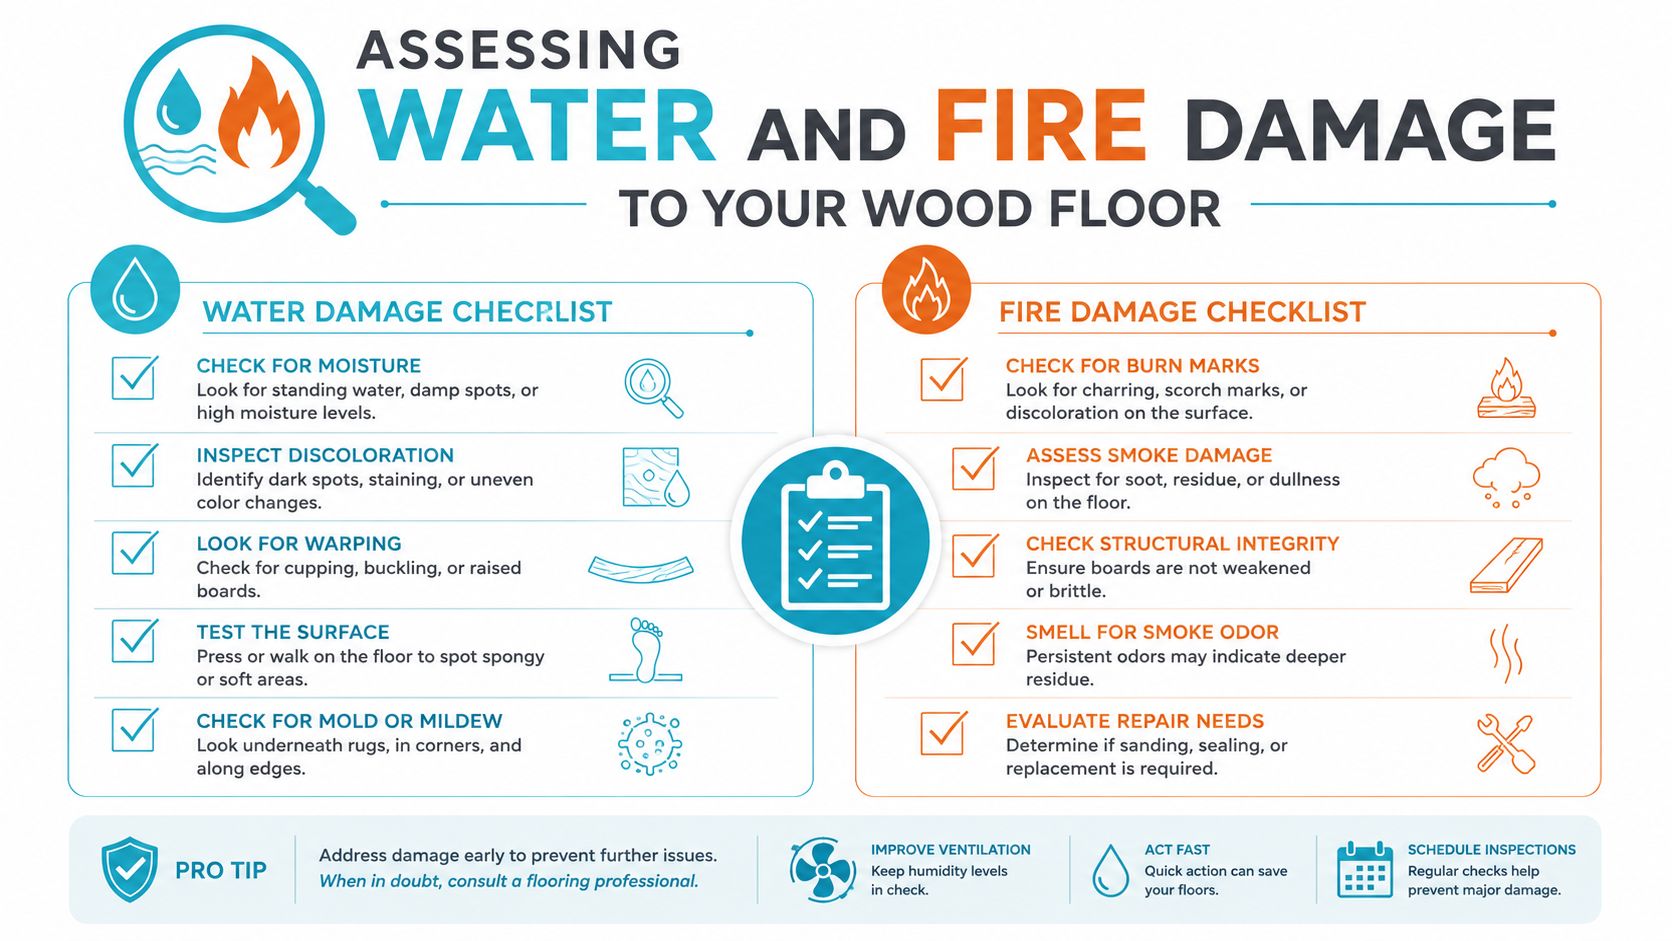
Assessing Water and Fire Damage to Your Wood Floor
Start with measurement, not a sander. Use a pin or pinless moisture meter on boards in the affected area, at the perimeter, near transitions, and in locations that look normal. Then test the subfloor where access is available. One reading can miss a wet pocket beneath a board, so professionals compare multiple points and look for patterns.
For installed hardwood, independent restoration guidance cites an NWFA target range of 6% to 9% moisture content before refinishing, as explained in this hardwood floor water-damage guide. The NWFA installation guidelines also say the target should be within 2% of the expected in-use moisture content, and that the subfloor should be within a few percent of the new flooring before replacement.
Read the shape before choosing the repair
- Cupping: The edges sit higher than the center. This usually indicates a moisture imbalance, often with more moisture below the board.
- Crowning: The center rises above the edges. It can develop after uneven drying or after someone sands a cupped floor before it stabilizes.
- Buckling: Boards lift away from the subfloor. This is more serious and can indicate expansion pressure, trapped water, or fastening failure.
- Finish failure: Cloudy, peeling, blistered, or darkened finish can reflect water intrusion, but the finish alone doesn’t prove the boards are structurally damaged.
- Softness and movement: Spongy boards, new squeaks, or floor movement point toward subfloor or fastening concerns.
After a flood, remove wet furnishings and document affected areas, then use this practical flood cleanup checklist to avoid overlooking secondary hazards.
Fire damage needs a two-source inspection
Look for blackened or brittle fibers, smoke staining, blistered finish, and odor. Also inspect areas reached by firefighting water, including edges near walls and low points where water may have collected. If the subfloor is charred or no longer sound, refinishing won’t restore the assembly.
Mold odor or visible growth changes the job again. Moisture below hardwood can support concealed growth, so review the warning signs in this guide to mold beneath hardwood flooring before opening boards or baseboards.
Dry First and Repair Second
The instinct to fill, sand, and coat the floor is understandable. It’s also how homeowners lock a moisture problem beneath a new finish. A cupped board may flatten as moisture equalizes, so the floor can look dramatically better after controlled drying without any sanding at all.
One recent industry source reports that professional mat drying within a short window can reverse cupping in 85% to 90% of cases. That figure appears in this discussion of cupping, crowning, and buckling after water exposure, but it shouldn’t be treated as a guarantee for every floor. Board construction, water exposure, subfloor condition, and drying conditions still control the outcome.
Remove water without creating a second problem
Begin with extraction. Remove standing water and wet materials from the room, then create controlled airflow across the floor. Dehumidification matters because fans only move moisture into the surrounding air. In Florida, opening windows can make drying less effective when outside air is already humid.
Keep indoor conditions stable around 60 to 80°F and 35% to 55% relative humidity, a working range identified in independent hardwood repair guidance. Continue measuring both the floor and subfloor rather than relying on a fan schedule or a surface that feels dry.
The structural drying methods used for water damage are designed around removing moisture from the building assembly, not merely drying the top finish. That distinction matters beneath hardwood, where trapped moisture can remain after the room appears comfortable.
Know when drying has changed the decision
Drying doesn’t mean waiting passively. It means extracting, directing airflow, controlling humidity, inspecting for odor and movement, and retesting until readings stabilize near the appropriate target. If the floor is still above its normal range, refinishing is premature.
A floor soaked for days may have loosened throughout the installation or damaged the subfloor. At that point, drying is still necessary, but it may prepare the area for removal and replacement rather than cosmetic restoration. Patience protects the repair. It doesn’t promise that every board can be saved.
DIY Board Replacement and Refinishing Steps That Last
Once localized damage has dried and the surrounding floor is stable, a skilled homeowner can sometimes replace one board. The job fails when the cut wanders into neighboring boards, the subfloor remains damp, or the replacement plank doesn’t match the existing tongue-and-groove profile.
Replace only the damaged plank
Set a circular saw to the exact thickness of the damaged plank, not deeper. Make two relief cuts down the board, then use a chisel to remove the center section. Work toward the ends carefully and preserve the tongues and grooves of adjacent boards, because those joints help the replacement sit flush.
Modify the replacement plank so it can drop into the opening without forcing neighboring boards apart. Dry-fit it first, apply the appropriate adhesive or fastening method, and weight it for about 24 hours for a flush bond, as described in this localized hardwood repair method. A replacement that sits proud will telegraph through the finish, and a forced fit can create new pressure at the seams.
Secure loose and squeaky boards
Squeaks usually mean movement between the board and its support. Drill pilot holes, then drive finishing nails or screws at a slight angle to improve holding power and reduce splitting. Stay at least 1/2 inch from the board edge, countersink the fastener head, and fill the opening afterward, following the fastening guidance from hardwood flooring repair specialists.
Don’t fasten blindly over a wet or weakened subfloor. A screw can stop the noise temporarily while failing to provide durable support.
Treat gaps according to their width
Seasonal movement can open and close small gaps as humidity changes. Liquid filler isn’t a structural repair, and it tends to dry out and crumble under foot traffic when a gap is too wide. Gaps wider than 1/8 inch should be shimmed with matching hardwood strips rather than packed with filler, according to technical repair guidance.
For refinishing, remove damaged finish with a coarse pass, then progress through 36 to 40 grit, 60 grit, and approximately 100 grit for the main sanding sequence. Some restoration work uses 120 to 180 grit for final smoothing, depending on the floor and finish system, as outlined in this hardwood floor repair guide. Never use aggressive sanding to flatten a floor that hasn’t stabilized.
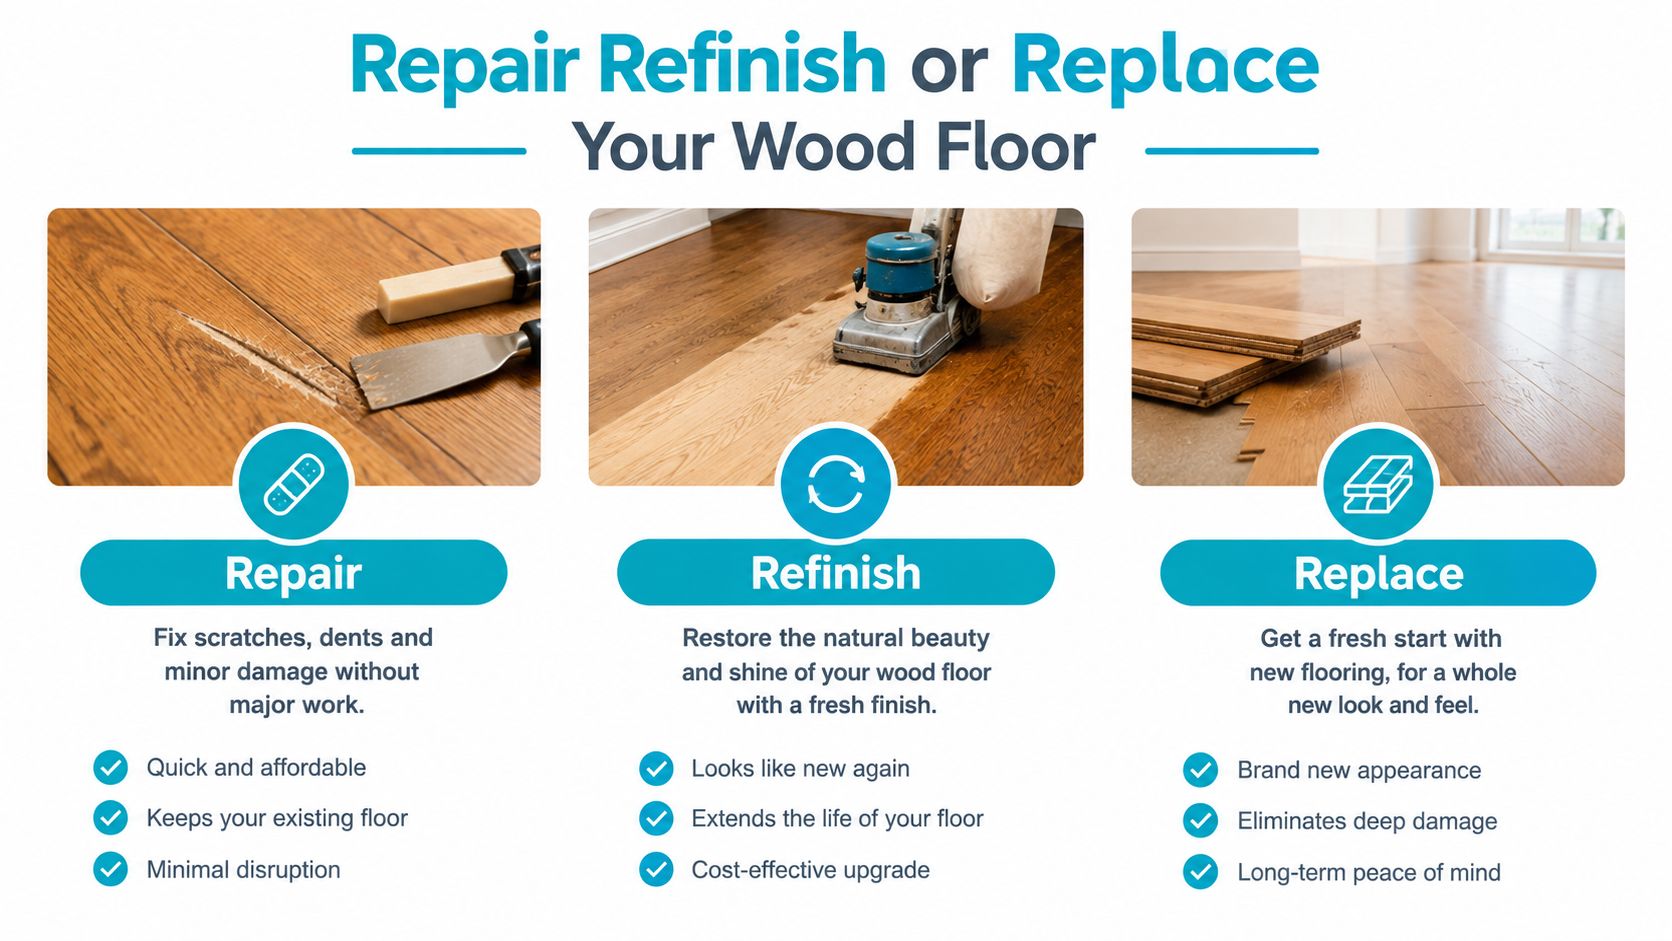
Repair Refinish or Replace Your Wood Floor
The right choice depends on four conditions: the size of the affected area, the shape of the boards, the moisture readings, and the subfloor. A localized stain on dry, sound wood is a different job from widespread buckling over a saturated subfloor.
Use the following decision guide as a starting point, not as a substitute for testing. The floor must be dry enough for the selected work, and the subfloor must be capable of supporting repaired or replacement flooring.
| Damage Scenario | Recommended Path | Relative Cost |
|---|---|---|
| Dry, isolated surface stain or finish failure | Spot repair or refinishing | Lower |
| A few stable boards with localized damage | Board replacement and finish blending | Moderate |
| Cupping that improves during controlled drying | Reassess, then refinish if readings stabilize | Moderate |
| Loose flooring across the installation | Reinstallation or full replacement | High |
| Wet, swollen, soft, or damaged subfloor | Remove affected flooring, repair subfloor, then reinstall or replace | High |
| Fire charring combined with structural weakness | Professional removal and reconstruction | Highest |
Cost follows exposure time and assembly damage
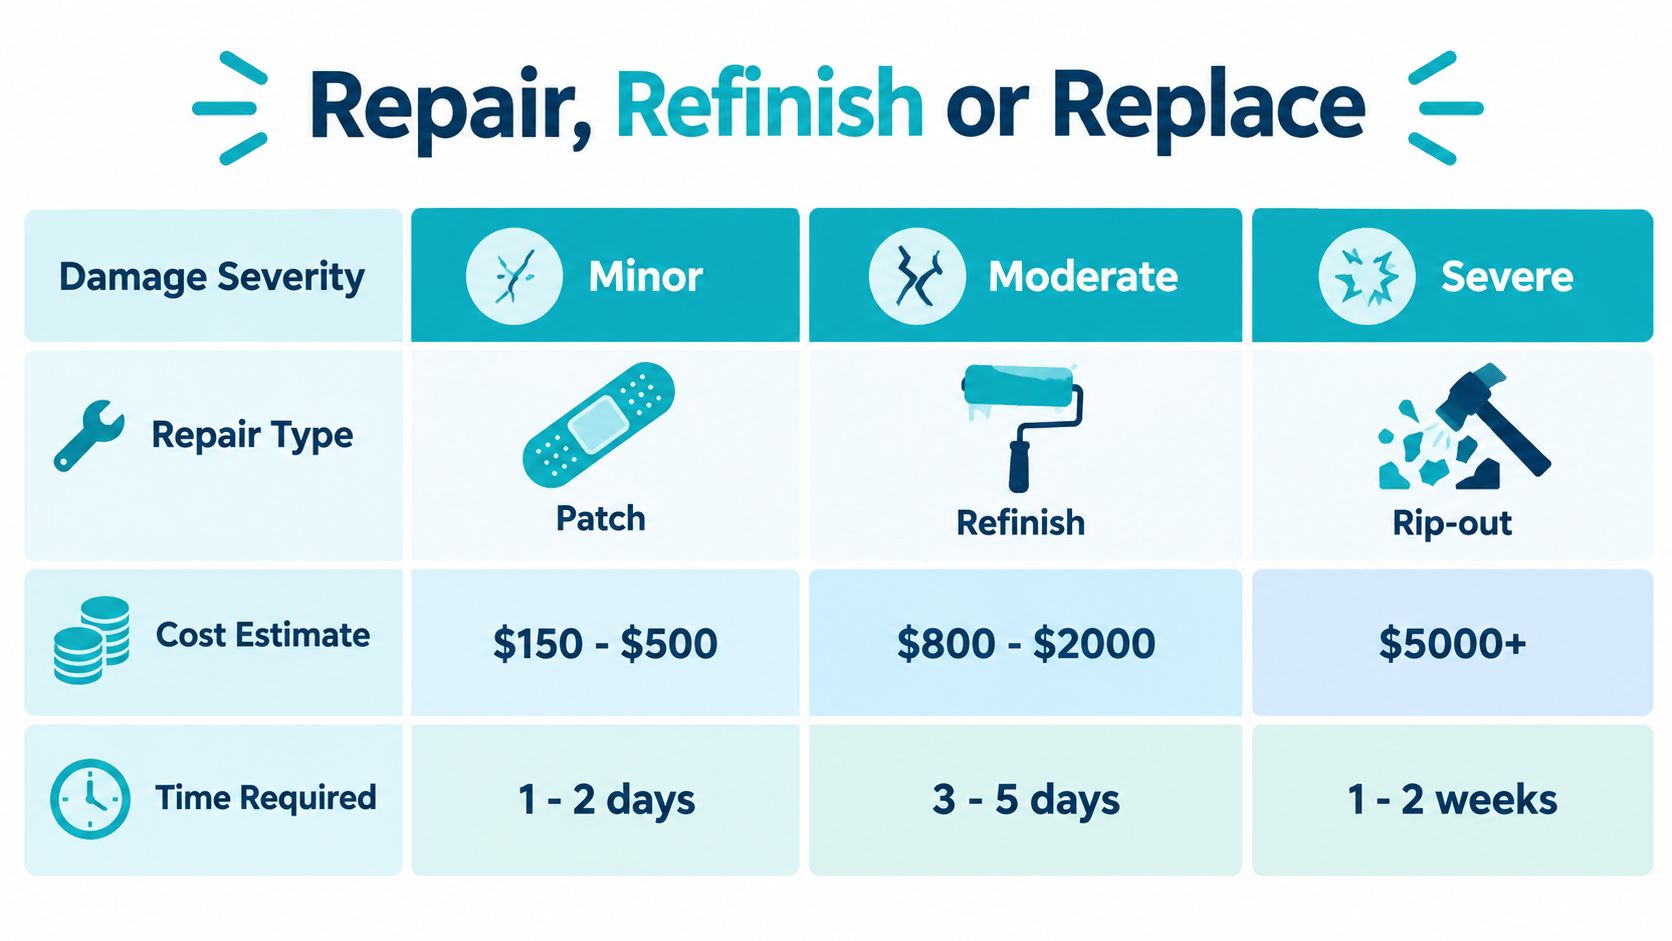
A quickly dried spot that only needs refinishing may cost a few hundred dollars, while a floor and subfloor soaked for days can reach five figures, according to industry cost guidance. Broader flooring estimates place floor repair or replacement at $3 to $20 per square foot, subfloor replacement at $3 to $10 per square foot, and total water-damage restoration at $1,400 to $6,300, as reported in this wood-floor water-damage cost guide.
Those ranges aren’t a quote. They show why a fast response can preserve a smaller repair scope, while delayed moisture exposure can add demolition, drying, subfloor work, replacement material, and refinishing.
The escalation trigger is structural
If flooring has loosened from the subfloor throughout the installation, patching individual boards usually isn’t enough. Reinstallation or full replacement is often necessary because the fastening system and supporting materials no longer provide reliable stability.
A homeowner can save money by repairing sound localized damage, but forcing a cosmetic solution onto a structural problem creates repeat work. Measure first, inspect below the boards where possible, and choose the least invasive option that will remain stable.
When to Call a Professional Restoration Team
DIY work is reasonable for a dry, isolated board or a small finish defect. It becomes risky when water has reached the subfloor, boards have lifted, odor suggests microbial growth, or fire has weakened the structure. Those conditions involve more than carpentry. They require documentation, controlled drying, material removal, and a clear decision about what can remain.
Stop and call for help if you find:
- Widespread buckling: Raised boards can conceal trapped water and damaged fasteners.
- Subfloor saturation: Softness, sagging, or loose flooring means the support layer needs inspection.
- Mold odor or visible growth: Don’t sand or seal over suspected contamination.
- Fire-related charring: Charred wood may lack the strength needed for refinishing or fastening.
- An insurance claim: Photos and moisture documentation should be collected before conditions change.
An experienced restoration company measures affected and unaffected areas, documents the source and extent of damage, and separates drying from reconstruction. That process helps prevent a contractor from replacing material that could have been saved, while also identifying hidden damage that a visual inspection misses.
AMPM Restoration Services is a locally owned, licensed, bonded, and insured option with 24/7 emergency response, approximately a one-hour response time, IICRC-certified crews, insurance claim coordination, financing options, and service across Bradenton, Sarasota, Palmetto, St. Petersburg, and the greater Tampa Bay area. Its restoration work includes water damage, mold removal, fire and smoke damage, storm and flood cleanup, flooring repairs, reconstruction, and related mitigation.
For a plain-language explanation of the broader process, see what a restoration company does after property damage. A free inspection is worthwhile before you commit to sanding, board removal, or replacement.
Frequently Asked Questions About Repairing Damaged Wood Floors
How long does a water-damaged wood floor take to dry before repair?
There isn’t one reliable schedule. Drying depends on how far water traveled, the flooring and subfloor materials, airflow, humidity, and whether moisture is trapped below the boards. Begin repair work only after repeated readings show the floor and subfloor have stabilized within suitable levels.
Will cupped hardwood floors flatten on their own?
They may improve when drying allows moisture to equalize, especially after a quick response. Don’t sand while the boards are still wet, because uneven drying can leave the floor crowned later.
Can fire-damaged wood floors be saved?
Some floors with smoke staining or finish damage may be repairable after cleaning and drying. Charred, brittle, structurally weakened, or water-soaked sections may require board and subfloor replacement.
How can Florida homeowners prevent future floor damage?
Keep indoor humidity controlled with a dehumidifier during humid periods and a humidifier during dry winter conditions. The goal is to limit excessive wood movement, while leaks, appliance connections, and storm entry points should be checked promptly.
Does insurance cover wood floor repair after water or fire damage?
Coverage depends on the cause of loss and the policy. Sudden accidental damage may be treated differently from a long-term leak or flood, so document the source, affected materials, and professional findings before removing flooring.
How soon should I schedule an inspection?
Schedule one as soon as you notice cupping, buckling, odor, dark staining, loose boards, or fire-related damage. Call 941-946-7807 for a free inspection and estimate, along with insurance claim assistance and financing options.
AMPM Restoration Services can inspect, dry, clean, repair, and reconstruct water- or fire-damaged flooring for homes and commercial properties across Florida’s Suncoast. Visit AMPM Restoration Services or call 941-946-7807 for a free inspection and estimate, with insurance claim assistance and financing options available.