


You're standing in the kitchen before sunrise, feeling cold water under your feet and trying to decide whether the puddle came from the sink, the dishwasher, or a failed supply line. In Bradenton, that moment deserves immediate action. A cabinet can look merely damp while water is already moving into the toe-kick, subfloor, drywall, and nearby baseboards.
Water damage under the sink is both a plumbing problem and a moisture emergency. The first hour affects drying, mold risk, structural damage, and the evidence you'll need if you contact your insurer. The safest response is to stop the source, make the area electrically safe, document what happened, and check for moisture beyond what you can see.
What an Under-Sink Leak Really Means for Your Florida Home
At 2 a.m., a Bradenton homeowner may notice the problem by stepping into a cold puddle. The sink cabinet base feels swollen, cleaning products are floating in shallow water, and the first instinct is to reach inside for the shutoff valves. That instinct needs one adjustment. If water is near an outlet or electrical connection, safety comes before plumbing.
Water damage and freezing account for nearly 24% of U.S. homeowners insurance claims, and the Insurance Information Institute has estimated that about 1 in 67 insured homes has a water-damage or freezing claim in a given year, according to ConsumerAffairs' water-damage insurance claims summary. The average household claim from water damage or freezing was about $12,514 for the 2017–2021 period, and other major-market summaries place the average around $13,954 from 2018–2022, depending on the reporting period and methodology.

Those figures cover broad residential losses, not only kitchen cabinets. They still show why a small leak shouldn't be dismissed. Water damage in walls can remain hidden after the cabinet floor appears dry, particularly when water follows plumbing penetrations or cabinet seams.
Florida humidity changes the decision
The mold clock starts when porous materials become wet. Mold can begin growing on damp surfaces within 24 to 48 hours, as described in federal emergency guidance on mold and mildew. Humid Gulf Coast conditions don't create a separate rule, but they can make evaporation and drying more difficult.
Particleboard, MDF, drywall, and unfinished framing absorb water differently from tile or stainless steel. A drip behind the toe-kick may wet the adjacent room's baseboard, lift flooring edges, or reach an outlet below the counter. The visible puddle is often the beginning of the inspection, not the end.
Practical rule: Treat an under-sink leak as urgent until moisture readings show that the cabinet, wall, and nearby flooring are dry.
First Steps to Stop the Leak and Protect the Cabinet
Start with safety, not cleanup. If standing water is near a GFCI outlet, power cord, disposal connection, or other electrical component, turn off the circuit at the breaker before reaching into the cabinet. Never stand in water while handling an energized outlet, and don't touch the breaker if you'd have to move through unsafe water to reach it.
Once power is safe, follow the water path backward:
- Close the local valves. Turn the two chrome angle-stop valves behind the P-trap clockwise until snug. Open the faucet briefly to release pressure from the supply lines.
- Shut off the main if necessary. If a valve spins, drips, or won't seat, use the home's main shutoff at the exterior meter box or where the service line enters the house.
- Remove pooled water. A wet/dry vacuum is more effective than towels for cabinet seams and the floor beneath the sink. Keep the cabinet doors open so air can reach the wet surfaces.
- Protect the surrounding floor. Place towels or painter's plastic around the cabinet edge, and use a plastic tote to contain wet contents while you sort them.
- Document before dismantling. Photograph the source, the cabinet interior, the floor spread, damaged contents, shutoff valves, and any staining behind the cabinet.
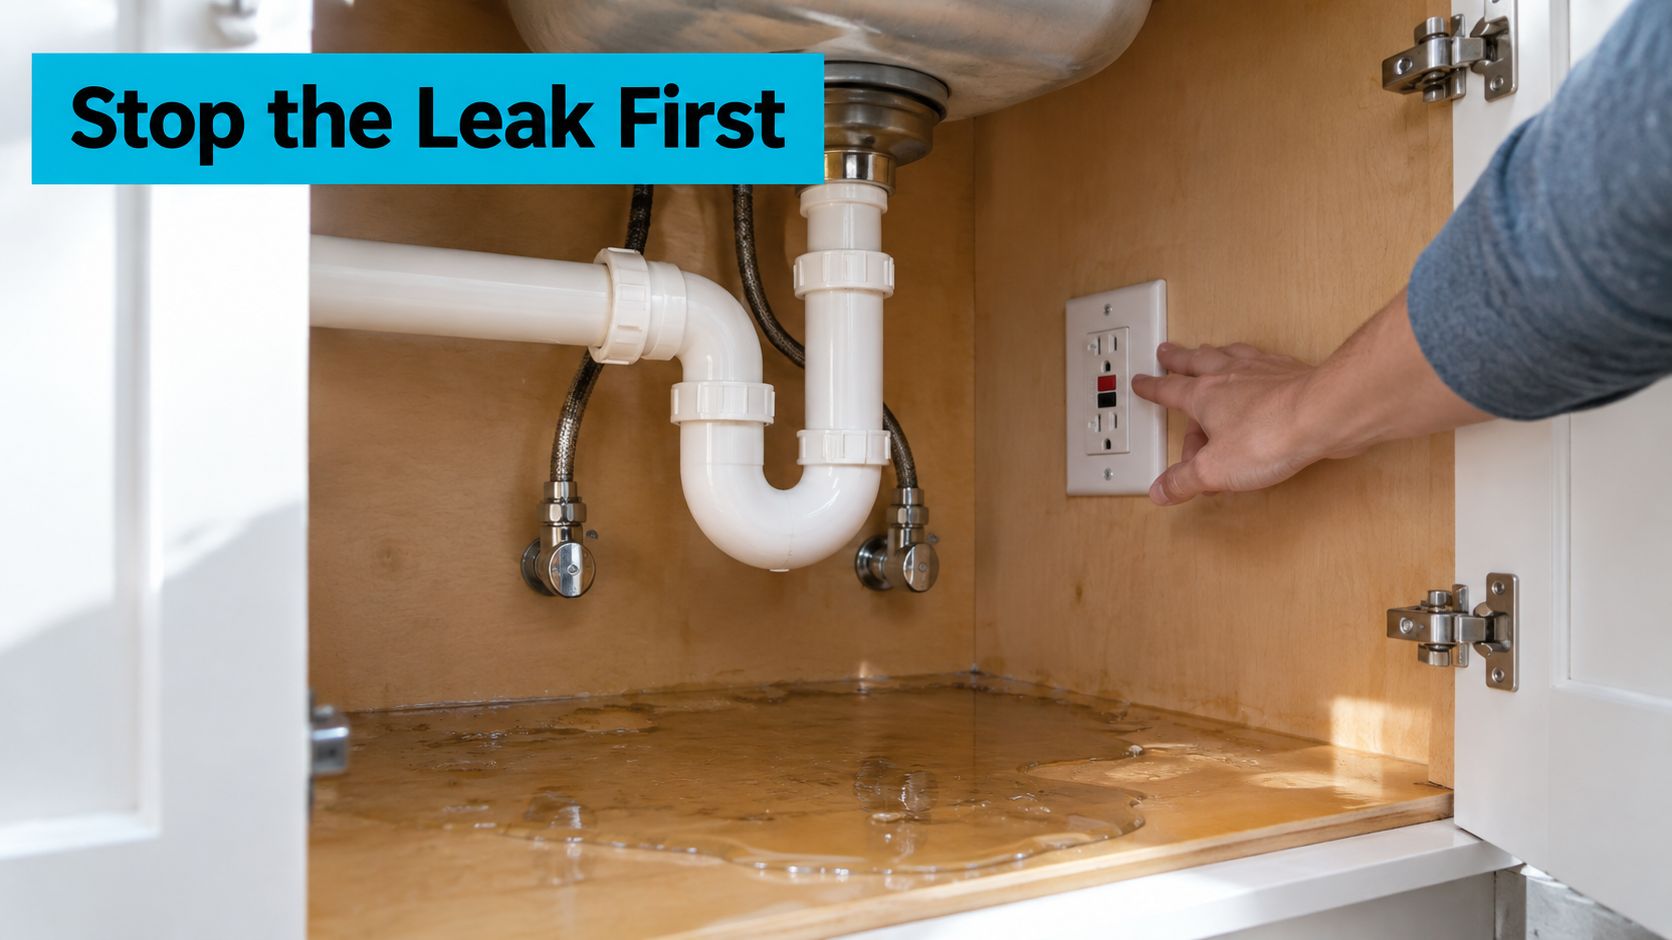
Tools that help in the first hour
Keep an adjustable wrench, channel-lock pliers, headlamp, nitrile gloves, painter's plastic, towels, and a wet/dry vacuum nearby. A moisture meter is useful if you know how to compare affected materials with a dry reference area. It won't replace a full inspection, but it can show whether the cabinet floor is drying or still holding moisture internally.
If the shutoff fails or the supply line has ruptured, arrange emergency plumbing help from SouthRay from SouthRay Kitchen & Bath. Once the plumbing source is controlled, check whether water is leaking into the house through the cabinet, wall, or floor assembly rather than assuming the valve solved the entire problem.
Don't use a household vacuum for standing water, and don't seal a damp cabinet with plastic. Plastic can trap moisture against particleboard and make drying slower.
Inspecting for Hidden Moisture Beyond the Cabinet Box
Water rarely respects the cabinet's four walls. It can travel under the toe-kick, along subfloor seams, behind the sink base, beneath a dishwasher, or into the baseboard of an adjacent room. A musty smell, bubbling paint, warped trim, a cool patch, or a persistent odor suggests the moisture has moved beyond the visible cabinet.
A pin-type moisture meter measures electrical resistance between its probes and reports a wood-moisture percentage. Use the reading comparatively. Test an unaffected section of similar material, then compare it with the cabinet floor, toe-kick, subfloor edge, and nearby wall. Cabinet water-damage guidance commonly treats 6% to 12% as a normal dry range for wood materials, while readings above about 15% indicate increased mold and structural risk.
Sweep the surrounding area methodically
Start inside the cabinet, then inspect the toe-kick removal zone and the wall behind the sink. Continue across floor transition strips, the dishwasher's adjacent edge, and baseboards in the next room. If the leak ran long enough or water has appeared below, inspect the ceiling beneath the kitchen as well.
Thermal imaging adds information that touch cannot provide. A cooler signature along the cabinet floor, behind the wall, or beneath the dishwasher may indicate evaporative cooling from wet materials. Thermal imaging doesn't measure moisture by itself, so confirm suspicious areas with a moisture meter or targeted inspection.
| Material | Safe Reading (%) | Action Threshold (%) | Required Response |
|---|---|---|---|
| Cabinet wood or subfloor | 6% to 12% | Above about 15% | Continue drying and verify against an unaffected reference |
| Drywall near plumbing penetrations | Compare with an unaffected area | Elevated or persistent reading | Open or remove affected material when it cannot be dried |
| Particleboard or MDF cabinet components | 6% to 12% | Above about 15% or visibly swollen | Assess for removal because swelling may be permanent |
A surface can feel dry while the interior remains wet. That's why repeated readings matter more than one dry touch test.
Drying, Disinfecting, and Salvaging Affected Materials
Begin by extracting standing water with a wet/dry vacuum. Remove trash bags, cleaners, shelf liner, and stored items so air can reach the cabinet floor and side panels. Open the doors, clear the toe-kick area, and avoid stacking wet contents inside the cabinet while you work.
For a professional drying setup, an LGR dehumidifier can lower humidity while a low-velocity air mover directs airflow into the toe-kick and out through the open cabinet doors. The equipment needs to work as a system. A fan alone may move damp air around the room without removing enough moisture, especially in a closed Gulf Coast home.
Clean hard surfaces and separate porous materials
PVC supply lines, the sink basin, metal hinges, and other nonporous surfaces can be cleaned with an appropriate EPA-registered disinfectant. A 1:10 bleach-to-water solution is another option for compatible hard surfaces, but never mix bleach with ammonia, acids, or other cleaners. Wipe the surface, follow the product label, and dry it completely.
Porous materials require a different judgment. Swollen cabinet bottoms, MDF shelves with readings above about 15%, and drywall that has wicked water may need removal rather than prolonged drying. Professional structural drying methods rely on measured conditions, airflow, dehumidification, and documentation rather than the appearance of the surface.
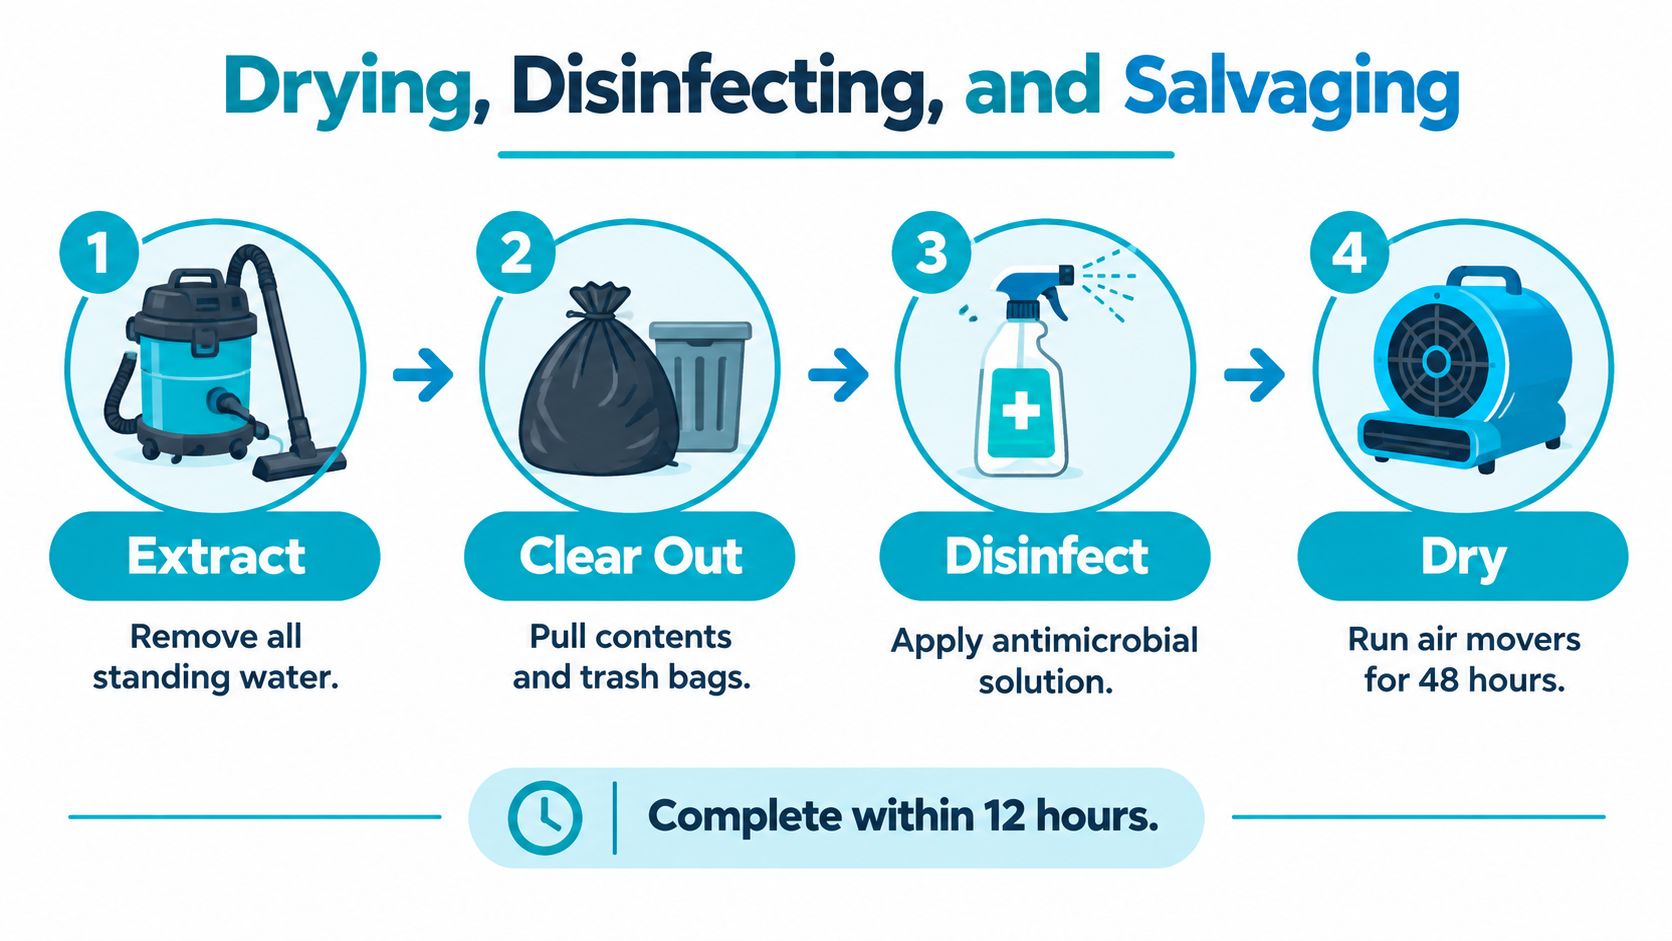
Know when drying is no longer the right treatment
Federal occupational guidance recommends reducing excess moisture and drying or removing affected materials in less than 48 hours to limit mold potential, while also cautioning that mold can develop sooner or later depending on conditions, as explained in federal moisture and mold remediation guidance. Use that period as a prevention target, not a guarantee.
If the leak involved contaminated water or microbial growth, drying may not be appropriate for porous materials. IICRC-related guidance distinguishes clean Category 1 water from more contaminated categories and explains that contaminated porous materials such as drywall and cabinets may require replacement rather than drying, as outlined in water-damage inspection and category guidance.
When to DIY and When to Call a Restoration Professional
A small, recent clean-water spill on a nonporous floor can sometimes be handled by a careful homeowner. The decision changes when water enters materials you can't see, when the source is questionable, or when the cabinet has begun to swell.
Use four questions before relying on box fans:
- What category is the water? A clean supply-line leak is different from water from a dishwasher drain, garbage disposal, or contaminated plumbing assembly.
- How far did it travel? Water beneath the toe-kick, across baseboards, under flooring, or into a wall cavity usually needs professional extraction and verification.
- Did the structure change? Swollen particleboard, delaminated laminate, and warped cabinet bottoms may not return to their original shape.
- Will you file a claim? Moisture logs, drying documentation, and a category-of-water determination can help an adjuster evaluate the loss.
| Factor | DIY Is Safe | Call a Pro |
|---|---|---|
| Water source | Recent clean supply-line leak | Dishwasher drain, disposal, sewage, or uncertain source |
| Spread | Limited to a visible, nonporous surface | Toe-kick, wall, baseboard, subfloor, or adjacent room involved |
| Materials | Tile, metal, PVC, and removable dry contents | Swollen cabinet components, drywall, laminate seams, or subfloor |
| Documentation | No claim and no concealed damage suspected | Insurance claim, persistent moisture, or need for formal drying records |
For Tampa Bay homeowners, a wet area larger than 10 square feet, water that has remained wet for more than 24 hours, or any dishwasher-related loss deserves a restoration assessment first. Those thresholds are practical screening rules, not substitutes for a moisture inspection. More detail on the risks appears in why you shouldn't DIY water damage restoration.
Insurance, Documentation, and Coverage Pitfalls
The slow-leak coverage gap surprises many Florida homeowners. A sudden and accidental supply-line failure may be treated differently from a P-trap that has dripped unnoticed for weeks, and gradual or preventable water damage is often excluded. Insurance coverage guidance for under-sink leaks and mold explains that an undetected kitchen sink leak developing over weeks or months is unlikely to receive the same treatment as a sudden event.
Document the loss before cleanup changes the scene. Take timestamped photos and a short video of the active drip, wet cabinet floor, shutoff valve position, damaged contents, and water spread. Save receipts for emergency plumbing, extraction supplies, equipment rental, and temporary repairs.
Preserve the failure evidence
Keep the failed supply line, fitting, valve, and any cut-out cabinet section if they can be stored safely. Don't throw away damaged materials before you've documented them and asked the adjuster whether inspection is required. Your plumber and restoration contractor should provide written notes describing the source, affected materials, moisture readings, and water category.
Maintain a running record of calls, emails, texts, claim numbers, inspections, and work performed. Coverage depends on the policy and endorsements, so don't assume a general online explanation controls your loss. Homeowners comparing broader insurance information, including resources such as affordable home insurance California from Mai & Associates, should still rely on their own policy documents and Florida insurance professionals for coverage decisions.
The key distinction is simple. Mitigation should begin immediately, but permanent removal and reconstruction should be documented and coordinated so the claim record accurately shows what failed and what the water damaged.
Your First 48 Hours and When to Call AMPM Restoration
The first hour is for stopping the source and making the area safe. During hours 1 to 6, document the loss, remove standing water, and expose the cabinet floor and toe-kick area. During hours 6 to 24, active drying should use dehumidification and air movement, with indoor relative humidity managed in a controlled range rather than guessed from comfort.
By hours 24 to 48, repeated moisture readings should show whether affected materials are returning toward normal conditions. Guidance connected to the University of Colorado identifies drying conditions of less than 30% relative humidity at 70°F as a benchmark in its remediation framework, while normal material conditions and continued drying are also required, as described in University of Colorado water-damage remediation guidance.
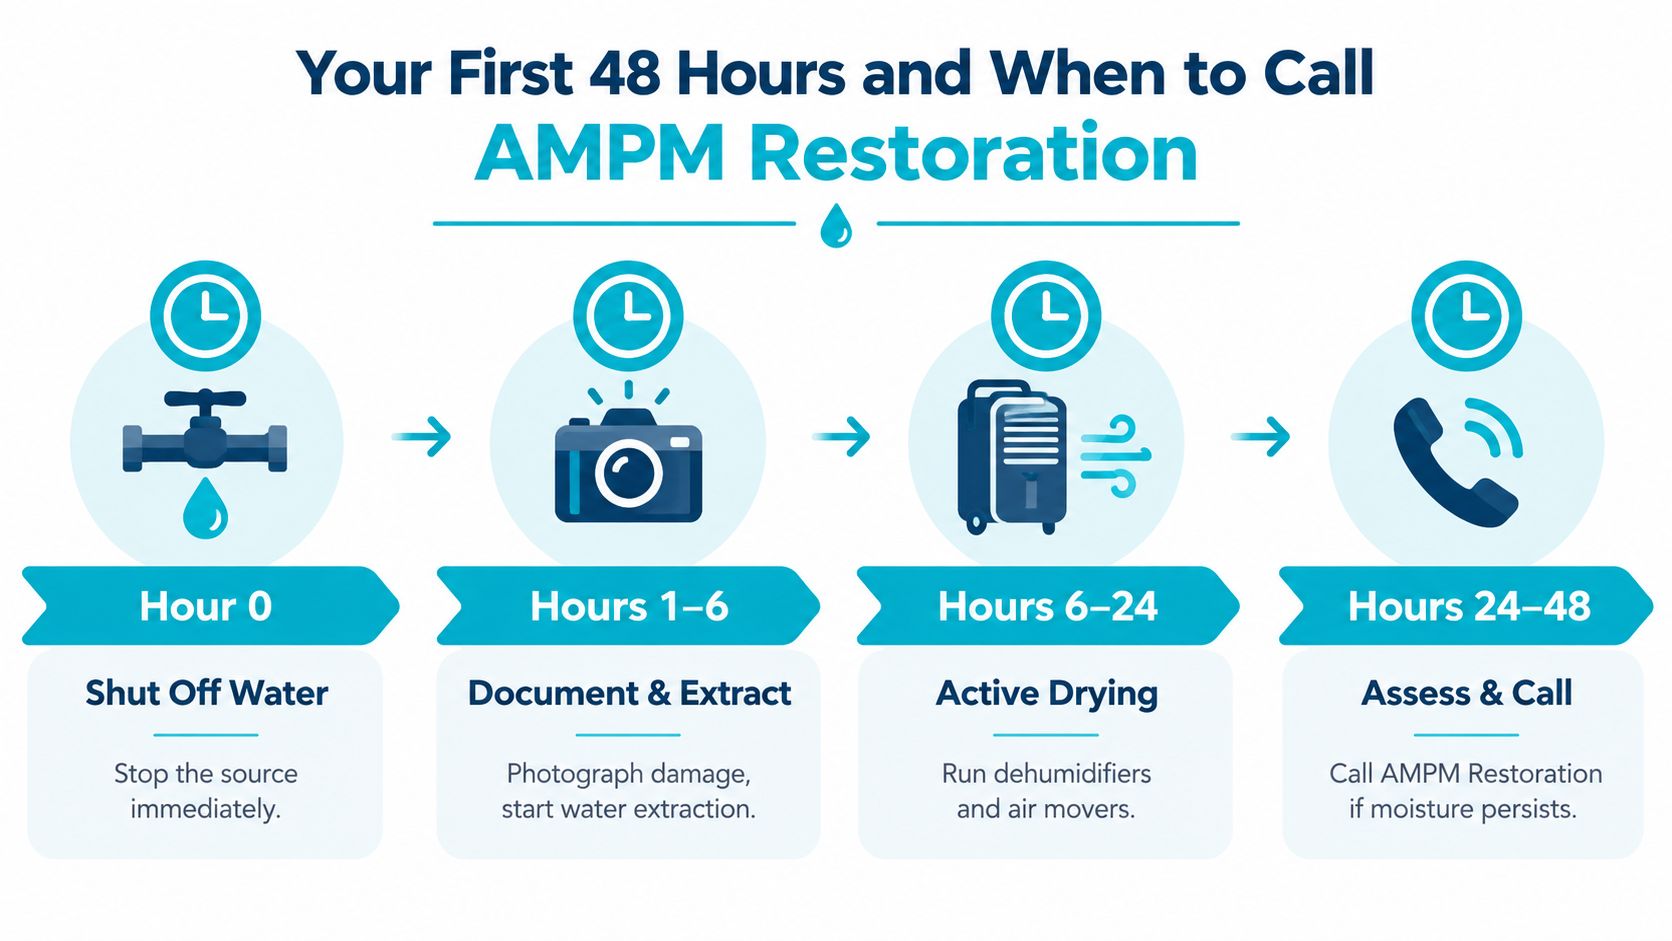
Call a qualified restoration crew sooner if the cabinet floor is swelling, a musty odor persists, water reached an adjacent room, or the source involved Category 2 or Category 3 water. Those conditions raise the chance that wiping the cabinet and running a household fan won't address concealed moisture or contamination.
Six practical questions homeowners ask
Can I dry a wet cabinet with towels and a household fan?
You can remove surface water that way, but towels and a fan may not dry the subfloor, wall cavity, or cabinet core. Use moisture readings to confirm progress rather than relying on touch.
How fast can mold start under a sink?
Mold can begin growing on damp surfaces within 24 to 48 hours, according to federal mold and mildew emergency guidance. Damp porous materials should be dried promptly.
Should I remove a swollen cabinet bottom?
A swollen cabinet bottom may not regain its original shape. Document it first, then have the material evaluated for drying or replacement.
Is water from a dishwasher treated like a supply-line leak?
Not necessarily. Drain water can carry more contamination than clean supply water, so the source and elapsed time should determine the restoration approach.
Can a sink leak damage the room next door?
Yes. Water can migrate through flooring seams, toe-kicks, baseboards, and wall cavities. Inspect adjacent areas when the cabinet damage seems disproportionate to the visible leak.
What should I do if the leak was gradual?
Photograph the damage, preserve the failed parts, notify your insurer promptly, and ask for a written moisture and water-category assessment. Gradual damage may create a coverage dispute, so accurate documentation matters.
AMPM Restoration Services provides emergency water extraction, structural drying, mold inspection and removal, repair coordination, and reconstruction for homes and businesses across Bradenton, Sarasota, Tampa Bay, Saint Petersburg, Lakewood Ranch, and surrounding Gulf Coast communities. Call 941-946-7807 for a free inspection and estimate, with insurance claim assistance and financing options available, or visit AMPM Restoration Services to request help with water damage under the sink before hidden moisture becomes a larger loss.